
DIY Succulent Centerpiece
Last updated on June 11th, 2024 at 12:35 pm
We made this simple succulent centerpiece for our dining room table. It’s an absolutely beautiful way to add some color and texture to your dining table without a lot of effort! If you want to incorporate some succulents into your table decor, this is a great way to do it!
I am a plant killer.
I know. It’s awful. I’m ashamed. But, the truth is I can’t keep a plant alive to save my life. It’s quite pathetic, actually.
But over the years, I have learned that some plants are more resistant to my murderous ways and can stand up to my lack of watering and providing proper care. At the top of that list are succulents. Not only are they hardy and easy-to-maintain, they are absolutely gorgeous.
That’s why I decided to use them for my new dining room table centerpiece!
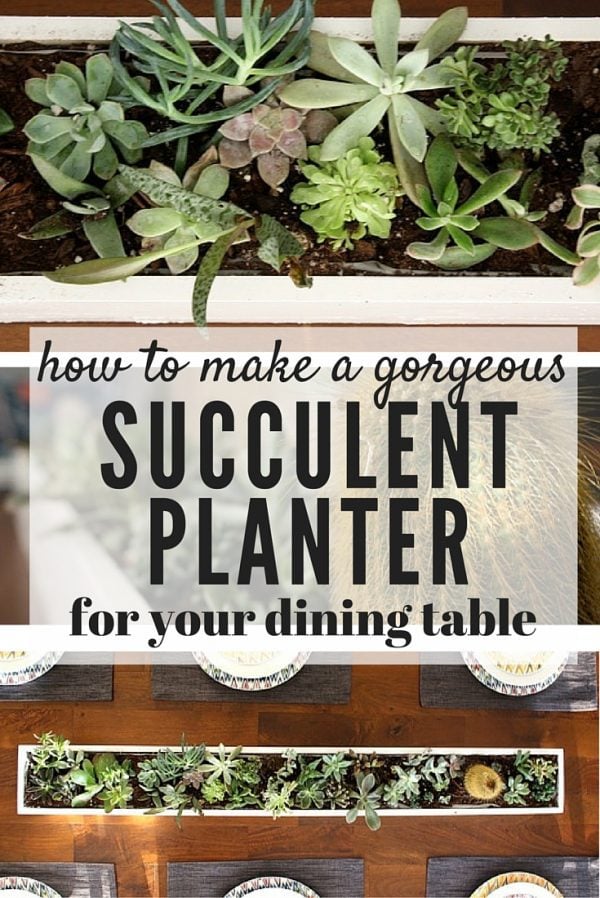
Mmm…beautiful.
We’ve been wanting to add some plants to our home for a while now. We’ve also been wanting to add something to our table to spruce it up a bit. So, we decided to combine the two ideas and started brainstorming ways in which we could tackle it. We went through a bunch of different ideas. We considered everything from several small planters across the table, to several small planters on a large silver platter, to one giant planter that would cover the length of the table.
Finally, we landed on the one-giant-planter idea. Mostly because it was almost impossible to find a platter that was both narrow enough and long enough to fit what we wanted.
How to Make a DIY Succulent Centerpiece
We chose MDF to build our succulent centerpiece. It’s cheap and relatively easy to work with. We chose the size for the planter based on a broad guess about what we thought would work best on our table. My tip here is to go ahead and set your table as if you were having dinner. Then, use a tape measure to see what size will fill up the blank space nicely without overwhelming your placemats. We cut a sample piece in the size and height we were thinking about to make sure we liked the scale on the table before we actually built the planter.

We were working with MDF, which is even less water friendly than most wood. So, we knew we would have to do something to seal the planter from the dirt and water that we’d be filling it with.

We built a simple box with the MDF that fit the dimensions we wanted to use. Once we had it built, we used something called Pruning Seal to act as a waterproof barrier for the box.
A test run showed us that the pruning seal alone probably wouldn’t be completely waterproof. We didn’t want to take any chances, so we also lined the inside of the planter with a plastic drop cloth to prevent any water from damaging the wood.
If I were doing this again, I’d recommend using a more water-resistant wood. Something like cedar would work great!
Be sure to drill some holes in the bottom of your planter to allow for drainage. For watering, I would recommend just taking the whole thing into the kitchen and set on the sink to water. Then, let the excess water drain out. Return it to the table once it’s done so that the table doesn’t get damaged!

We also primed (Zinsser is my favorite primer brand!) and painted the outside of the planter in white paint. We played around with the idea of using a bright color, but we wanted the focus to be on the succulents and not anything else. So, we stuck to a neutral color.
All that was left to do was plant! We ordered a set of succulents from Amazon (did you know you could do that??!). We also grabbed a cactus from Lowes to bring in something with a little more height.
To make sure we planted them in a configuration we liked, we started by setting them all into the planter. We arranged them so that there weren’t too many large ones grouped together, and that there was a nice variation of types throughout the planter.

Once we were happy with the arrangement, we planted and put it into place!


LOVE. Love, love, love.
I’m so incredibly happy with how it turned out, and now we’re just crossing our fingers that we’re able to keep these little guys alive! Our table is much more textural and colorful now, and we absolutely love the life it brought to our dining room.
How are you with plants? Do you struggle as much as I do?
Do you have an update on this? Do you still have it? If not, why? How long?
I absolutely love this and want to make my own!!
I would love something like this in my dining room! And no, I had no idea you could order succulents from Amazon! #MM
Yup! It’s pretty amazing what you can find on there, isn’t it?!
This is the cutest DIY centerpiece ever! I’ll have to save this for when I need a change on my table! Thank you for sharing.
Thanks so much, Candace!
What a beautiful project! I’ve been replanting my succulents as they get little babies for the last year. I have lots of pots outside, but I love it for the dining room. Might just steal this idea…
I think it looks awesome and I kind of want to do this now 🙂
Sorry about the dying plants. we’re having the same problem. Actually, we also had a similar idea for a a tabletop planter but with cement and grass.
What a great way to add some greenery to your house! In case you haven’t seen it, your dishes in this month’s Matchbook magazine.
Love your little succulent garden! That is so awesome! I think the white looks great too. And good to know you can order them from amazon. I had no idea!
Awesome job you guys! Nice work all around! It looks fantastic on your table! If I didn’t think my kitty would get in that and try to eat everything all up (oh yes – cactus included) I would try to make one of my own!
Amanda, it looks SO good! Totally worth it!
I love the idea of a Chevron pattern! And if the imperfections start to bug you, you can always cover it in fabric or paper with mod podge. I saw a great tutorial on Joyfolie about using glue and butcher paper as a floor treatment, but I think it would work great on your planter too!
I also had a disappointing project, and strangely enough it also involves MDF. Last year, I built Ana White’s apothecary media console. The building part was fine, but the MDF was a freebie lot a friend gave me, and it was absolute crap. Once the console was done, it almost immediately started falling apart. I hated it. The shelves stuck, hinges kept coming loose, blech. I hated it. Finally I gave in and sold it on Craigslist for 40 bucks. It still makes me cringe to look at pictures of it!
Looks great!
I love it! I think it was totally worth all your hard work 😀
It looks great! I think going with white was a smart choice. The succulents and table settings POP. 🙂
I love it, and I love that it’s custom-made to fit your dining room table! Great job!
I love how it turned out and I really like the white!
Love it! I can’t keep plants in my house because I tend to kill anything that doesn’t whine to get fed, but I like them in other peoples’ homes! Also, if you wanted to add back a bit of color you could always do a design on the planter, like chevron or some kind of stencil. 🙂
great idea! great job.
I love the white. Perfect.
hahaha I’ve been wondering about this project since you told me you bought so many succulents SO long ago! I see now why it didn’t go up sooner 😉 I think the end result looks fantastic though! I really love the white, and it looks wonderful on the table!
We built the three huge planter boxes in our backyard, which ended up being 8’x2′. It was SUCH a pain and we also thought that it’d be a weekend project. Fat chance. It took us nearly a month to do, and we were lucky enough to have Dad’s help with some of it!