
How to Make a Billy Bookcase Look Built In
Last updated on July 17th, 2024 at 10:34 am
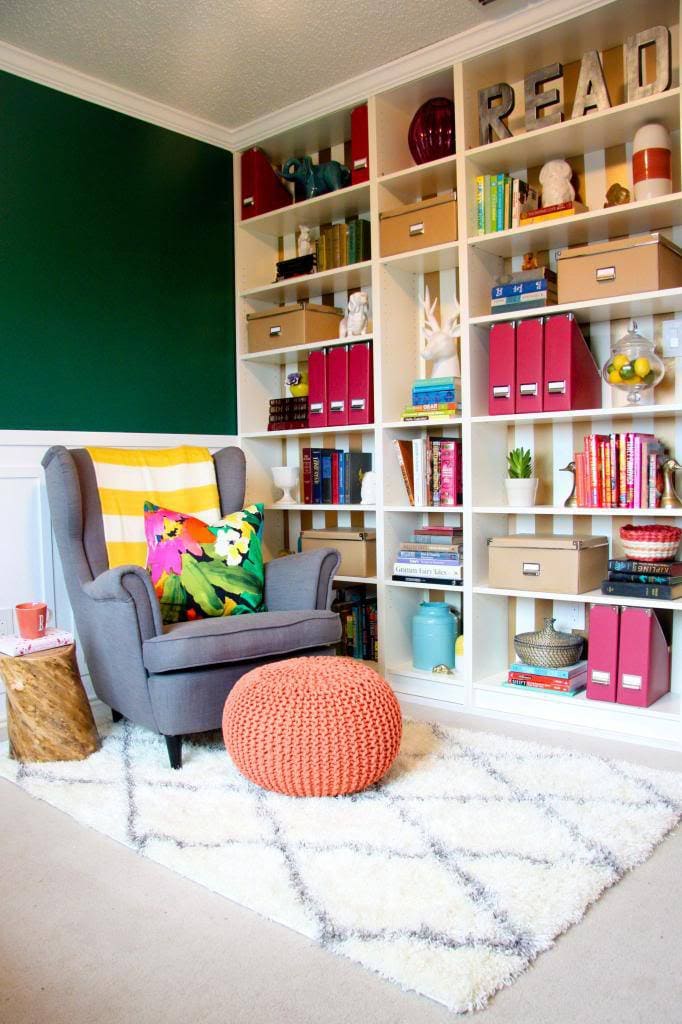
We recently created a gorgeous reading room in our guest room and added some Billy bookcase built ins. Today, I’m going to show you how to make an IKEA Billy bookcase appear to be a custom built-in in your home!
Is it just me, or does everyone have that one room in your house that’s just…embarrassing?
You know – the room where you always keep the door closed and you shove everything that doesn’t have a home into. The room that feels completely hopeless and that you think will never be a place you actually want to spend any time.
Ugh. That room.
Well, I decided to do something about ours.

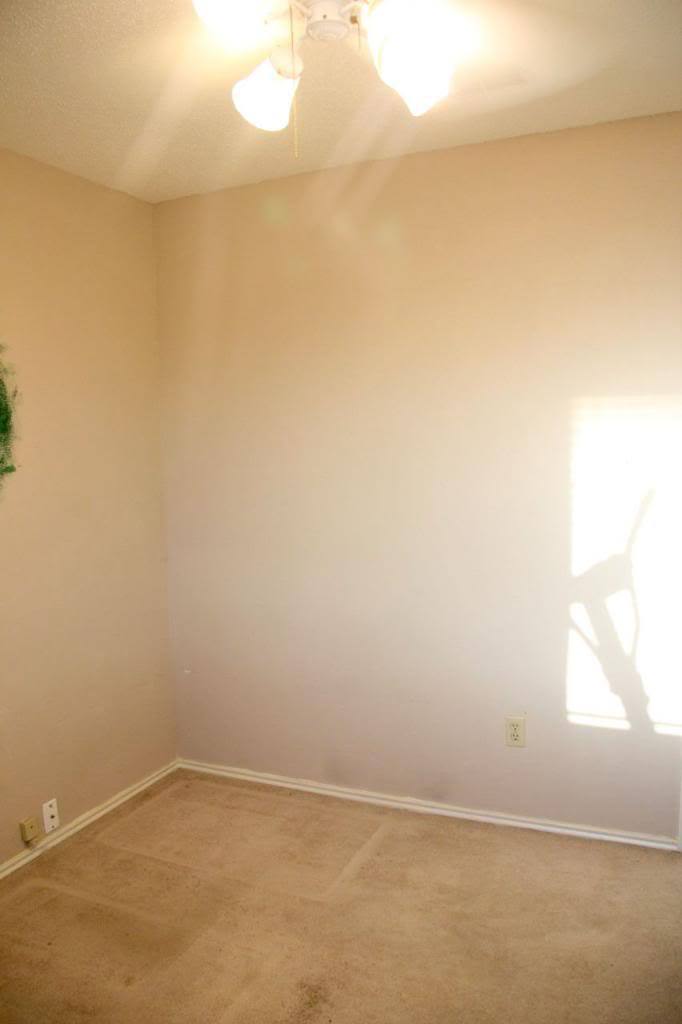
Prior to now, this room has been basically untouched since the day we moved in – we use it to hold our two (giant) dog kennels, and I work out in it, but other than that it’s pretty unused. And pretty ugly.
We decided it was high time to do something about it…we started off by emptying out the room…
Quite frankly, it was already a vast improvement.
We had decided to turn it into a reading room – I’m a big reader and would love to have a place to relax and hang out, and since we don’t have any kids yet this room could be used for just about anything. We wanted the room to have the feel of what you think of when you picture a traditional reading room, but an updated, more modern version of that.
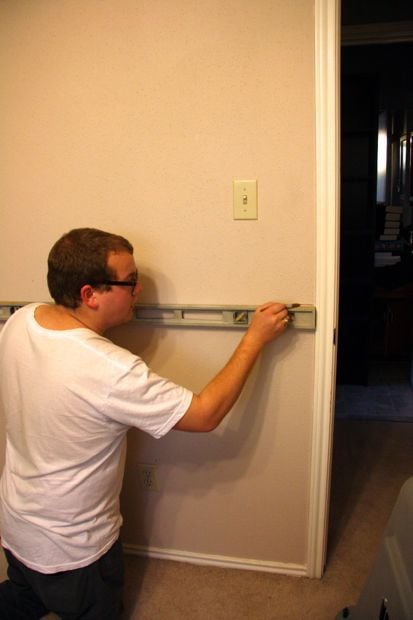
We decided to add some architecture with crown molding and trim around the room – and the first step was marking where we wanted it. Our decision was kind of arbitrary – Google told us that the standard height for chair molding is anywhere between 30″ and 36″, so we played around with it by holding up a piece at various heights. We decided to go against all of the rules and hang ours at 40″ – no real rhyme or reason, it just looked best to us…and we’re rebels like that.
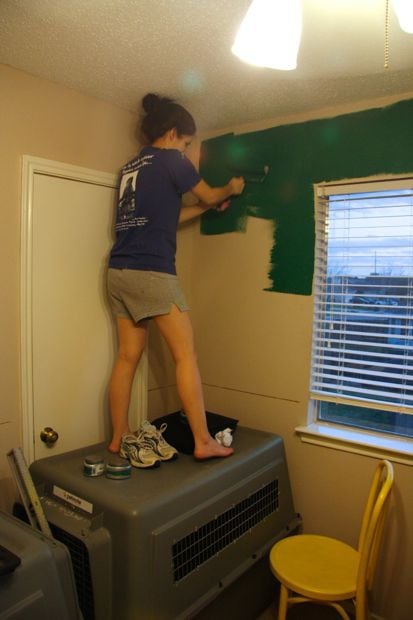
Once it was all marked, I got to painting. We went with a pretty hunter green for the top half (Juniper by Valspar, if you’re interested) and a bright white on the bottom. At this point, our dogs’ kennels were still in the room (it’s a pain to take them apart, so we were postponing it), so I used ’em as a nice stepladder to help me reach the ceilings. Hey, I’m nothing if not resourceful!
DIY IKEA Billy Bookcase Built In: How We Did It
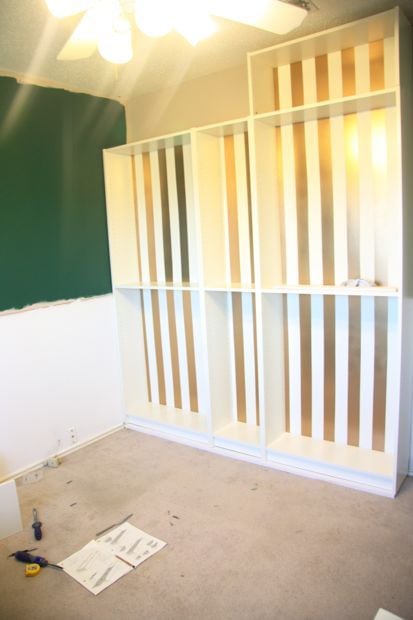
Once the room was all painted, it was time to bring in the bookcases – we used IKEA Billy bookcases, and we wanted them to look built-in.
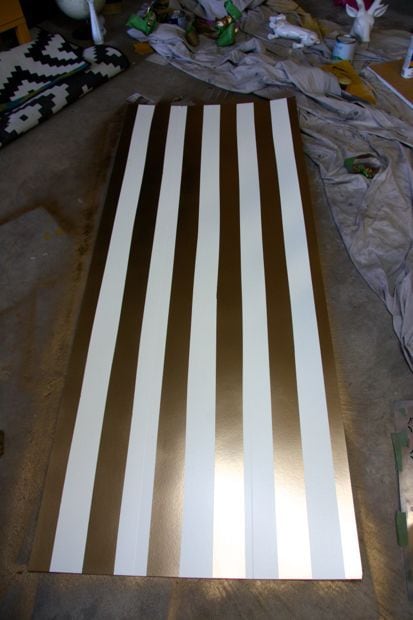
Adding some fun to the back panels
Before we installed them we wanted to add a bit of fun to the back panel (the room so far was very traditional, and it needed a fun modern punch), so we decided to go with gold stripes. I did them 3″ thick, and I just taped off every other stripe with my trusty Frog Tape and spray painted the backs.
Add height, if necessary
After everything was all dried, we brought it into the room. We laid down a spare 1×12 board to give the bookcases a little more height – without it, the crown molding wouldn’t have fit, so we needed to bump them up just a bit. It’s not even noticeable in the finished product, it just blends right in and gives it an extra inch.
You’ll notice we also used the Billy bookcase height extension units – this helped them actually reach the ceiling!
Cut a hole for light switches and electrical
One of the tricky parts here was that we had an outlet and a light switch on the wall where the bookcases were going. We wanted the whole thing to look as built-in as possible, so we needed to cut some holes in the back of the bookcase. To figure out where to cut, we got creative and put some lip gloss on the switch (and the outlet) at the four corners.
Then we pressed the bookcase up to the lipgloss so it would transfer over exactly where it needed to be…
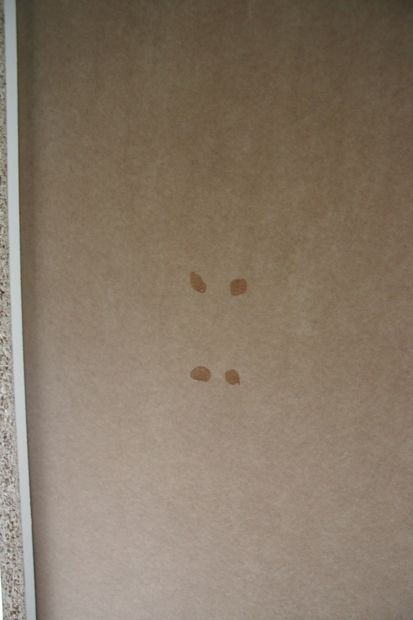
And from there it was super easy to cut a small hole and add the cover!
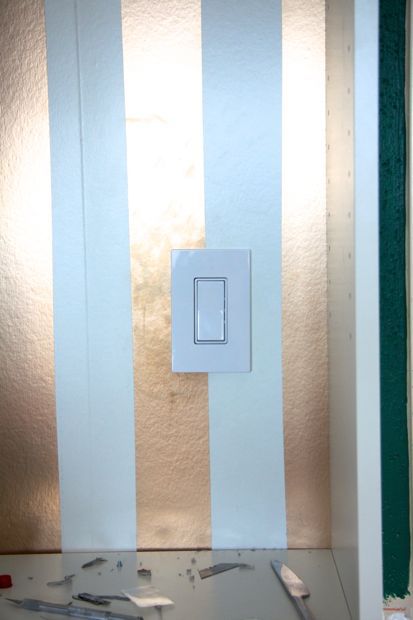
It’s a small touch, but it makes a huge difference towards making the whole thing feel more custom.
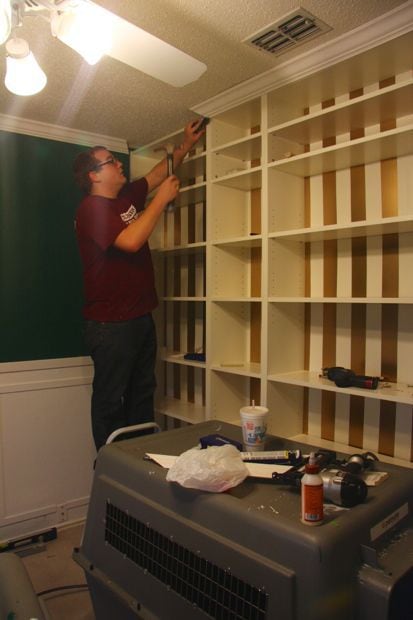
Add trim
At this point, the bookcases were in and it was time for the finishing touches – like the trim! It was a pretty straightforward process – except for the crown molding, which hurts my brain and we won’t be doing again for as long as we can avoid it!
In addition to the chair molding and the crown, we added some picture molding around the bottom half of the wall – we wanted to amp up the traditional feeling of the room a little more and add some fun detail. It’s one of those touches that kind of layers into the room and isn’t that noticeable in the finished product, but it wouldn’t be quite the same without it!
We also added a cute, modern wingback chair from IKEA that the dogs were instantly drawn to, especially Ranger. I’m surprised we got them to stay out of it long enough to take the final photos!
Once the trim was complete, it was time for the fun part to begin – bringing in the accessories!
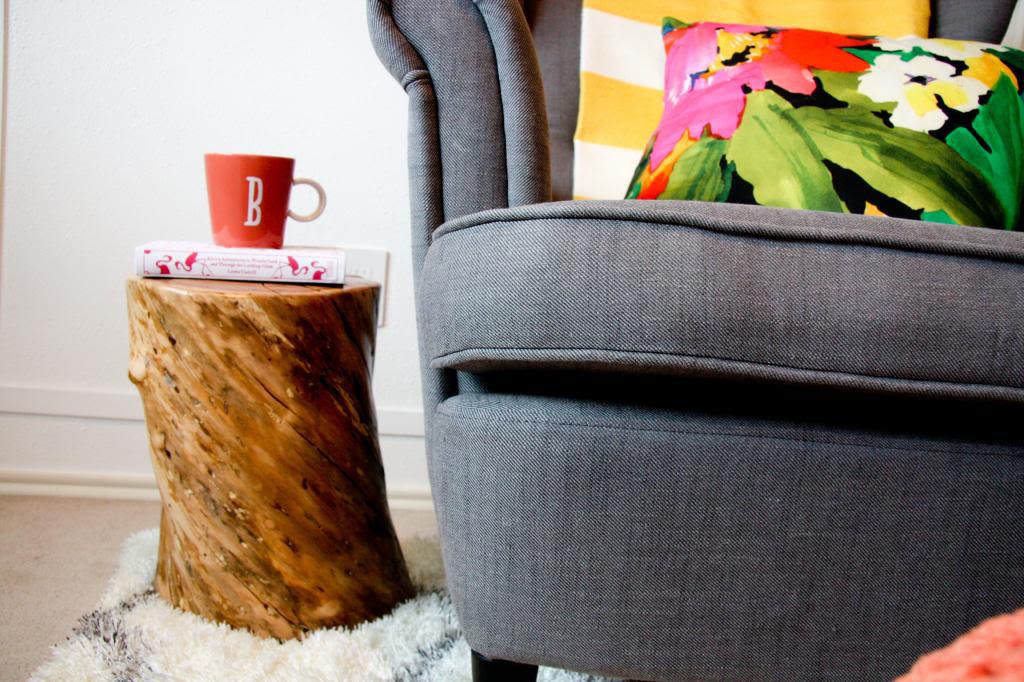
Our other big DIY project for this room was our tree stump side table. I promise it’s way easier than you think it is!
And that’s how we turned an empty, boring room into a reading room that I plan on using on a daily basis. I’m so in love with how it looks now, and I can’t believe it took us this long to take care of it!
What would you do with an extra empty room in your house?
This was my pick! I think you did an amazing job! Congrats on 3rd place and lots of fun prizes!
I absolutely love this room! You have such a great eye and fun style. We were thrilled you were a part of the contest. Thanks so much for all of your hard work!
Jess (& Monica)
Thanks so much! I LOVED being a part of it!
I think the room looks fabulous, that is a ton of work in one week! The shade of gold is lovely on the stripes! Also fell in love with the hot pink magazine holders–ikea, too? I was a contestant on “crafting” with the stars a few years ago and out in round 2. It’s tough, but look at all the projects you got done!
It is tough, isn’t it?! And thanks – we love the room! The magazine holders are from Ikea, yes…they’ve got the best selection for that sort of stuff!
So bummed that you weren’t the winner!! I just *knew* this was your project. I LOVE how it came out. Kudos for for making it as far as you did and for all the awesome things you created in the last few weeks!
AWESOME job Amanda! Love the built in look! 🙂 and that gold is amazing!!
Thanks, Sarah! I was, of course, blown away by your awesome project! 🙂
I knew this was your project! I could tell instantly. Is this room earmarked for a baby’s room someday? Those bookshelves will be useful then too!
It is! That made decisions pretty difficult because we hated to re-do a whole room only to have to undo everything in a few years when we have a kid! We’ll probably add doors to the bottom of the bookcases down the line when there’s a baby in here so we have some concealed storage for baby stuff.
I also voted for you reading room, it was my favourite. It looks fantastic, third place is no kick in the butt. Everything you’ve accomplished throughout this competition has been more than we done in pretty much the past year of living in our house haha. We’re slow.
I’m still in shock you guys didn’t win. You definitely put in the most work overall! Seriously, that’s an entire room transformed. Built-ins aren’t exactly easy, And for that matter, neither is board and batten and crown moulding! You guys did so much to that space. I think Jen has the right idea, even though you didn’t win a silly contest, you totally won with that new space in your home! And it’s going to completely improve the value of your property. You can still use the room as a bedroom, and those built-ins will be a huge plus. Great job!
I love your reading room! The bookcases turned out super awesome! The whole room has a great look!
Sorry you didn’t win – but congrats on placing third. I loved seeing all your projects these last few weeks 🙂
This turned out great! Oh how I would love a reading room… Where did you get the bookcases?
They’re the Billy bookcases from Ikea!
I vote you come install built-ins in my house. Someday I will have a reading room/library with them!!!
Haha, deal!
I LOVE this room. I covet that pouf. I saw it at Target but couldn’t handle buying it full price but by the time it went on sale it was gone! Whomp. Haha.
I voted for y’all! (without knowing it was you!)
I love love LOVE this room, seriously i kept drooling over the picture!
Y’all did such a great job!
I’m hoping to have my “reading room” next year…the bookcases i want will require me to save some $$. Did y’all get yours from ikea?
Yup! Just the regular ol’ Billy bookcases – they’re nothing fancy, but I think they look great! 🙂
That paint color is amazing! I still think you had the best project, even if you didn’t win!
Thanks! We looove how the paint color turned out!
This is my absolute favorite project that you’ve done 🙂
It’s amazing. I really want to have a library once we move into an actual house.
Bah! I totally voted for you, lame. But, at least you have this awesome new space!
I voted for this one! I loved it so much, and I loved how unique the idea was. Yeah, you could have just redecorated a bedroom, but you guys created a whole new space. LOVE IT! Congratulations! 🙂
Thanks, Krissy!
I was so disappointed to see you didn’t win the competition, but getting a new awesome space in your house is a win of another kind! I love this space and you all did such a great job. I want to come over and curl up with a good book myself!
I love it! I thought it was the best space and voted for it without knowing it was yours! It looks amazing! I think my favorite part is the gold striped backs!
Umm that lipgloss trick is awesome! I am definitely going to have to remember that, I’m sure it will come in handy for something someday.
Actually, this whole room is awesome. We have a small, unused bedroom in our house and it was going to become my “dressing room”, and then a laundry room…and now I’m thinking it should be a reading room.
Aw, thanks! We’ve loved having it so far! And I have to attribute the lip gloss trick to Corey – it was his idea. 🙂
Well done on third place, you guys did awesome. Your reading room is fantastic!!
What a wonderful space! And crown molding? Insane. The math to do the angles is killer. Great job. I love that you and Corey accomplish so much together. Now take a well deserved breather after all these weeks of raising-the-bar fantasticness!