
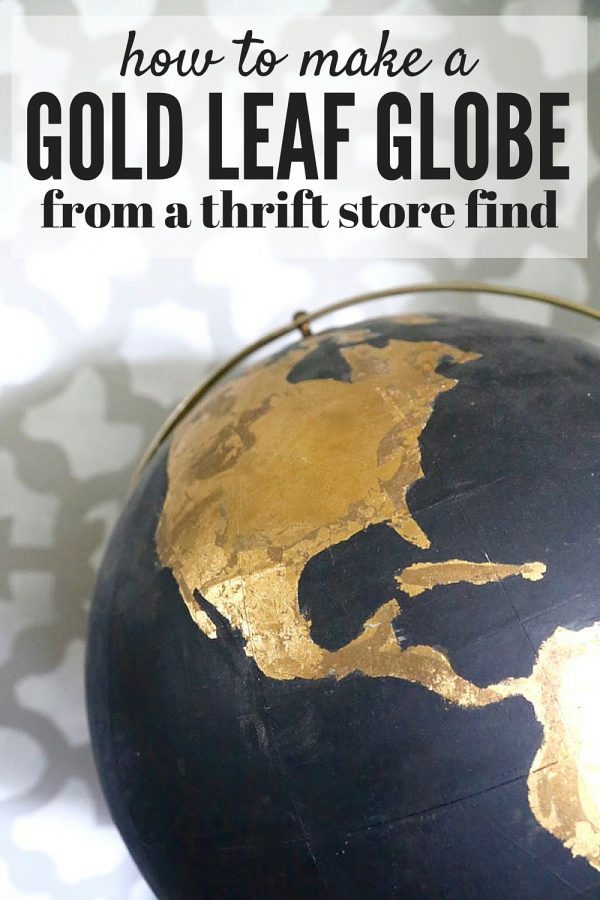
DIY Black & Gold Globe
Last updated on March 4th, 2023 at 10:45 am
Do you ever have those moments where you walk into a thrift store and from across the store you just feel something calling to you? You aren’t sure what, you aren’t sure why, but you know something is waiting.
And then you see whatever it is just sitting there at the back of the store, patiently waiting for you to discover it and turn it into something amazing. Sometimes you know immediately what you’ll transform it into, and sometimes you have no idea but you just know you need to have it.
Just me?
Well, I’m glad I followed my gut with this one…
This post contains affiliate links. Click here to read my full disclosure policy.
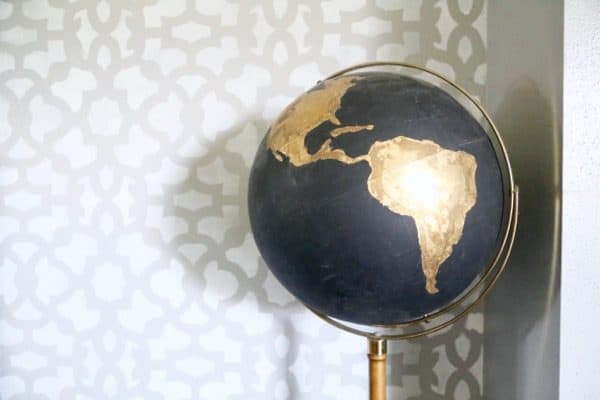
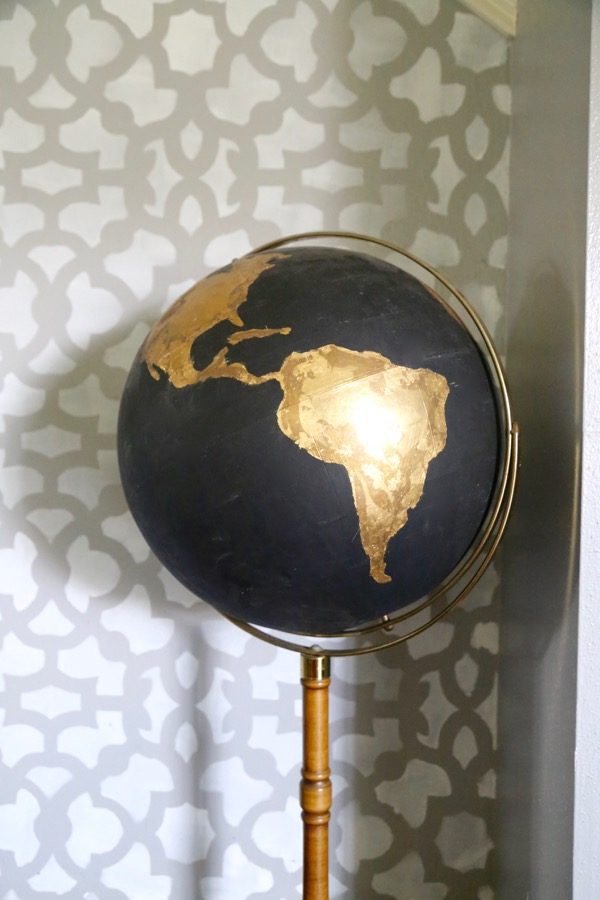
We bought this globe from Goodwill a while back when we were browsing for something else – we saw it almost immediately upon walking in the store and knew that we had to have it. It was $25, which was a bit on the steep side for our normal Goodwill purchases, but you don’t walk away from a globe with that much potential.
My mind immediately began racing with all of the possibilities for what we could do with this guy, but Corey had his mind made up from the start – a black background with gold-leaf continents.
I love a man who knows what he wants.
How to make a gold-leaf globe:
Materials you’ll need:
Tutorial:
This was an absurdly simple project – I started off with some black craft paint and painted all of the oceans black. I didn’t let myself get too fussy with this part – no one really has the entire globe memorized and won’t realize if a tiny little island in the middle of the ocean is missing. And, really, I wasn’t going for geographical accuracy so some of the smaller islands were sacrificed for the sake of my sanity.
(Sorry, Hawaii)
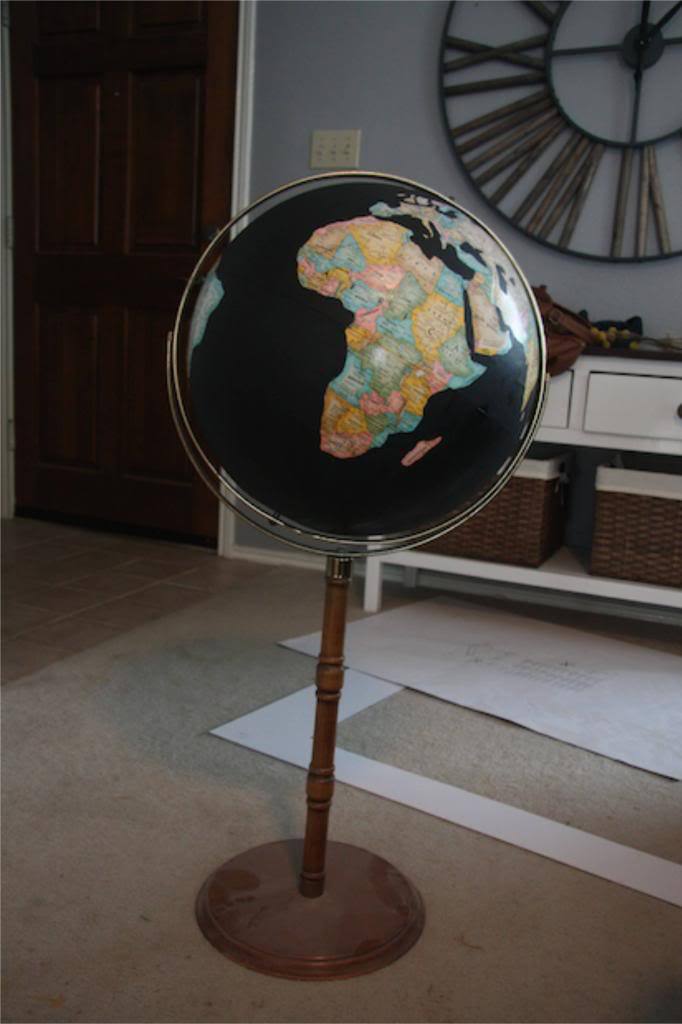
I had to do two coats of the craft paint – it took maybe two episodes of Vampire Diaries. Or, for those of you who measure time like normal people, a little under two hours.
But I’m slow…and maybe a little lot distracted by Ian Somerhalder’s jawline.
Mmm.
But, I digress. Once the black paint was done, it was time for the gold leaf. I was a little terrified of this before I got started because it seems so intimidating. But this stuff is seriously foolproof. It looks amazing no matter how much you feel like you’re messing it up, and it’s really impossible to make it look bad.
That’s my kind of crafting.
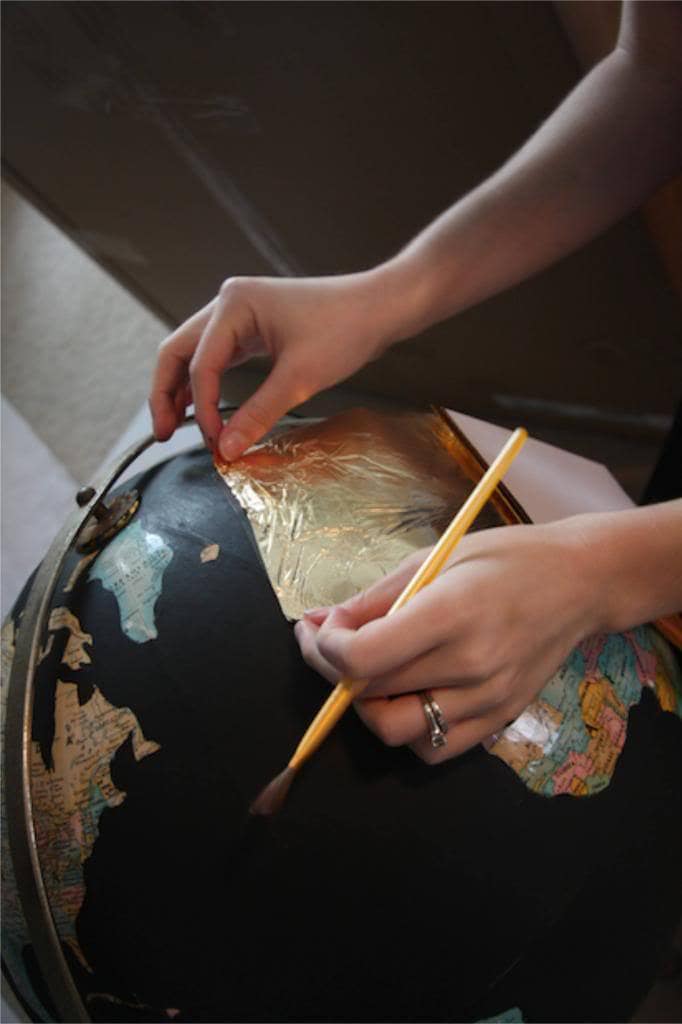
All you have to do is paint on the adhesive and waited a few minutes for it to become tacky – the directions say wait at least 20 minutes before applying the gold leaf, but I found that it didn’t take more than 5 or 10 for it to get tacky (and if I waited much longer it started to lose the stick). So, I’d just paint it on and test it every few minutes until it felt nice and sticky, then I’d plop the gold leaf on and press it down until it all stuck.
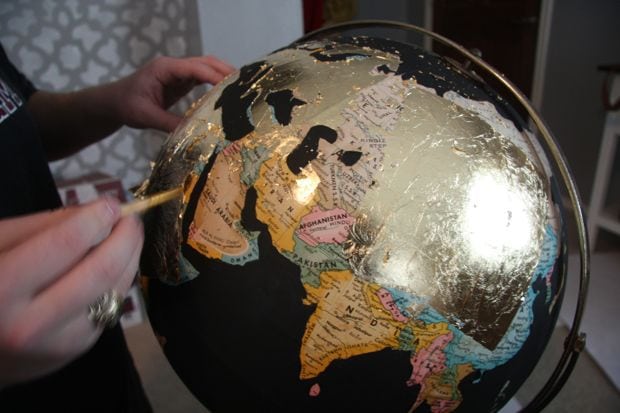
From there, I just removed the excess gold leaf and we were good to go! It took a few applications in some spots to really get the whole thing covered, but when all was said and done it was a really simple process that was only slightly annoying.
It did make a big mess though. Fair warning.
And just like that, it was done! We considered painting the base a fun color, but I kinda dig the wood look with the black globe and we couldn’t agree on a good color, so we decided to leave it as-is for now.
I love how this project turned out – the black globe and gold accents makes me weak in the knees, and I always love a more modern take on such a classic piece. This was my first project using gold leaf, and I’m very surprised at how easy it was to work with – I’ll definitely be trying it again in future projects!
Anyone else drooling over Ian Somerhalder globes lately? I did another fun globe project that took a totally different approach – and I love it just as much!
Hello. I’m thinking of doing this project, it just seems so cool! Every gold leaf product I’ve looked at seems somewhat silver, except the really expensive ones. So before I buy some gold leaf (because it’s obviously expensive), just wondering what carat gold your kit was? Thanks!
Hi Patrick! I linked the exact product I used in the post (here’s the link again for you). It’s not actually made of gold – it’s made of copper and zinc and looks just like gold. It’s also very inexpensive – the package I used is only about $8 on Amazon right now. 🙂
Hi! I’m thinking about doing this for my senior project, but instead of gold, do pictures. Do you think that will work? Do you have any recommendations? Also, what type of paint did you use for the black?
Hi, Katie!
It could work – pictures are a lot thicker than the gold leaf, so it might be challenging. I would try using Mod Podge to attach the pictures. And I just used black craft paint! 🙂
It worked! Thank you so much! I printed tiny pictures on copy paper and made a collage within the continents; I also did it with sheet music and outlined it with a gold sharpie. it turned out super cute! Thank you for all your help!
I’m so glad to hear it worked out!
Hi Amanda – Love this so much. What tool did you use to remove the excess gold leaf?
I have really gotten into decorating globes. Obsessed might be a better word. Most of mine are full of bling – old costume jewelry and rhinestones 🙂 they are fun – but I am afraid I will have to steal your idea now. Adore it!
I just used a small, dry watercolor paintbrush!
Great. Thanks.
Aw darn it…I also wanted to say that I am going to do one in black and gold and another in white and silver, however I haven’t quite made up my mind yet but I think I will making mine into lamps.
Hi again…also wanted to mention that I would have done the wire around the globe in gold leaf too and although the base looks ok, I agree with Sherry that it does distract from the sophistication of the black and gold, HOWEVER, if your home has other things like this then it’s ok but if you have a sophistication to your home, (which it sure looks like you do considering the walls and little bits of decor that I can see) then I would consider redoing it. Don’t get me wrong, it is just gorgeous!
Hi Amanda, This is gorgeous!! I was wondering if you used the spray sealer over the gold leaf? You didn’t mention it in your post so I was wondering if the gold is staying on it or flaking off? How long have you had the globe completed like this?
Thanks! : )
Hi Shirley – I didn’t spray or do anything to the globe after adding the gold leaf, and it’s still in pretty much perfect condition two years later. It doesn’t get touched a lot, but has been in our living room for two years and doesn’t look any worse for the wear!
Hi Amanda…thanks!! That really helps to know. Hopefully soon I will have all of my supplies and I will be able to get mine done. I am actually going to do hanging lamps with mine and will try to show you when I have finished!
What is the name of the solid grey wall color? Love it!
Thanks! It’s Olympic Flagstone
Thanks for the post! It helped me get motivated with my own globe project.
I referenced this tutorial in my post.
https://brainstormrodeo.wordpress.com/2015/01/07/tripod-globe-holder/
I love this idea ! It’s so cool ! 🙂 I’m going to share your post in my french blog !
What type of adhesive did you use?
I used some glue that I found right next to the gold leaf at Hobby Lobby – it’s meant to be used with it, and I think they sell it as a kit!
Very impressive…I just started a globe collection and this idea is next! Thank you for sharing!!!
Hi, just curious, but do you think you could write over the gold foil? Or is it too delicate? We are thinking of using a globe for our guest book at our wedding. I love this idea! But wasn’t sure a paint pen/sharpie would work over gold foil? Thanks!
You could probably write on it very lightly, but I would worry about it in a setting like that because people probably wouldn’t be very careful with it! You could always do a white (or gold?) sharpie on the black part, though!
Thanks, Amanda!
I’d paint the base a glossy black, not matte like the globe. (Or possibly an “antique bronze” color.) I think the existing wood tone kind of detracts from the sophistication of the black and gold, but otherwise it’s really nice!
Oh my goodness. GENIUS!!! I bought a globe from good will years and years and years ago and still have not come up with a clever idea to fix it up. But now I know. Thank you for this tutorial what an AMAZING creation!!!! This is exactly the type of bright idea I have been waiting for someone else to come up with first 😉
Wow wow wow! This is seriously an amazing project – I’m obsessed!!!! Such a great idea.
I think this is such a fun piece! I would love something similar. I think it’s so pretty, but a great conversation starter.
UM. HELLO. Did y’all unleash a beast with crafting with the stars??? I loved your stuff before but you have seriously upped your game these last few weeks! Keep up the great work, guys! Also, I totally vote for keeping the natural wood, I think it’s gorgeous with the black and gold.
Thanks!! The natural look grows on me a little more each day, haha
Love this! You have a great eye for fun stuff.
That is so cool looking! Ya’ll are so creative. 🙂