
Painting Laminate Countertops: 1 Year Later
Last updated on January 31st, 2024 at 02:40 pm
Ever wondered about painting laminate countertops? Is it possible? Should I try it? How will painted kitchen cabinets and countertops hold up over time? I’ve got all of the answers for you today with our experience.
I can’t believe it’s been a whole year since Corey and I painted our cabinets and laminate kitchen countertops. It made a world of difference in how the entire room looks, and I think it’s ridiculous that we waited so long to do this little makeover!
A few months back I shared an update on how our vinyl flooring is doing after two years and it quickly rocketed to being one of the most viewed posts of all time on the blog. Holy cow! Since you guys clearly love updates on how things are working out in our home, I figured I would start sharing how we’re feeling about some of the decisions we made in the past…starting with the kitchen!
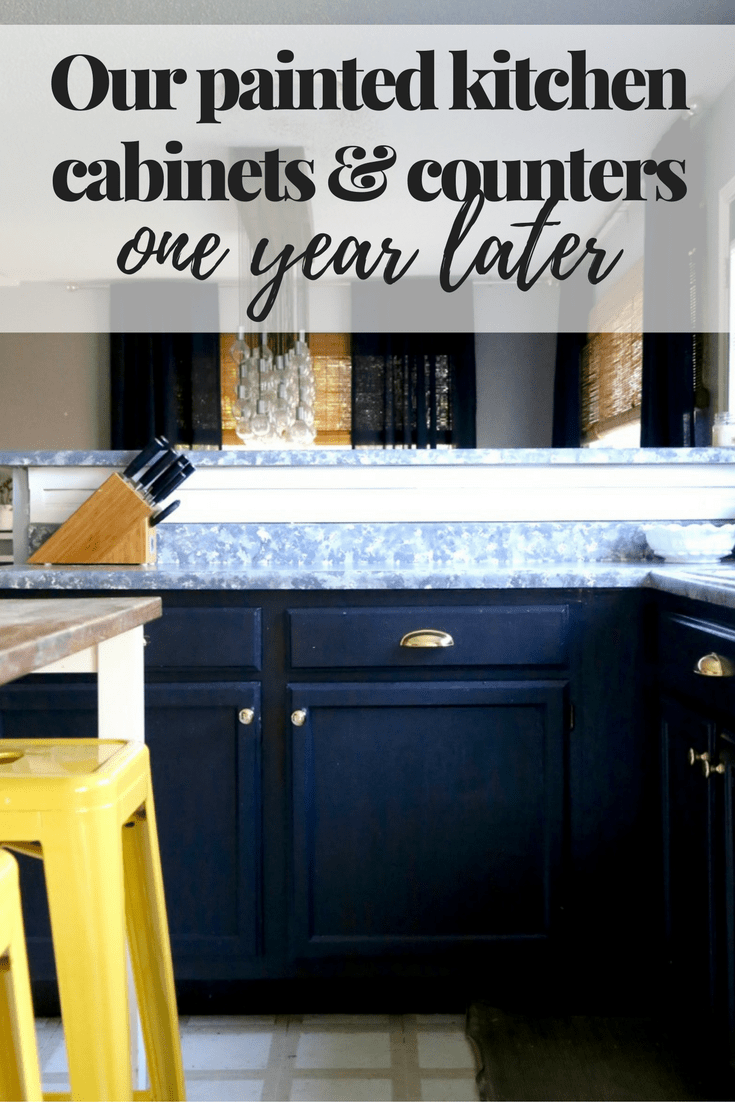
We decided to paint our kitchen cabinets and counters kind of on a whim last September – we dove in and tackled it in just a couple of days, we didn’t do a ton of planning or research, and we just sort of…did it. We roll like that sometimes. So, let’s chat about how they’re holding up one year later in a house with two (clumsy, occasionally messy) adults, one (clumsy, always messy) toddler, and two dogs.
Painting Laminate Countertops
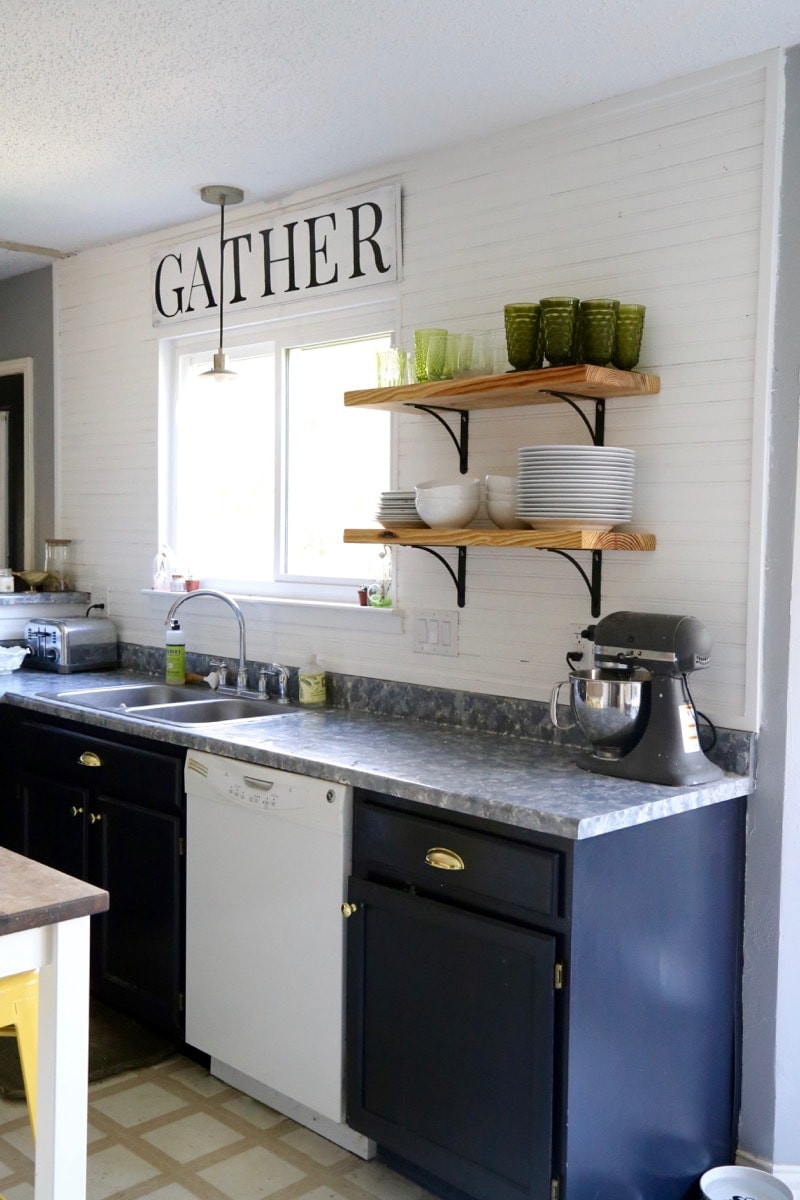
If you’ll remember, we painted our (horribly ugly) laminate countertops at the same time we painted the cabinets. They were a faux wood grain before and it was just about the worst laminate pattern I’ve ever seen in my life. I knew there was absolutely no way I could possibly make them look worse with paint, so I decided to give it a shot.
The project itself was incredibly easy. It was a little annoying to have to keep things off of the counters for a few days while everything dried, but that was honestly the worst part of the whole thing.
How do we feel about them now?
We have mixed feelings.
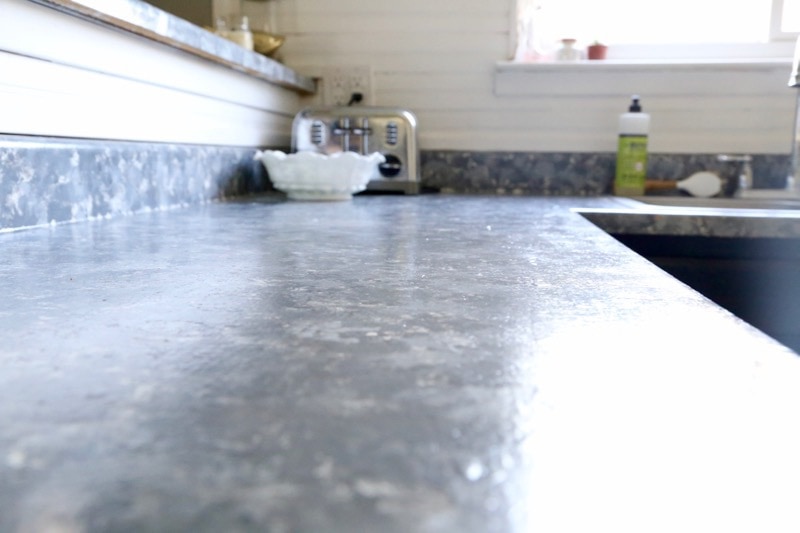
The pros are that it looks undeniably better than it did before. While it might not look like actual granite, it looks significantly better than the faux wood grain from before. It flows with the rest of our house so much more seamlessly. It doesn’t really look painted unless you get up close to it. From far away I think it really just looks like a faux granite laminate. We’ve even had a few people who have a hard time believing us when we tell them that we painted it! I’m so pleased with the difference it made in the room. The painted cabinets wouldn’t have looked half as good if I had left the countertops as they were.
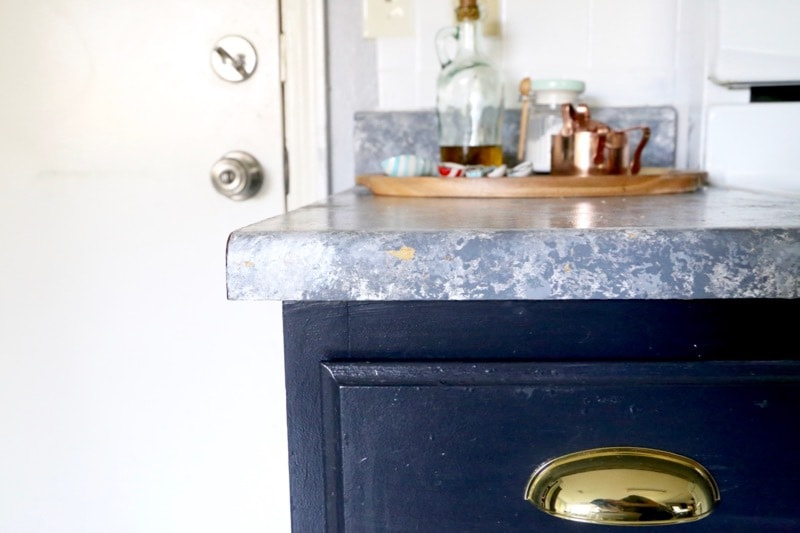
And now, the cons. These countertops are not intended to be a long-term solution. There are several small areas where the paint has chipped or developed scratches. It’s not noticeable unless you’re really looking for it, but if you work on the counters every day it’s impossible to miss. The paint also doesn’t hold up very well behind the sink at all. Because it’s such a wet area, there are some areas where the paint has started to peel a bit and it’s looking not so hot. Again, it’s not something that guests are noticing or that you’d really even see if you weren’t paying attention. But these are the things that I definitely notice.
Frequently Asked Questions
How Did You Paint Them?
But, here’s a brief rundown of the process I used:
- Use painter’s tape to tape off any areas you don’t want painted.
- Use a lint-free rag to deeply clean the countertops. It’s essential that they’re fully dust, dirt, and grease free!
- Use some 120-grit sandpaper (or a sanding block) to lightly scuff up the laminate surface.
- Apply a high-quality primer (I recommend this one) using a foam roller.
- Time to move on to paint. I used plain latex paint. Would I recommend it? Nope! If I were painting laminate cabinets again, I’d probably use a floor paint instead. It’s meant to be a little more durable! Use a brush to apply it to the backsplash if necessary.
- Now, use a paint roller to apply your base coat of white paint. A second coat is recommended here too for full coverage.
- Once it’s dry, use sponges of varying sizes to create the granite look with acrylic paint. I just layered them in one color at a time, and added some white accents at the end. The first coat will look wild, but just keep going. It’ll get there!
- Finally, once it’s all dry, use a water-based sealer to add a topcoat.
How Do You Clean Painted Countertops?
I clean these exactly the same way I cleaned our countertops before. Just plain old countertop cleaner spray and a microfiber cloth. I haven’t had a single issue with keeping them clean, and the spray doesn’t seem to affect the paint or sealer in any way.
What Do They Feel Like?
They feel just like any other painted surface. When you touch them, it’s pretty clear that they’re painted. They’re pretty smooth thanks to several layers of sealer and they don’t really feel like laminate anymore to me.
How Careful Are You With Them?
This one is hard to answer because I feel like it really depends on how you use your kitchen. We have a butcher block kitchen island, and basically all meal prep happens there. We’ve always used that space as the primary area to chop, mix, and put meals together. So, our counters don’t see a ton of heavy-duty action on a regular basis. We do, however, use our countertops on the regular and we aren’t necessarily careful about what we do on them. Basically, I’m just aware of the fact that they’re painted and try not to do anything that could obviously damage them.
Would You Do It Again?
I would absolutely try painting laminate countertops again – just not with this method!
In fact, I’ve spent a lot of time painting laminate countertops since this project. In our current home, I use a countertop paint kit to get a whole new look on two sets of bathroom counters in our home. Instead of a granite countertop look, I went with a marble look. I’m a huge fan of how it turned out, and it’s an epoxy finish. So, it’s way more durable than this was. It doesn’t require priming, it’s really simple, and it works on almost any countertop material.
If this is a project you’re considering, I highly (highly!) recommend checking out this tutorial for painting laminate counters with a countertop painting kit. It can take your old countertops from dated to practically brand new!
Final Thoughts
In the end, I absolutely 100% recommend this. It’s one of my favorite DIY projects. But, I’d recommend doing the other method I linked above. This is an okay method if your counters are awful (like ours were!) and you don’t have the $200 for the kit. It’s practically free if you have paint laying around! So, if you plan to eventually replace your counters and want to give it a shot, I give you my blessing. Just go into it with realistic expectations (this isn’t a long-term solution, it won’t look perfect), and you’ll be super pleased!
Would you ever consider painting your cabinets or counters?

We re-did my sister’s kitchen. Painted cabinets, painted countertops and self sticking vinyl floor tiles with self-sticking vinyl marble backsplash.
She got new apppliances and sink/faucet and we made new curtains. Found an old vanity to make butcherbloc island.
But her renovation costs mainly were appliances and paint. We got the vinyl flooring and backsplash at ReStore and the sink/faucet from Craigslist.
She went from rustic country to French country chic!
It was lots of work but has endured very well for 3 years
Sounds like a great makeover! It’s so satisfying to do these sorts of things on a budget!
I’ve been wanting to do my cabinets in the kitchen for just over 5 years now. Looking at and reading different blogs, websites, personal and professional, I have decided to keep saving for the countertops of my dreams. I hope that isn’t too far away as I’m not getting any younger…lol.
I painted my island a year ago and just now getting to the rest of the countertops. I used a metallic paint for the extra oomph instead of glitter. I had to get new appliances so painting the counters is my cost savings measure for now. Appliances are expensive. Just wanted to share that changing the paint, if the counters are still durable is relatively easy. I initially painted my counter a gray and black (in a desk area). was not happy with the combination. I was able to mist with water to lift up the paint. Let it dry and started all over. Not hoping to have to repaint down the road. (I am going to put in a counter eventually) My appliances and sink will be here Saturday and my newly painted counters will be ready to go.
Thanks for sharing your experience! Metallic paint is genius!
Getting ready to do my counters. My summer project. I sure want to make it last longer than a year though. Just me and my hub. What about hot crock pots etc.?
Hi Deana! We had no issues with our crock pot on the counter – I would use a trivet for any hot pans, though. Most of our dings or scratches came from areas where we weren’t careful when moving things around in the kitchen (for example, moving a refrigerator and scratched the counters), or from when messes accidentally got left on the counter for too long (my mother in law spilled turkey juice on the counter one Thanksgiving and I didn’t realize it until hours later). If you’re relatively careful with them and use a durable paint, it shouldn’t be too bad!
We have just started to redo our kitchen. We were indecisive for a year about painting them. I want white, hubs wants anything but. Just yesterday we went and got oak to do crown molding on the top of them and got that installed. But now I have to sand and stain all that.
I wish I had just started painting them white when he was away lol. Your kitchen looks really good. Love the counter tops.
Haha, maybe gray or black would be a good compromise? I think wood cabinets are beautiful too, though!
This is amazing to me that you can paint countertops!! Well done.
Thanks, Jessica! It’s so easy!
Painting the countertop is such an interesting idea. It also seems like a great way to test a color palette without committing to the expense of new stone tops and hoping it looks as nice as you imagined. (Or maybe I’m just super terrible at making expensive decisions.)
They turned out gorgeous!
Thank you!
Thank you for the information. I want to paint our cabinets. I am just scared to start. I also want to replace the counter tops Perhaps I could try painting them like you did.
It’s a great temporary solution while you save up to replace them!
I am contemplating painting my cabinets. Fear is my enemy, lol. Glad to see everything has help up fine. Thanks for linking up to Merry Monday! Pinned! Have a great week!
Kim
I would absolutely love to paint our cabinets but we have tons of them, crown molding, and tons of intricate details. I know that I would never be able to get the factory finish look that I would want so I will just have to wait until we have the money to replace them one day. Yours look great and I love the black!
Thanks so much! You should try a paint sprayer – it does wonders for that perfect finish!
Love your honesty! I think they’ve held up pretty well being a short term solution. I also love the dark cabinet color!
I love the bold color you used for the cabinets. We painted ours about 5 years ago and they are still holding up, aside from a few nicks and touch ups.
This is great information. The painted counter tops look great for a short term solution.
Great idea for a post! I love the fact that it was an honest recap.
Good advice, Amanda! I definitely love my painted cabinets, so I agree wholeheartedly. It sounds like your counters were horrible before, so I’m glad your painted ones are better.
Thanks for the honest and straightforward update – pinning!
Stop-gap measures that hold up well = success in my books!
Amen!