
Our Front Door Makeover {How to Add a WINDOW To Your Door!}
Last updated on April 7th, 2026 at 12:05 pm
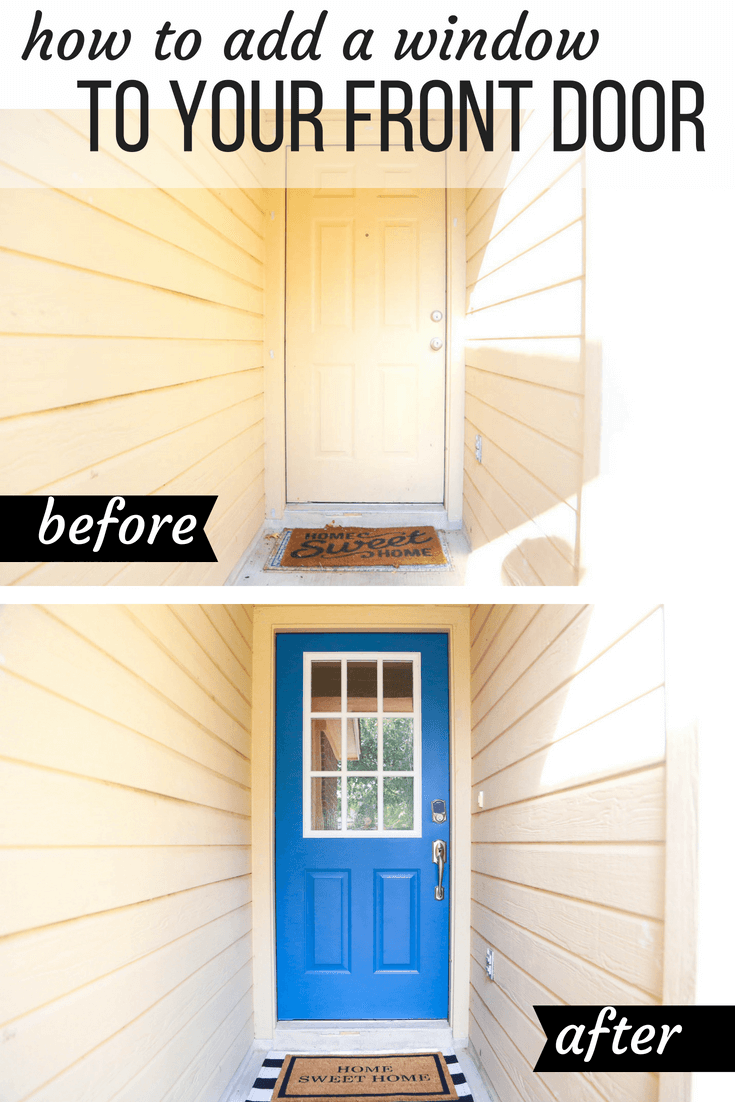
We just gave our front door a total overhaul by painting it and adding a window (yes, I said we added a window to our front door!), and the end result is absolutely stunning. And, it’s so easy to achieve! See all of the details of our DIY front door makeover in this post.
This project has long been one of the most controversial projects I’ve ever shared. People have big feelings about this front door makeover. But, did you know that if you have a plain ol’ front door, it’s possible to completely transform it by adding a window to it?
It is! And it’s EASY! Today, I’m going to show you how to add a window to your front door and walk you through exactly how we took on this DIY front door makeover. If you’ve ever wondered how to update a front door without replacing it, this post is for you!
Where to Buy a Front Door Window
You can actually buy a window for your front door in a lot of places. Most window replacement kits can be used to add a window to the door instead. I purchased mine originally from a company called Zabitat, but these days you can grab one on Amazon! Here are a few options:
- 9-lite front door window
- I love this simple window with 4 panels
- A simple frosted glass window
- This one is great for a wood door
- You could do two of these narrow ones
- And this one has some beautiful detail on it
These work in both metal or wood doors. We were working with a metal door – cutting through a solid wood door might be more challenging, but it’s not impossible!
DIY Front Door Makeover Video
I know it’s hard to imagine how this is actually even possible, so let’s start off with the most important part: I made a video of the entire process so you can see how it works! I’ll share photos and more details down below, but you know you want to see our reactions when we literally cut a giant hole in our front door (in the middle of August. In Texas. When I was 9 months pregnant).
How to Add a Window to Your Front Door
Materials You’ll Need:
- Front Door Window (linked above!)
- Painter’s Tape
- Measuring Tape
- Jigsaw with an appropriate blade
- Drill + 1/2″ drill bit
- Screwdriver
Step 1: Remove Door
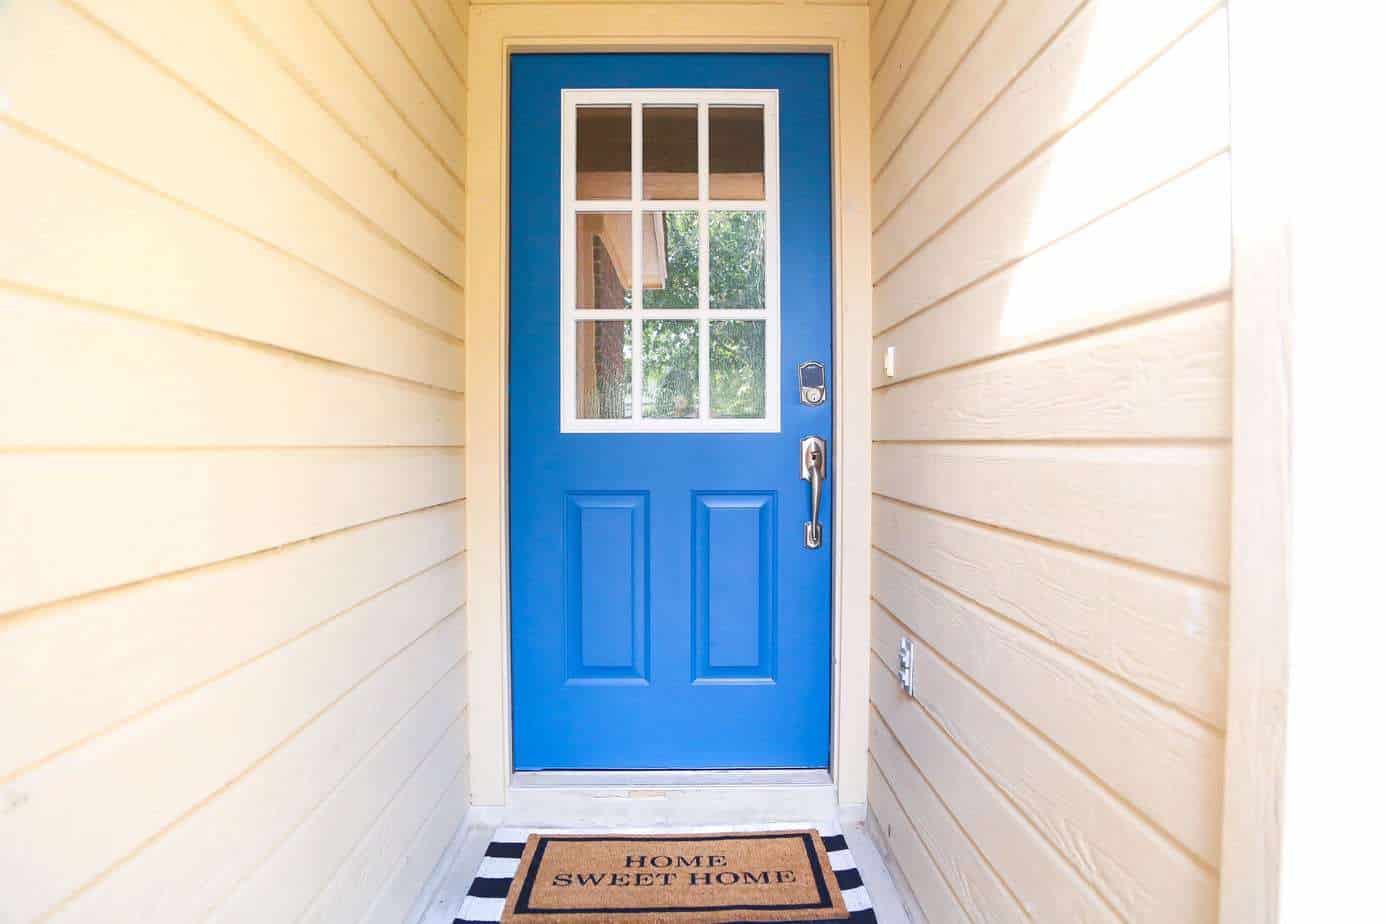
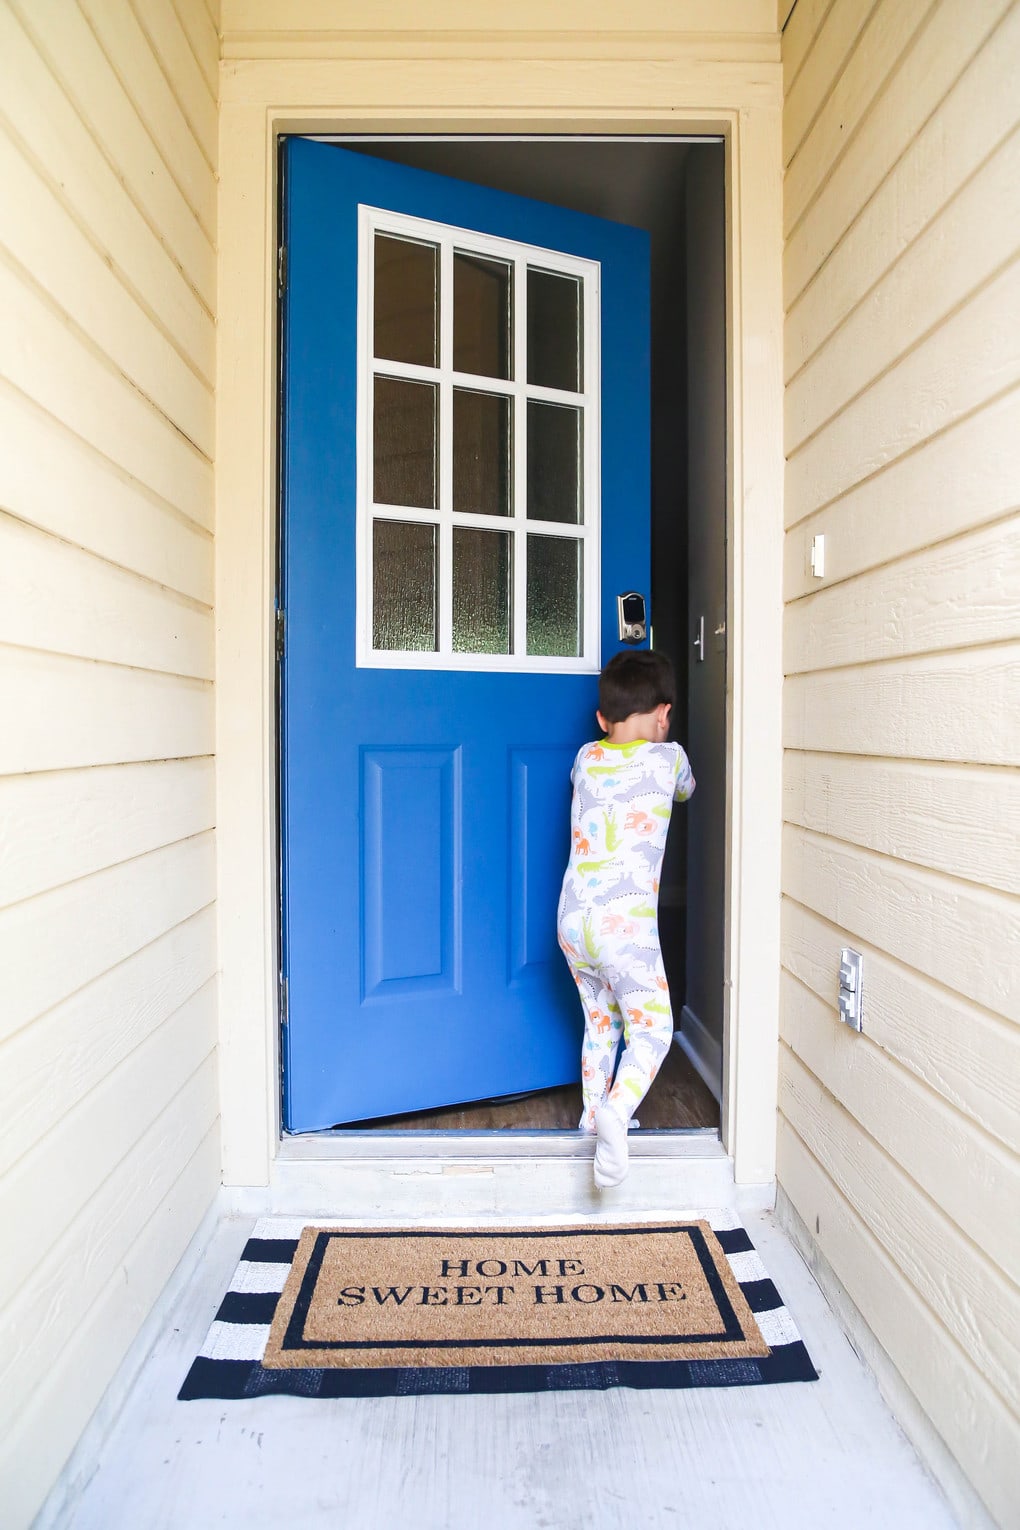
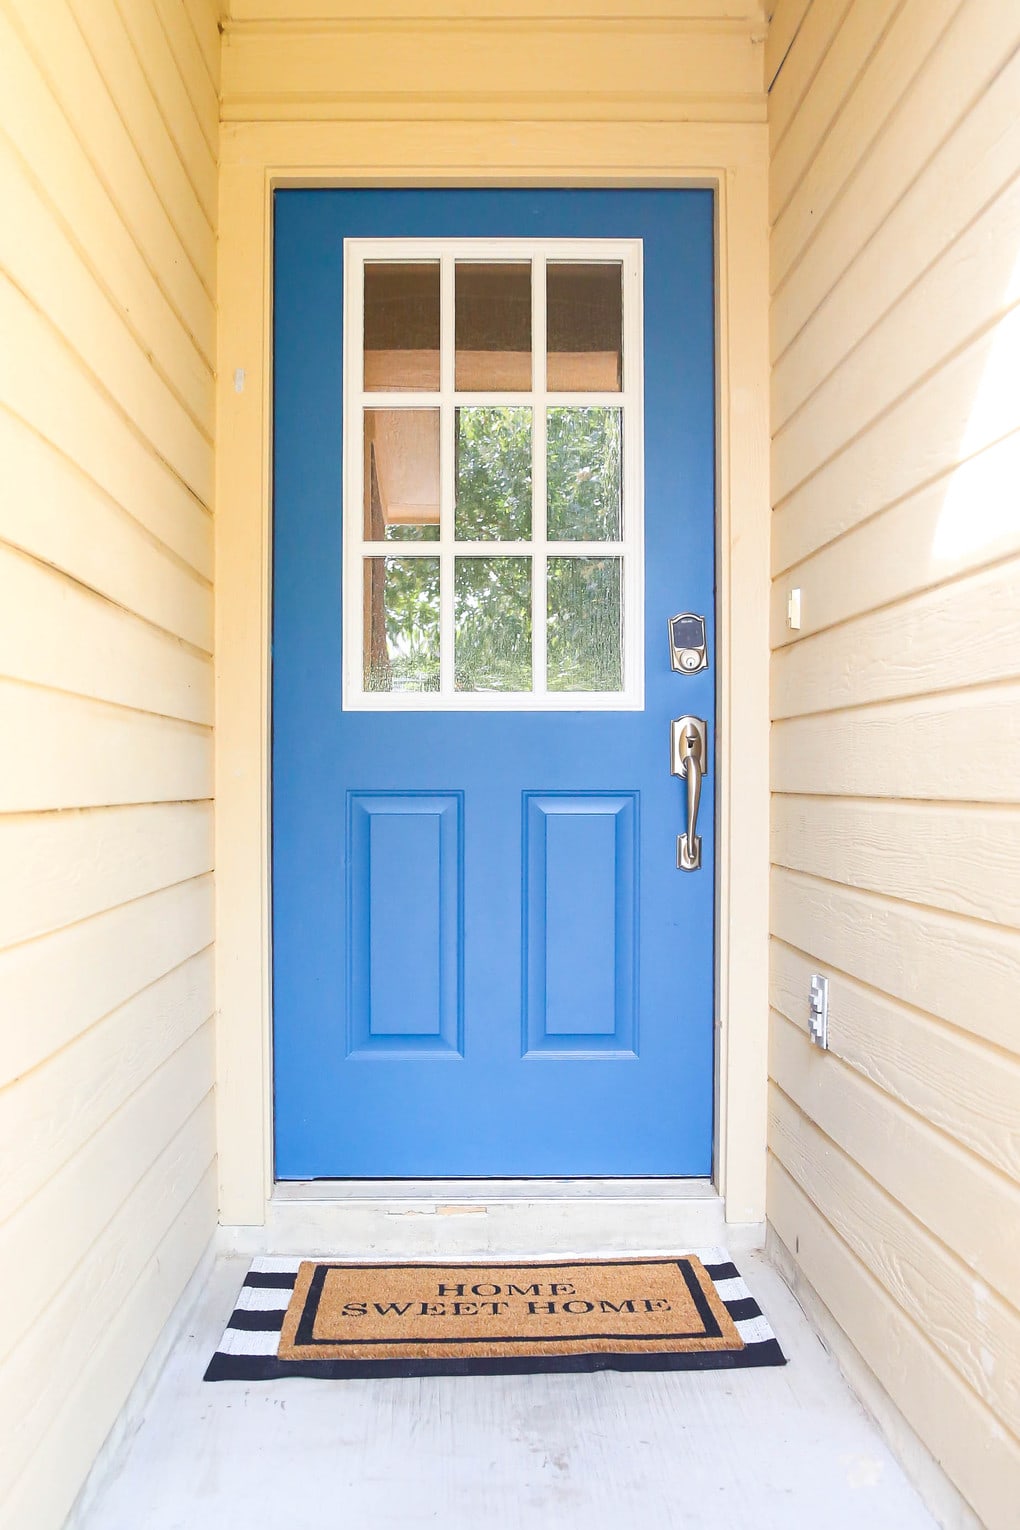
Start by removing your door – if you want to paint it, now is a great time to go ahead and take care of that. The blue on our door is Georgian Bay from Sherwin Williams (though, in some photos you’ll see that we eventually painted it black).
Step 2: Measure and Mark for Your Cuts
Your front door window likely comes with some detailed instructions and a measuring guide. At the very least, it’ll come with a note on how large of a hole you need! So, your next step is to measure the size of your cut on the door and mark it. You really want to take your time with this part of the process. You don’t want a too-big hole!
We measured the size of the hole, then used a Sharpie and a level to draw a perfectly straight line. Like I said, this is probably the most important part of the entire project because it sets the stage for the rest of it. Don’t rush, and measure more than once!
Step 3: Add Painter’s Tape Around Your Line
Metal and wood both can splinter when cut, so you’ll want to be sure to add painter’s tape all around the edges of your cut to help prevent any issues. Again – move slowly and be methodical with this!
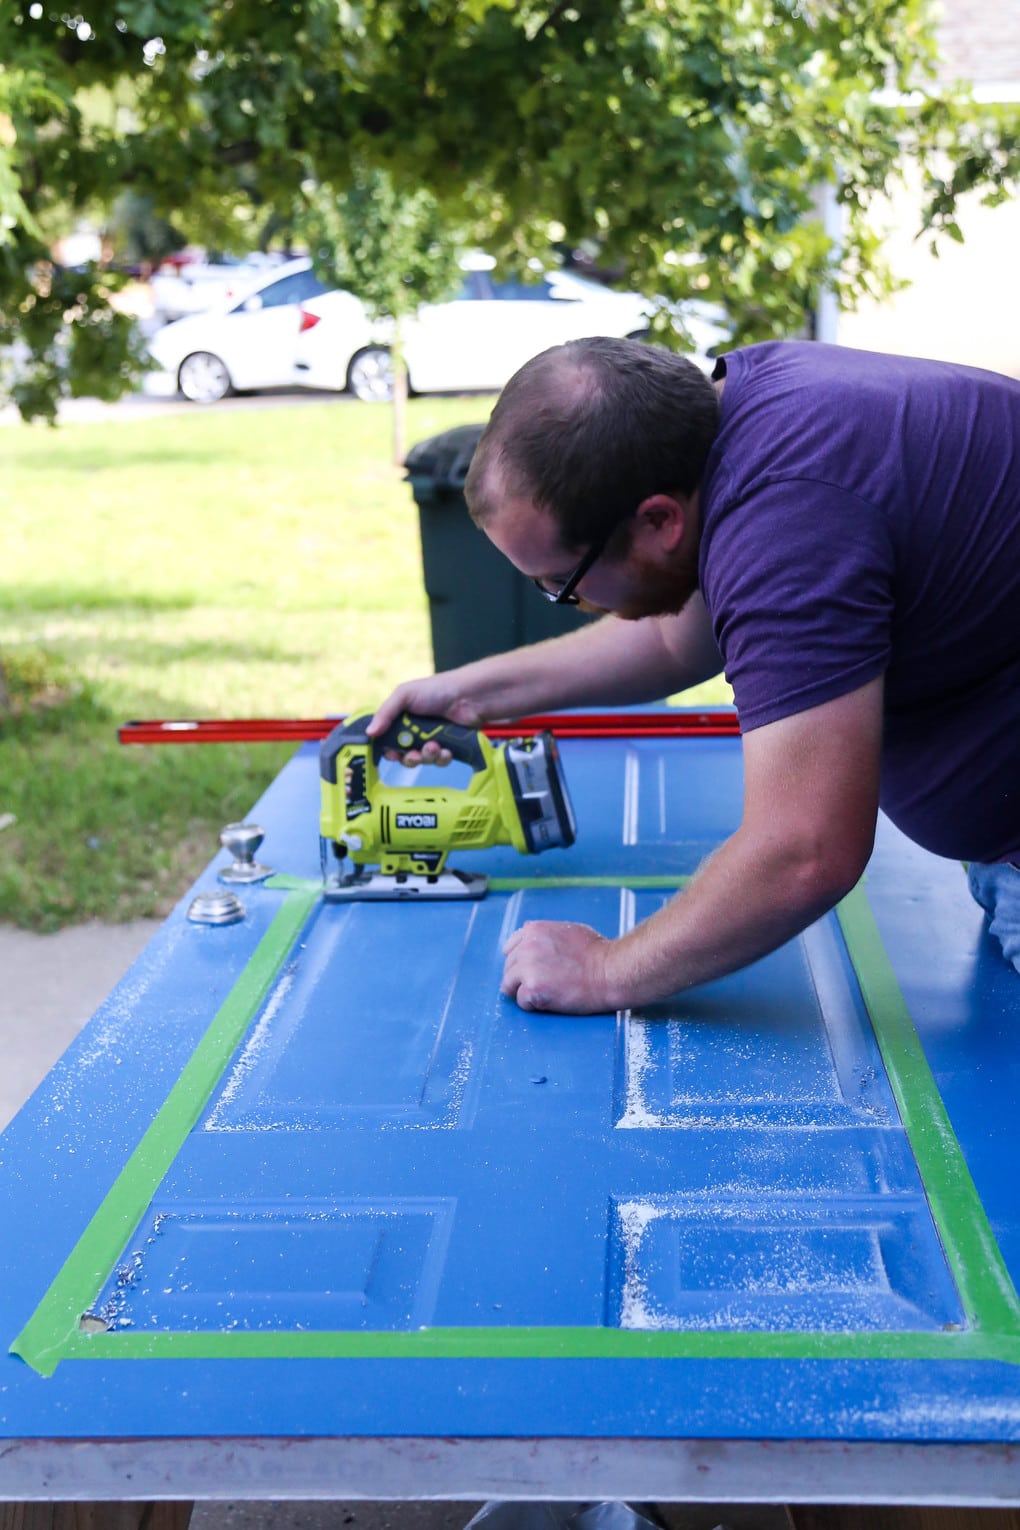
Step 4: Use Jigsaw to Cut the Hole!
We used a 1/2″ drill bit to drill starter holes in all of the corners. This allows you to cut the hole for the door using your jigsaw.
Then, it’s time for the scary part – cutting out the hole. I was pretty terrified (because again, hello giant hole in my front door!), but it really was no big deal and was a breeze to cut through.
If you’re working with a hollow core door, you might find it easier to only cut through one side of the door, then flip the door over and repeat the process. It’s up to you, just do what works best! In the end, as long as you end up with a giant scary hole in your door, you’re good!
You’re free to pause here and have a minor panic attack about the entire project failing and having to go buy a new front door. We certainly did.
But afterward, get yourself together and chill out because I promise this is no big deal!
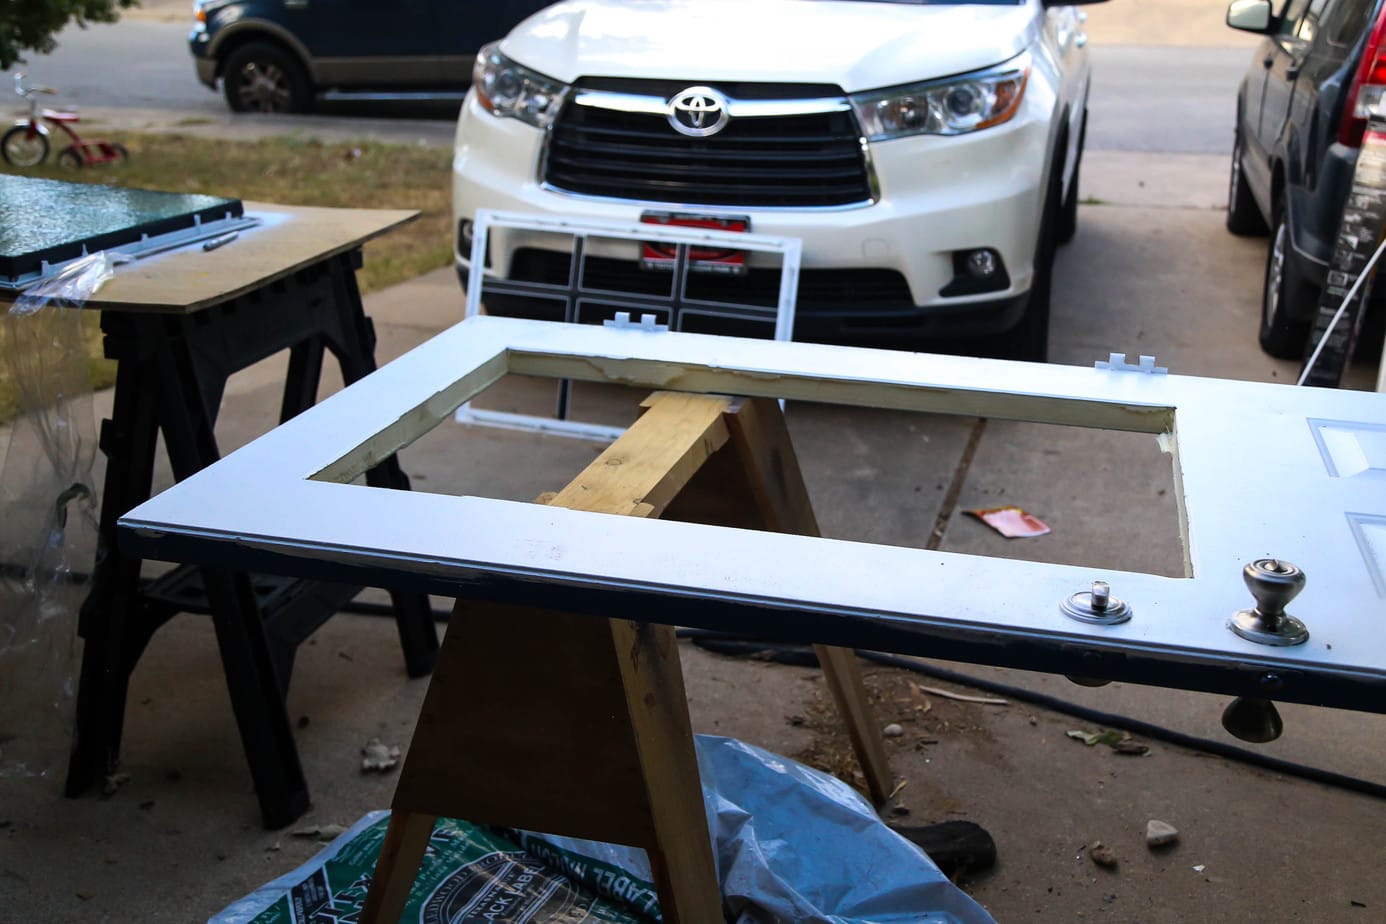
Step 5: Install the Glass!
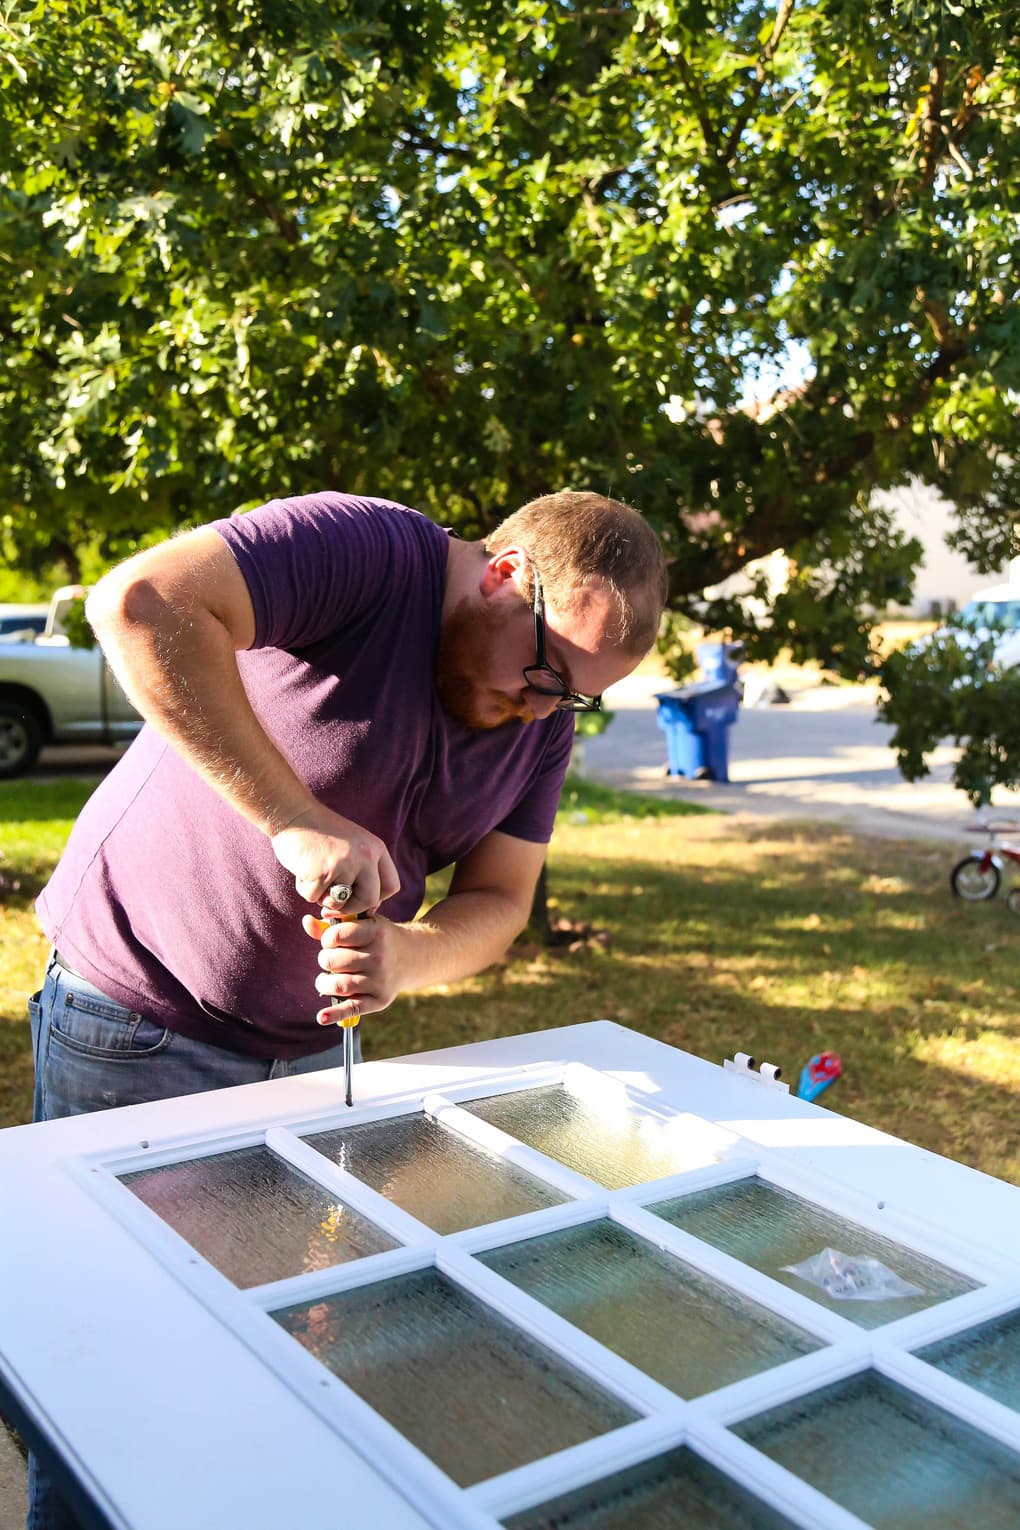
Now, you’ll simply lay your glass out on the sawhorses, then pick your door up and (gently! carefully!) lay it on top of the glass. Then, fit the frame back on top and screw it in!
Your door window might have specific instructions on how exactly to do this part, but most of them come with a window that fits inside the hole, then an outer frame that fits on top and can be screwed right in with a screwdriver! It’s the easiest part of the process and takes mere minutes.
Step 6: Put Your Door Back Up and Breathe a Sigh of Relief
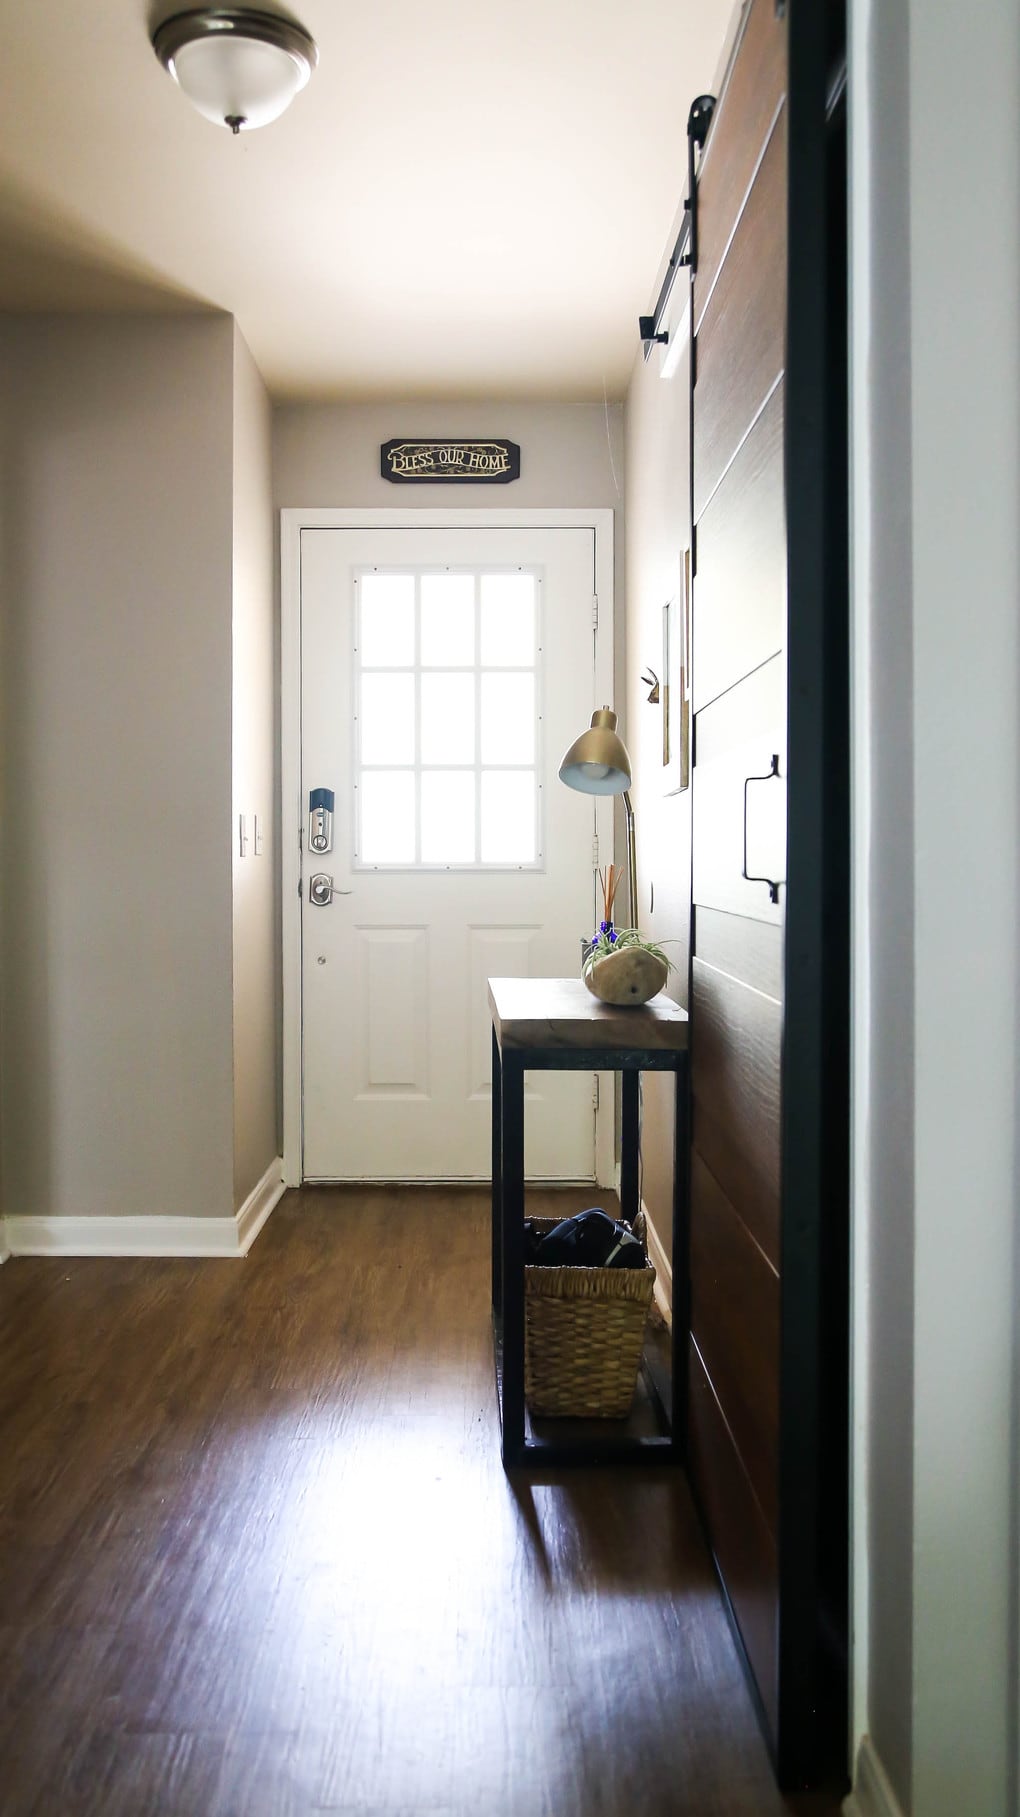
Now you’re ready to re-install your door and take a deep breath because you did it! You installed a window in a door that didn’t have a window before! How amazing is that?!
In all seriousness, I really do think this is a pretty incredible product and I am so incredibly pleased at how the makeover turned out. I can’t believe how gorgeous our front door looks now and I literally still think that we’ve left the front door open every time we walk by because I’m not used to having so much natural light in our entry!
Frequently Asked Questions
Doesn’t this decrease security?
The number one critical comment I get is people saying they would never do this because it decreases home security. I’m not sure I understand the argument since that’s more of a general “front door with a window” thing, and less specific to this actual project.
Yes, if you have a front door with a window it’s theoretically possible for someone to break the window and get in. It’s also possible for someone to break any window in your house to get in. Personally, I don’t see that as a reason to have fewer windows. I’m all about adding as many windows as possible to my house. You’ll never convince me otherwise.
How much does it to add a window to your front door?
Of course, it varies wildly depending on which front door window you choose. Generally speaking, you can find them on Amazon for anywhere from $150-$200 (or more). More specialized companies may sell them for $500-$800. Replacing a front door can cost upwards of $1,500 or more, so it can be a pretty huge savings!
What about privacy?
We went with a textured privacy glass for this door, and you can’t see anything through it. We can see vague darkness and shapes from inside if someone comes up to the door, but that’s it. You cannot see into our house at all, unless you were to walk up and press your entire face right up to the glass. And even then, you’d see more shapes than details!
How to Update Your Front Door Without Replacing It
If you want to revamp your front door without replacing it and adding a whole window feels like a little more than you want to take on right now, here are some other ideas:
- Give the door a fresh coat of paint. I love a black front door, but I’ve also painted my doors blue (as seen here) and yellow! A red front door is also always a really fun touch.
- Add a wreath or other door decor. Seasonal wreaths aren’t just for Christmas! Adding a wreath to the front door can give it a fresh look without changing the door at all!
- Add your house numbers to the door. It will make your front entry stand out even more and can be a really pretty detail.
- Decorate your porch. Don’t have the budget to replace the door? Work on decorating the area around the door instead! Make the entire entry a little more beautiful and that door will simply fade into the background.
Looks amazing. We are doing this to our door! I can’t find dimensions on the insert and door anywhere… is that something you can provide me?
I think your new front door color is not flattering It looks like IKEA blue. A more appropriate residential color would be more appropriate.
It’s literally their house! Preference, my dear, it’s all about preference.
Looks great the job you did. I would like to go one step further. My current front door looks like yours – we have the window area already in. We would like to take that whole window out and put in a glass window that opens half way (like a wall window) with a screen to let in fresh air. And maybe put two decorative louvred panels on the outside to make the door look nice from the outside. Not sure what brand our door is but it looks like a standard stock door like a jenweld with the panels at the bottom and the glass area in the upper part. Was wondering if anyone made something like I was looking for. Any ideas or links appreciated,
Thanks
Looks very nice! However, here in Florida with the Hurrican Codes, I doubt this will pass any inspection… and, why have an electric door looking mechanism when all you have to do is unscrew the little screws and/or toss a stone into the window and in you are… I hope the glass is break in resistant or hurrican proof though… Looks very good, I like the blue…
I’m sorry for being nit-picky, but I’m an electrician and I notice things people might not (it’s a CURSE!! lol) The keyless entry pad is very off level! That would drive me NUTS!! But the door looks fab!!!
Yes it is, and yes it did drive us nuts. 🙂
I was just looking at DIY videos on YouTube and saw your video. What a great idea and perfect timing. We’ve been mulling over buying a new door because the builder-grade “hershey bar” one we currently have is so boring and we want a section of clear glass on the top. This isn’t our forever home, so we don’t want to spend a lot of money on renovation projects. We are handy, so it’s going to be an easy change for less than $100, and it will add the perfect amount of morning sun in our entry.
Thanks, and well done.
BW
The window is over $400. what you did essentially is make a stanley 9lite 2 panel door which is $344 from home depot.
are their cheaper options to add a window? even just a 12×12 simple plain window is all I need. I found ODL add on internal blinds windows for $80 but they are adds ons. not actual window replacements. I have the stanley door and after moving 2100 miles across country I dropped it and shattered the glass. trying to replace it (glass) or better with internal blinds. but the $80 kit “goes over” your existing glass meaning it has to be intact and be their.
back door has no window. want a small window just so we can see out the door before opening it. Suggestions?
also the lock you linked is not keyless. it still takes a key. I finally found one that is keyless but its a bit on the cheapy side. looking for something a wee bit nicer.
You’re right – you can generally buy a door with glass for a similar price, but we loved this for a few reasons. First, you can get exactly what you want (right down to privacy glass versus regular glass) and we aren’t wasting a perfectly good door! The door you mention has regular glass, not privacy glass, which was an important feature to us and often doesn’t come standard on those cheaper doors.
Zabitat has lots of options and prices, just glancing at their site it looks like they have over 30 window options that are under $200, and another 100 that are under $300 – so you should be able to find something good there!
Most “keyless” entry locks also do accept a key and personally, I’d suggest not getting one that doesn’t. Batteries on those can run out unexpectedly and I’d hate to get stuck without a good way to get in – I always like having the backup option of being able to enter with a key if I forget the code for some reason or if the keypad glitches.
I guess I”m just not a DIY’er cause my Home Depot has doors with a window already put in for very similar price as just the window LOL. Looks good, though.
Haha, thanks! And yes, it’s not for everyone – but we’re really pleased with how it turned out, and love that we could totally customize exactly what we wanted. 🙂
Yes they do BUT they charge $500.00 to install the Door!!
Oh, we don’t need a window in our door but we have an outside door that is all glass and I hate the blinds on the outside — they bang and get crunched and are a pain. This site offers enclosed blinds as replacements. I’m off to investigate…. (and your door looks amazing! the color is great and that natural light is wonderful)
Yes! Enclosed blinds are SO nice!
It looks great! I wish I could do this with my door, but I have restrictions due to me being in hurricane district (FL).
Bummer!!
Zabitat does offer Impact Resistant/Severe Weather glass inserts for hurricane zones!
Oh, that’s so good to know!
Does your keyless entry actually enable a deadbolt? We have a keyless lock on our door handle, but not on our deadbolt. We used to only rely on the keyless entry but it turns out that when you don’t have a deadbolt locked, your door is super easy to kick down and people will break into your house and take all your things! Good times. If there’s a keyless system out there that actually enables a deadbolt though, I’m intrigued.
Yes, it does! This is the one we bought – it has several extra safety features too like the option to automatically lock the door after 30 seconds and an alarm when the door is messed with. We are loving it!
Hi Amanda!
That makes such a huge difference. I guess the outside would have been just as cool with just the new color, but the hallway with the natural light is such a win.
It truly does sound like an amazing product – the only thing I think is missing is white covers for the window frame screws…
Greetings from Germany
Jenn(ifer)
Thanks! We really love it! But yes, haha – screw covers would be great!
Well, I stand corrected! My husband just informed me it DID come with screw covers, we just forgot to put them on! 🙈 Whoops!
Well that’s just perfect than! Looking forward to the before and after 🙂