
How to Hang a Gallery Wall
We’re finally to the point of putting finishing touches on Grant’s room, and it feels SO GOOD to be here!
One of the things I’ve envisioned for his room, even before we decided to add wallpaper, was a big ol’ gallery wall full of whimsical dinosaurs. Nothing scary or mean – only silly, friendly, unique dinos allowed.
Annnnd I think I managed to pull it off okay!
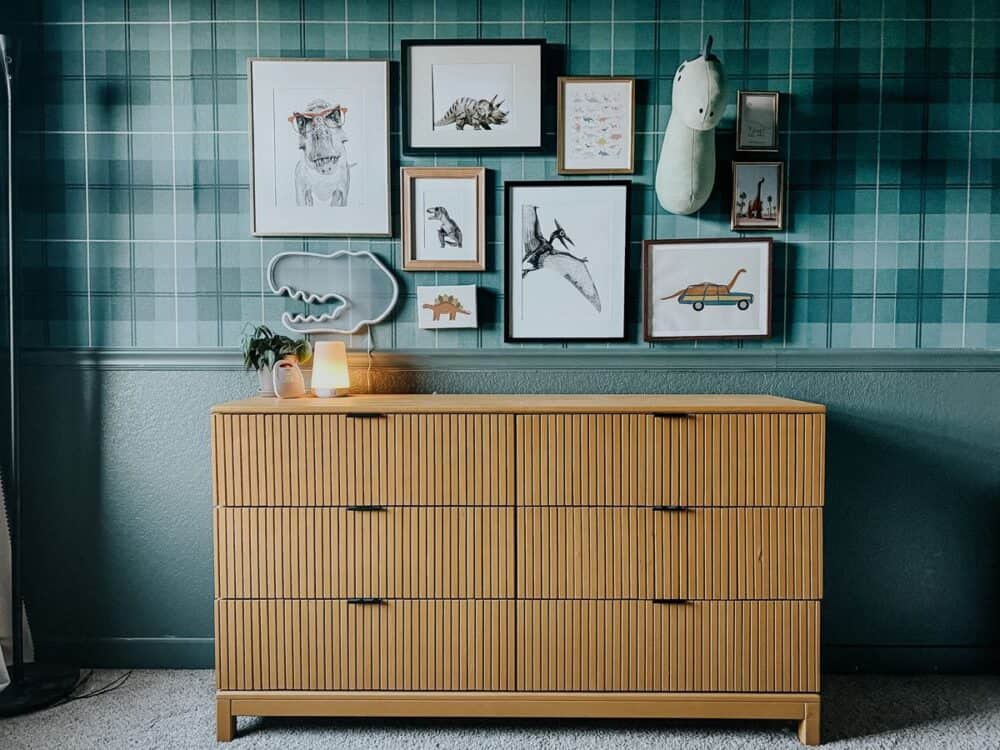
I had the most fun gathering pieces for this gallery wall and hanging it, and I really adore how it turned out. Hanging a gallery wall can feel really intimidating, though, so I wanted to take a minute to dedicate a post to how to hang a gallery wall. I’ll take you on the journey of this little guy from start to finish, and detail every step along the way.
Hopefully, after this post you’ll feel much more confident and ready to try one yourself!
how to hang a gallery wall
planning + gathering art
Of course the first step to any gallery wall is planning it out and purchasing art.
There’s absolutely no right or wrong way to go about this, but here are a few questions I ask myself as I’m gathering my supplies.
- Do I want a theme? In this case – yes! I’m shooting for an all-dinosaur gallery wall. But sometimes, the theme is family photos. Or maybe botanicals. Black and white prints. Or no theme at all!
- What style do I want? Your gallery wall can be formal and clean-lined, organic and free-flowing, or anywhere in-between! Depending on the style you’re shooting for, you might choose to place your prints in a grid, or in a line. You might decide to carefully plan out a specific shape. Or, you might throw all caution to the wind and just let the photos go wherever it feels good! (Spoiler alert: that’s usually my favorite kind of gallery wall!)
- What do I want for frames? Finally, you’ll need to consider what you want to do for your frames. If you want a really cohesive-feeling gallery wall, I generally recommend having at least one element be planned out. For example, if the content matches (dinosaurs!), the frames can be mismatched. If the frames are all the same, you can go a little more wild with the content. Of course, these rules are made to be broken. A super minimal gallery wall with matching frames and all black and white photos is gorgeous. And so is a totally random gallery wall with nothing matching at all! Don’t overthink this, just choose a direction to try and run with it.
When shopping for art, I have a few places I frequent. Etsy is my go-to for super affordable, downloadable art. You can find just about anything you’d imagine, and most downloadable prints only cost a few dollars. I send them off to Walmart to have them printed most of the time (because they offer same-day matte prints!).
If I want something a little nicer, I love browsing Minted’s collection. Full disclosure – they sent me a shop credit to buy a bit of art for Grant’s room, but they’ve always been one of my go-to places when I’m looking for good art! I love that it’s really customizable – you can get most prints in a canvas or a regular print, framed or unframed, with a mat or without a mat…there are even some prints that have multiple versions of them so you can customize the colors!
Minted is running a sale right now – it ends today! Use code FIFTEEN for 15% off anything sitewide. They don’t run sales often, so it’s a big deal!
designing a layout
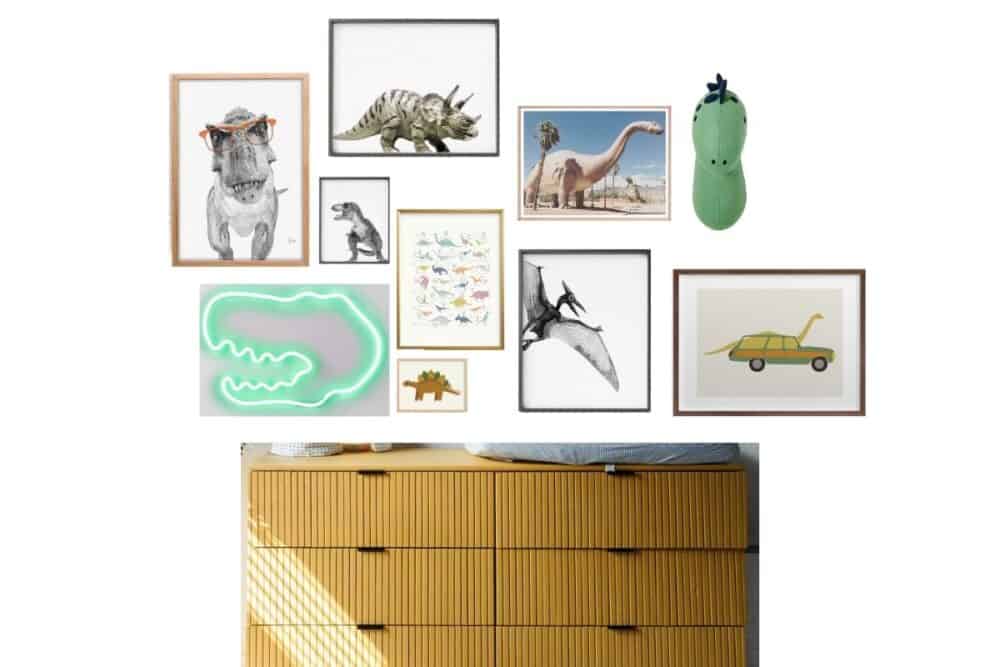
When I’m doing a gallery wall, my favorite way to plan things out a bit is to mock up my gallery wall in Canva. It’s free to use and makes these things so much easier! You can see in the image above what my plan looked like. I simply pulled a picture of the dresser I was hanging the gallery wall above, then I grabbed images of each piece of art I was planning to hang.
I played around with various sizes and layouts until I landed on something that I liked. There’s no real measuring or official planning at this stage. It’s very loose and based on what feels right to you.
Once you have a layout planned like this, it’s easier to know what sizes of prints to order! I picked sizes anywhere from 4×6 to 11×14 based on about how big they were in the image. Again, this is an art, not a science, and things will shift and change.
lay it out on the ground
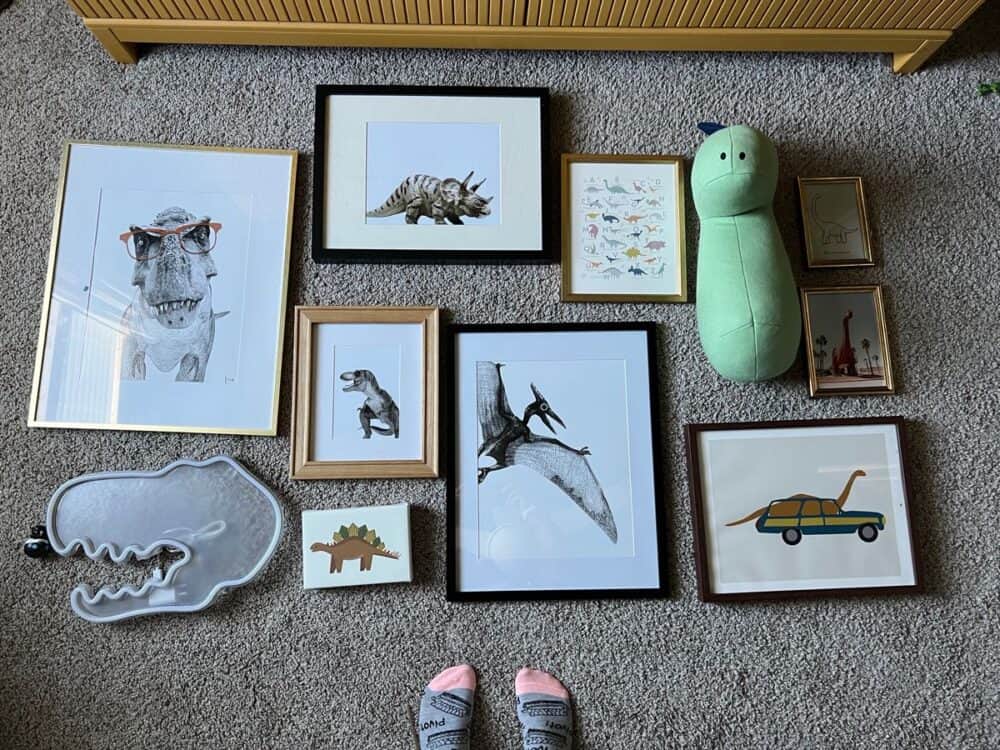
Once you’ve got all of your art gathered and prepared, it’s time to test it out in the space. I like to take all of my art to the room I’m working in and lay it out on the ground in the same rough configuration that I’ll be hanging it in.
I made a couple of changes to the prints I was using between the Canva planning stage and the floor planning stage (hah!), so I just adjusted as I went.
Here’s what I landed on the day I was hanging the gallery wall. You can see it’s really similar to the Canva plan, but just slightly tweaked. I had the inspiration image pulled up on my computer as I was laying this out, and I used it to guide me.
hang it up!
Once you’ve planned everything out and you know the general configuration you want, it’s time to hang it up!
If you’re doing a more formal gallery wall or something in a grid, it’s going to be very important to measure, use a level, and make sure everything is spaced properly. If you’re doing something a little more freeform, like I was, you can ditch the tape measure and just eyeball it!
I know that probably scares some of you. It’s okay to be scared. Try it anyways! Or, if you feel better measuring things out, go for it – just know that it’s also perfectly fine to wing it a little.
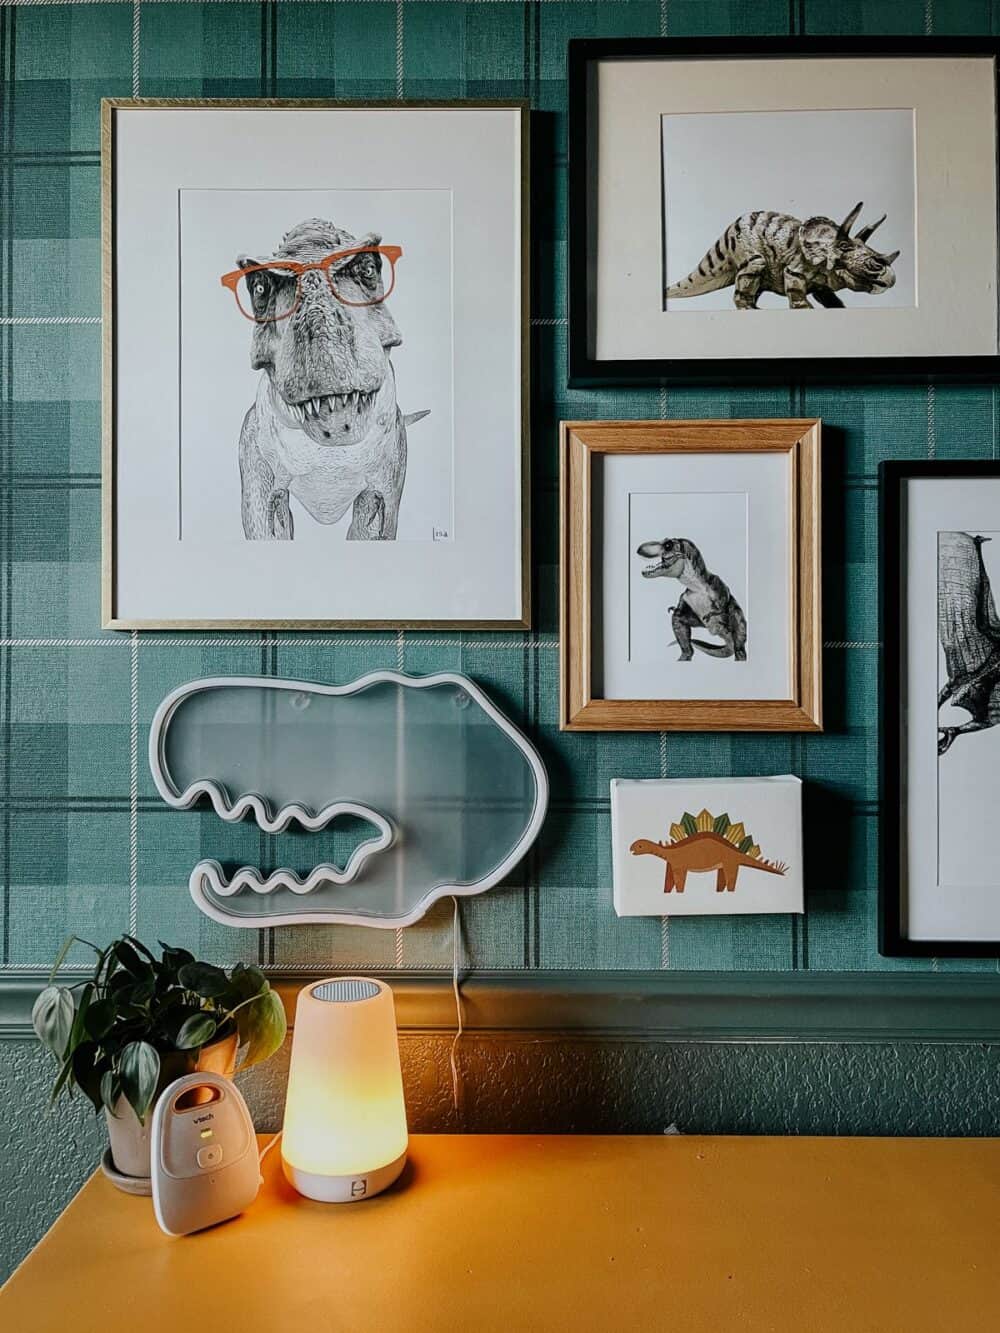
When it comes to hanging things, I really love these picture hangers, called Monkey Hooks, the most. They don’t require any tools (not even a hammer), and they can hold up to 35 pounds. Seriously. They’re maaaagic.
But they don’t work for everything. So, I like to keep a pack of picture hangers on hand so that I’ve always got what I need. On this gallery wall, I used a mix of the Monkey Hooks, regular picture hangers, and plain ol’ screws.
If you want some tips on hanging, I wrote a blog post about how to hang anything, and that’s a great place to start if you’re feeling overwhelmed by the actual process of hanging your art!
And that, my friends, is all there is to it!
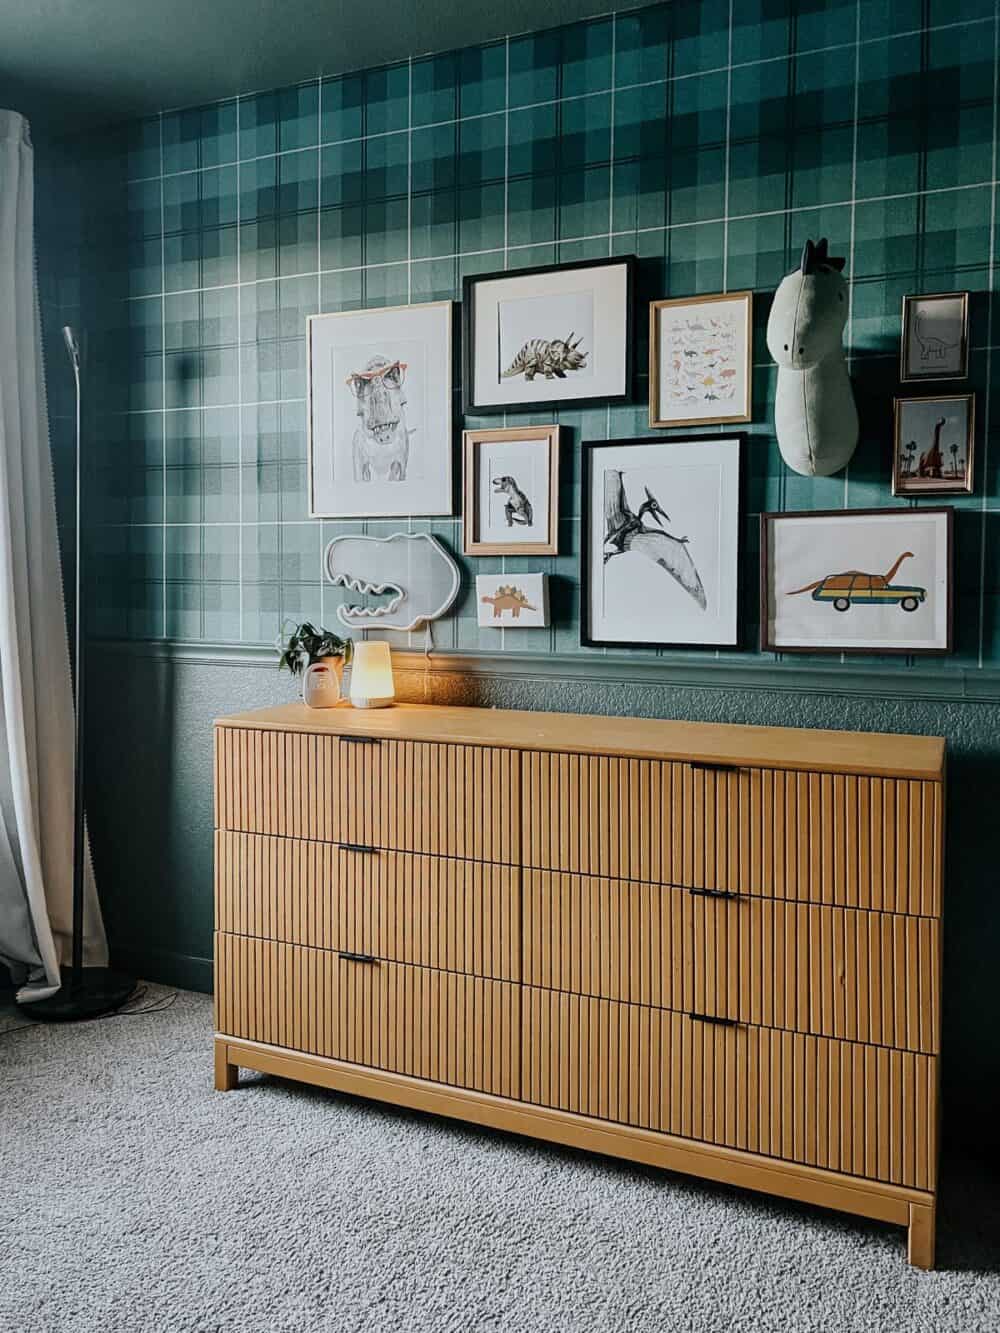
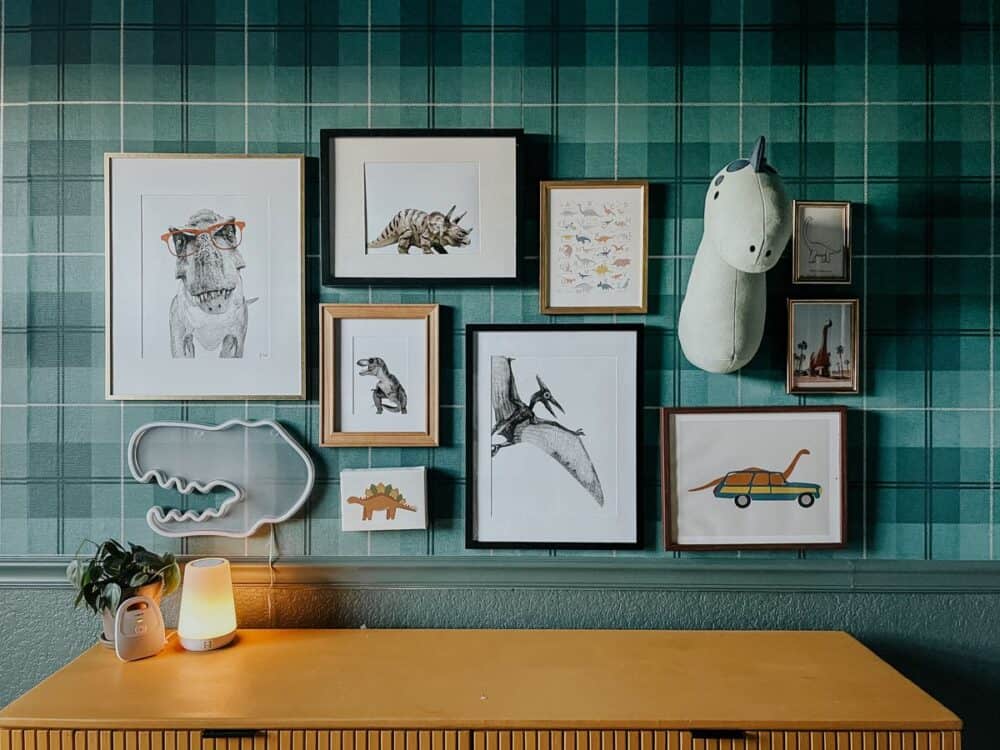
This gallery wall feels so good in this room and I’m just head over heels in love with it. It takes a really grown-up and sophisticated room and makes it feel a lot more playful. That balance is exactly what I was going for in here, and I’m really thrilled with how it’s turning out.
I’ve only got a few projects left before I can call Grant’s room complete!
gallery wall sources
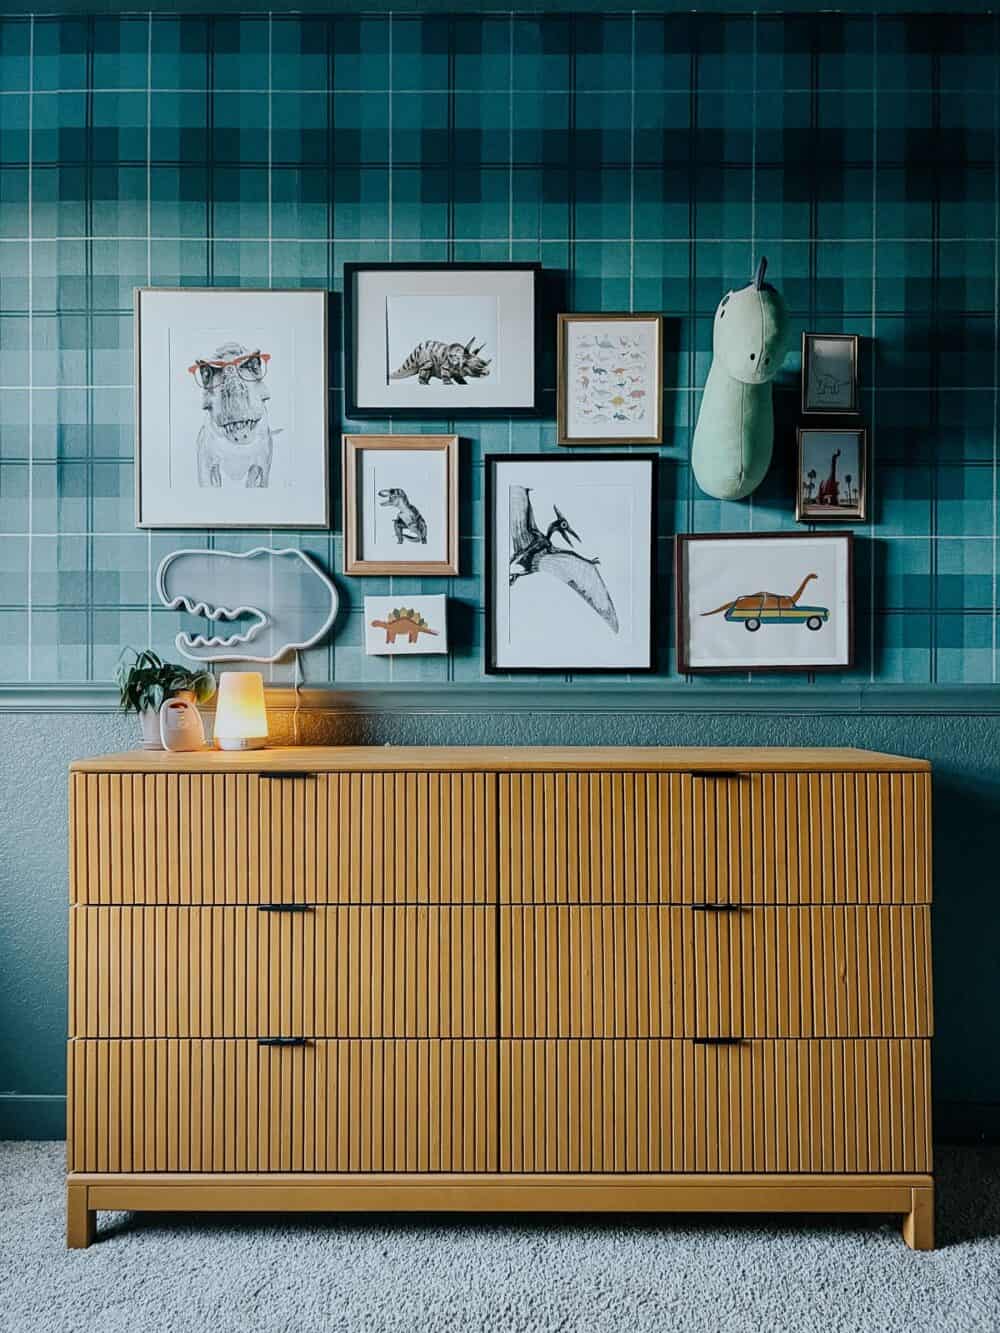
- T-Rex with Glasses
- Triceratops on white background
- Dinosaur alphabet
- Stuffed dinosaur head
- Cabazon dinosaur
- Brachiosaurus print
- Driving Apatosaurus
- Pterodactyl on white background
- T-Rex on white background
- Stegosaurus canvas
- T-Rex neon light
- Click here to learn more about Grant’s yellow dresser
- Wallpaper
- Paint color: Current Mood by Clare
Hi! Would you be able to give the sizes of each frame you used? I’m totally obsessed with the layout and would like to create something similar and it would be so helpful if your sizes were listed!
Hi! I need to go back in and edit the post to add that info! Thanks for that reminder! 🙂