
Our DIY Electric Fireplace {Part 1: The Hearth}
Last updated on February 7th, 2021 at 02:06 pm
We’re currently building a massive DIY electric fireplace in our living room – here’s part one of the build, all about the DIY hearth with drawers.
The fireplace project is officially underway and I couldn’t possibly be more excited about how it’s coming along so far.
Corey and I have been dreaming about and planning for this project since the day we moved into this house 14 months ago, so it feels really surreal to finally be doing it. It’s like we’re adding something that was always meant to be here and it just feels right – and honestly, that’s the best kind of project to take on!
So far, we’ve built the hearth (which was a beast all by itself!) and framed out the entire wall for the fireplace – it goes all the way to the (18-foot) ceiling!
There’s still a long way to go, but I’m going to break this tutorial up into a couple of parts because it would be a monster of a post if I did it all at once – and, frankly, by the time we finish this thing I may not remember how it started.
So, let’s start with the hearth, shall we?
** UPDATE: Here’s a list of all of the posts in this series about the fireplace!
DIY Fireplace hearth with drawers
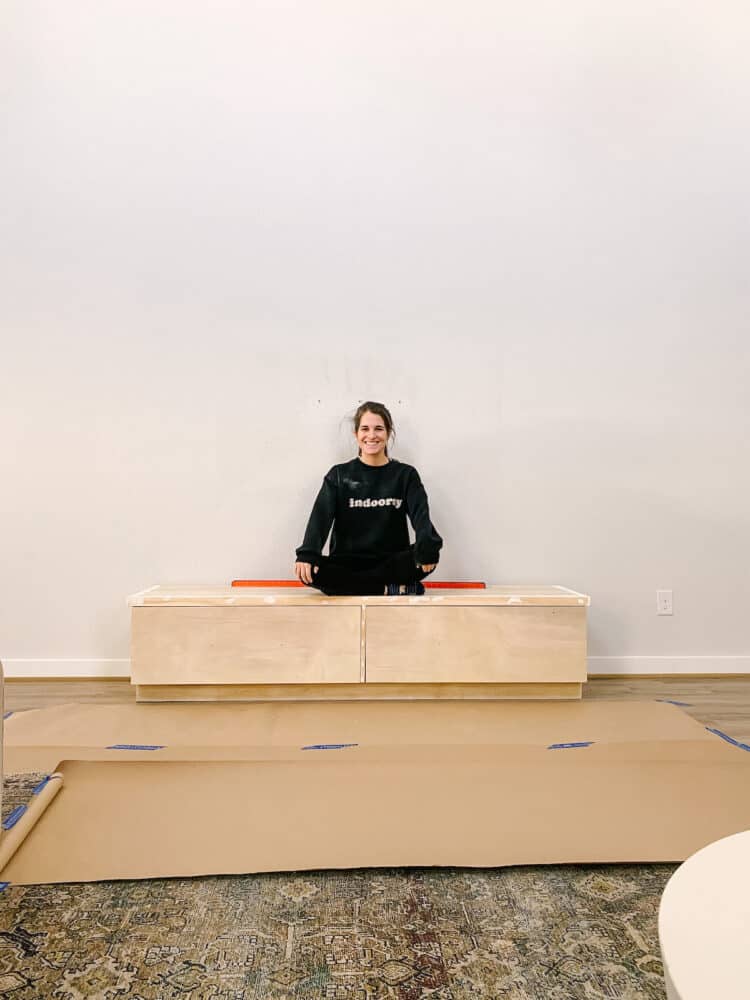
One of the features I knew I had to have the moment we started planning this was an actual raised hearth. I have always loved fireplaces that have a little place to sit – they feel so special and intentional, and we’ve never had a home with a raised hearth before.
We decided that if we were going to be building a raised hearth, we might as well add some drawers to the bottom for storage. We needed a place to tuck some video games, and our kids are constantly bringing toys downstairs, so having drawers here is a great way to keep the clutter to a minimum and also keep me from losing my mind from always trying to bring toys back upstairs.
I’d much rather just toss them in a drawer!
Here’s a basic overview of how we built this.
TOOLS AND MATERIALS NEEDED:
Materials
- Two sheets of 3/4″ plywood
- 1 sheet of 1/4″ plywood
- (2) 1×2 pieces of pine
- Four drawer slides (I used these)
- Wood filler
- Edge banding
- Paint
Tools:
- Table saw (optional, but certainly helpful)
- Circular saw
- Straight edge or level (for making straight cuts!)
- Corner clamps
- Speed square
- Jigsaw
- Kreg Jig
- Drill + Driver
- Nail gun (we used this 16-gauge gun)
First, a note: You can watch this part of the project unfold on my Instagram stories right here! It’s great if you’re a more visual learner, and can give you an overview of what’s happening before you dig into the details here.
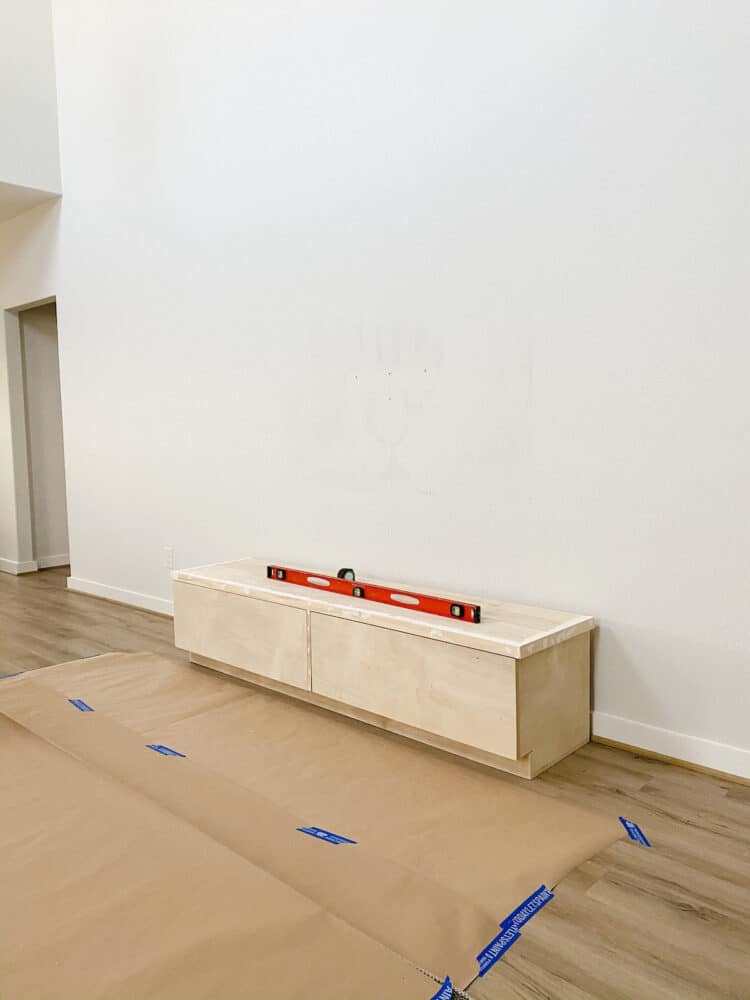
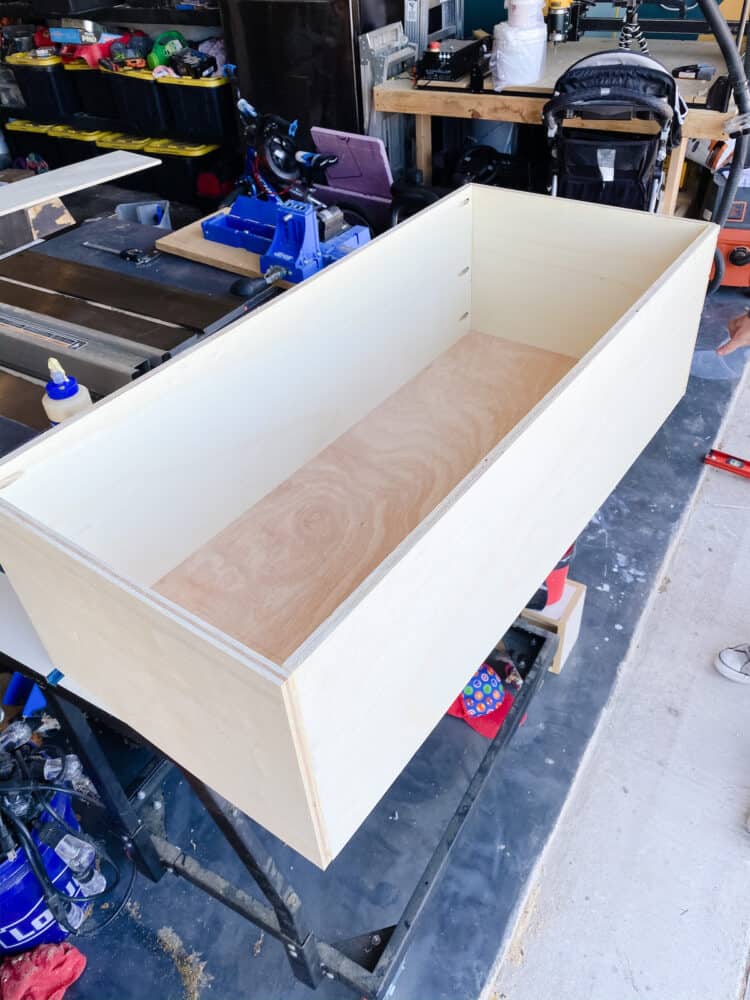
Our first step was to cut out the pieces for the base of the hearth. Our hearth is 77″ long, 18″ deep, and 16″ tall. You’ll need to adjust your cuts accordingly if you’re building a different size!
The initial cuts we needed for the base of the hearth were (these are all 3/4″ plywood):
- Two pieces cut to 18×77 (for the top)
- Three pieces cut to 18×16 (for the side supports)
- One piece cut to 15×77 (for the bottom)
- Two piece cut to 3×77 (for the toe kick)
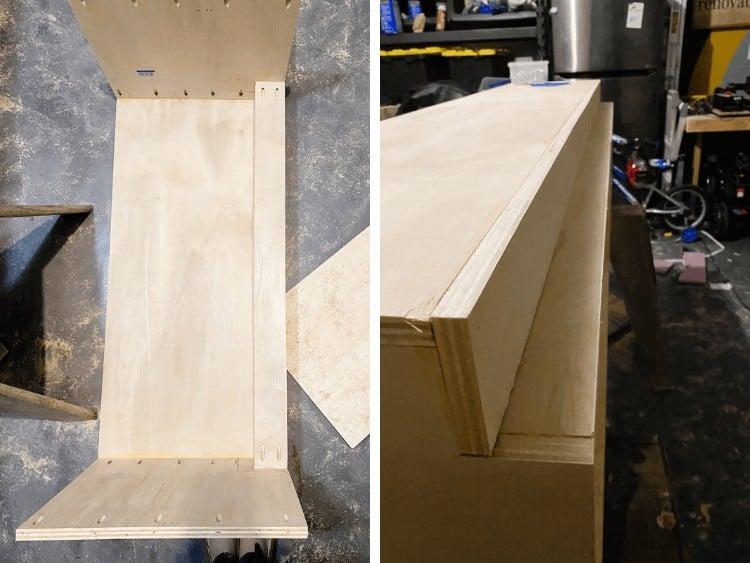
One the pieces were cut, I started by taking the three side pieces and adding a 3″x3″ notch in the bottom corner of them. This was to create a toe kick for the bottom.
To make the cut, I simply clamped a level to my board and used it as a guide for my jigsaw to help me create a straight cut. Once I had the notches cut out of all three pieces, I drilled pocket holes in the top and bottom of each piece to help me assemble the hearth.
First, attach them to the bottom piece. You’ll attach one on each side, and one perfectly centered in the middle.
Once you’re done with this step, it should look something like this:

Now, you’ll want to add some supports for the toe kick.
Take one of your 3×77″ pieces and cut them so that one fits on each side of the middle support. These will be attached in-between the side supports using pocket holes, so just measure your gap and cut them to size, then attach. Once they’re attached, you can attach the longer piece using wood glue and nails.
Here’s a look at the details of this part:
At this point, things are starting to come together and feel a little like an actual piece of furniture!
Now you’re ready to build the top.
You’ll start by taking your two pieces top pieces and gluing them together. Liberally apply wood glue to one side of a top piece, then gently lay the second one on top and line them up perfectly. Clamp them together and allow it to dry.
Once they’re fully dry, grab the hearth and flip it upside down and lay it on the this top piece (make sure the side that you want on the top of the hearth is facing the ground!). Use your pocket holes to attach it to the hearth.
Now, you’ve got a base!
Cut your 1×2 pieces of wood down to size and attach them all around the front and sides of the top of the hearth using wood glue and nails. This hides the raw plywood edges and provides a little bit of an overhang!
Building drawers
Next up, it’s time to build drawers. I won’t pretend I’m any sort of expert on this at all but I’ve done it with mild success a couple of times now so I’ll give you my pointers!
You’ll start by figuring out all of your measurements. I used 3/4″ plywood to build my drawers.
- Start by determining how tall you want them to be. This is simply determined by your piece and the drawer front you plan to use. I made mine about 2″ shorter than the drawer fronts (so, approximately 2″ shorter than the opening they were going in). All four of your drawer pieces will need to be cut to this height.
- The next measurement will be determined by the depth of the drawer slides you choose (which should be about 1″ shorter than the depth of the piece you’re installing them in). For me, that was 16″. You’ll need two pieces that are that length.
- And finally, you’ll need the width of the drawer – check the instructions that come with you drawer slides to see how to measure this for your particular slides. For mine, I needed the drawer to be 1″ narrower than the opening was. You’ll need two pieces at that length.
Once you have the four sides cut out for your drawer, you’ll want to drill pocket holes in each of the short sides of the drawer pieces.
Finally, you’ll need a bottom. We chose to use our table saw to cut a thin channel about 1/2″ from the bottom of the board so we could inset the drawer bottom. We cut the channel wide enough to accommodate 1/4″ plywood, and simply slid it into place as we were assembling the drawers. If you do this, you’ll need to cut the bottom piece slightly larger than the interior dimensions of the drawers, so there’s room for the plywood to sit in the channel.
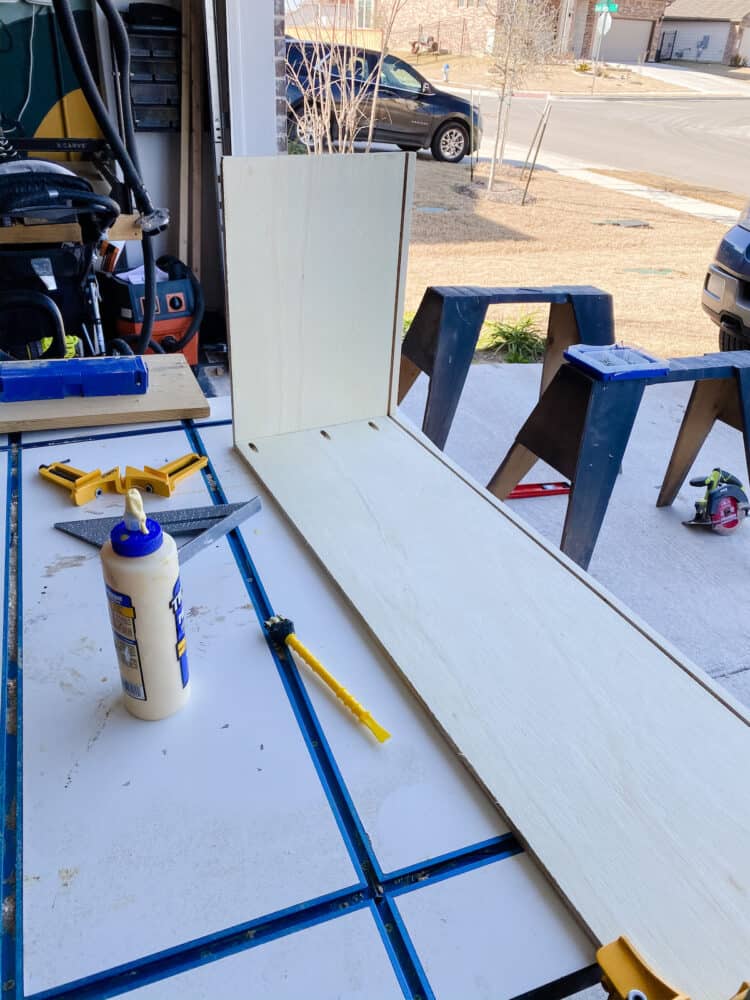
You can just cut it to the same size as the bottom of the drawer and glue/nail it into place on the bottom. This won’t be quite as sturdy in the long run, but may not be an issue if you only ever plan to store light things in your drawers.
Now that all of your pieces are prepped, you can assemble! I recommend using corner clamps (and double checking with your square as your assemble), and drill the four pieces together to form a rectangle, sliding the bottom into place before you attach the last one.
Now, attach your drawer slides. This is a process that requires a lot of patience, so just read the directions and take your time! Each drawer slide will have slightly different directions so I won’t get into too many details here – just be sure to measure multiple times, and you can use a drawer slide jig to help you out, too!
drawer fronts
Now, the final piece – this took me forever, but I made all of the mistakes so you don’t have to!
I used 3/4″ plywood for the drawer fronts. I placed a small spacer piece in-between them on the base of the hearth to make measuring a little easier. Measure your opening (mine are flush with the bottom and outer edge of the hearth) and cut the drawer fronts to match, minus about 1/8″ both length and height-wise.
Lay the entire hearth on its back (with the drawers facing up), and position the drawer front on top, using a small paint stir stick or popsicle stick to help evenly space them about 1/8″ from the middle support piece and the top of the drawer front.
Once you’ve got them positioned, drill two screws into them from the front. You can plan to drill the holes where your hardware will be going, or you can just plan to patch them later.
Now that they’re in place, you can pull the drawer out and add screws from the back to hold them in place more permanently.

I also added edge banding on all of the visible plywood edges, and then I patched and visible seams or nail holes using this wood filler.
Then, sand and paint!
As of now, mine hasn’t been painted yet. It was waiting for the framing to get done, so my paint job doesn’t get ruined. Want a sneak peek?!
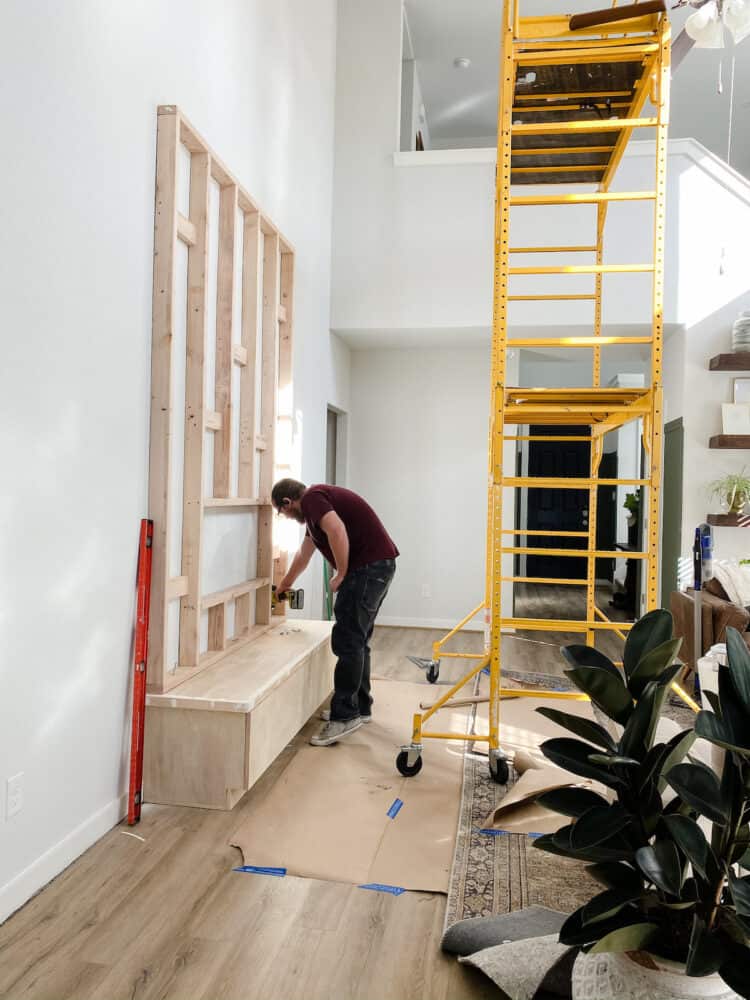
OH MAN!
It’s coming together, friends.
Next week I’ll share another little update, and I’m hoping by the end of the month the fireplace will be ready for its big debut. Stay tuned!