
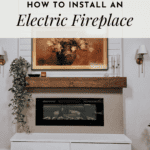
Our DIY Electric Fireplace
Last updated on January 22nd, 2024 at 05:01 pm
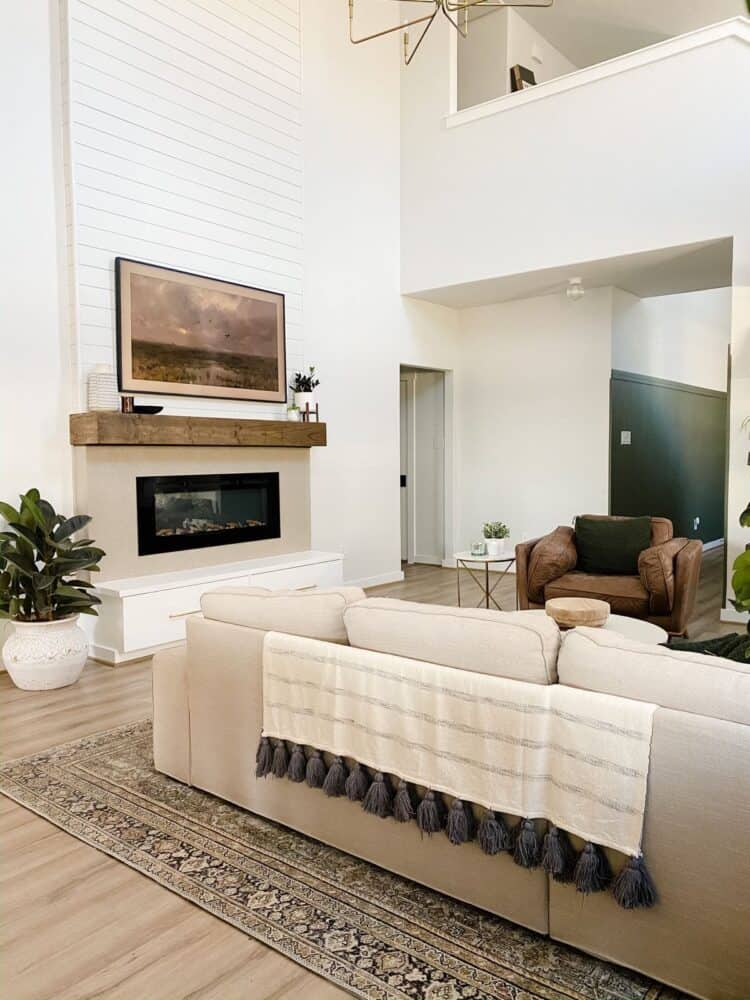
When we moved into our current home, one of the first things we put on our project list was adding a fireplace to the living room. We’ve never lived in a home without a fireplace, and even though we live in Texas it’s one of our favorite things to have. We wanted to keep it relatively budget-friendly and I really wanted to do it myself. So, we decided to go with a DIY electric fireplace and, three years later I can confidently say it was the right choice!
Today I’m recapping that project and taking you through how I created and installed our gorgeous, show-stopping DIY electric fireplace. To date it’s easily my favorite thing we’ve added to our house and I genuinely can’t even imagine our living room without it anymore!
This project is a big one, but it honestly isn’t a terribly complicated one. I’d still consider myself an amateur at best when it comes to more complex DIY projects, and this one was more or less a breeze for me. If I can do it, you can too!
How to Install a DIY Electric Fireplace
Before I dive in, I want to acknowledge that the step-by-step tutorial below is going to teach your how to build our fireplace. There really isn’t one right way to add a DIY electric fireplace, because it’s all so dependent on the design! So, feel free to take the below instructions and tweak them to meet your specific needs.
What is an Electric Fireplace?
Let’s start here. You might be wondering what an electric fireplace exactly is! Essentially, electric inserts are kind of like a large space heater that looks like a fireplace! There are no real flames, and the heat comes from some vents near the top of the insert. It can look pretty realistic, though, and it brings all of the warmth and coziness of an actual fireplace into your home!
Tools + Materials Needed
Some items on this list (like shiplap and Roman Clay) are design-specific! Be sure to read the entire tutorial to determine exactly what you’ll need.
Step One: Build Fireplace Hearth
Let’s start by talking about our hearth. We have 18-foot ceilings that we really wanted to take advantage of, and I wanted to add a bit of extra storage and seating. So, we built a large DIY raised hearth with added storage. This was probably the longest, most challenge part of the entire project! It was absolutely worth the effort in the end for so many reasons, but your process will be much faster without it.
I’m not going to go into all of the details of this build because it’s a super specific piece of the design, and not everyone will want to add one! But, if you do, the post I linked above has a ton of details on how we built it.
Step Two: Frame Out Fireplace Wall
Now, it’s time to build the wall that your fireplace will sit inside! We wanted our entire fireplace to sit a bit away from the regular wall to add a little bit of dimension. It’s hard to tell in the photos, but the bottom section of the fireplace (where the electric fireplace actually sits) is about 2″ deeper than the top part. This was technically an accident – we were supposed to build the entire frame with 2×6’s, but we used 2×4’s instead. So, once it was time to add the fireplace insert we had to build the bottom part out a bit. But, it really was a happy accident because I like this look even better!
But, I digress. In this part of the process, you’ll basically be framing out a wall. With our tall ceilings, I had to build two 8-foot-tall sections of framing, plus a tiny bit more at the top. You may need less (probably not more!) depending on how your ceiling height.
The part where your fireplace insert will sit is really the most important part of the framing. The instructions that come with your fireplace should have very detailed directions of what the framing should look like, so be sure to follow that! But, here’s a peek at how our framing looked:
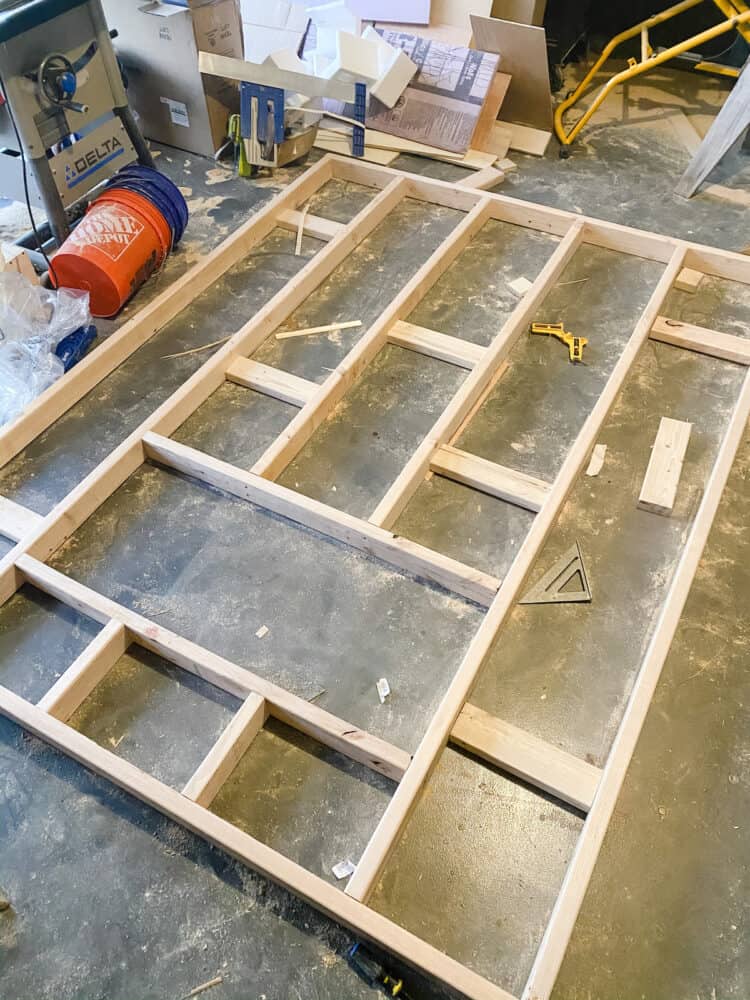
A few note about this to keep in mind:
- The smaller bracing pieces that you see that are sitting flat against the ground are there to help attach it to the wall! We drilled through those directly into studs to make it nice and sturdy. Use a stud finder to be sure you hit them!
- Double-check the depth you need based on your specific insert. As I mentioned above, I should have used 2×6’s here, and ended up having to build it out a bit in order to have room.
- I used corner clamps to help make this perfectly square, and I highly recommend them for anyone!
- Now is the time you really want to take into account where your electric fireplace insert will plug in. We have an electrical outlet behind our hearth, and our fireplace cord simply snakes down through the framing to plug in. If you don’t have an plug where you’d like your fireplace to go, you may need to have an electrician come add one for you.
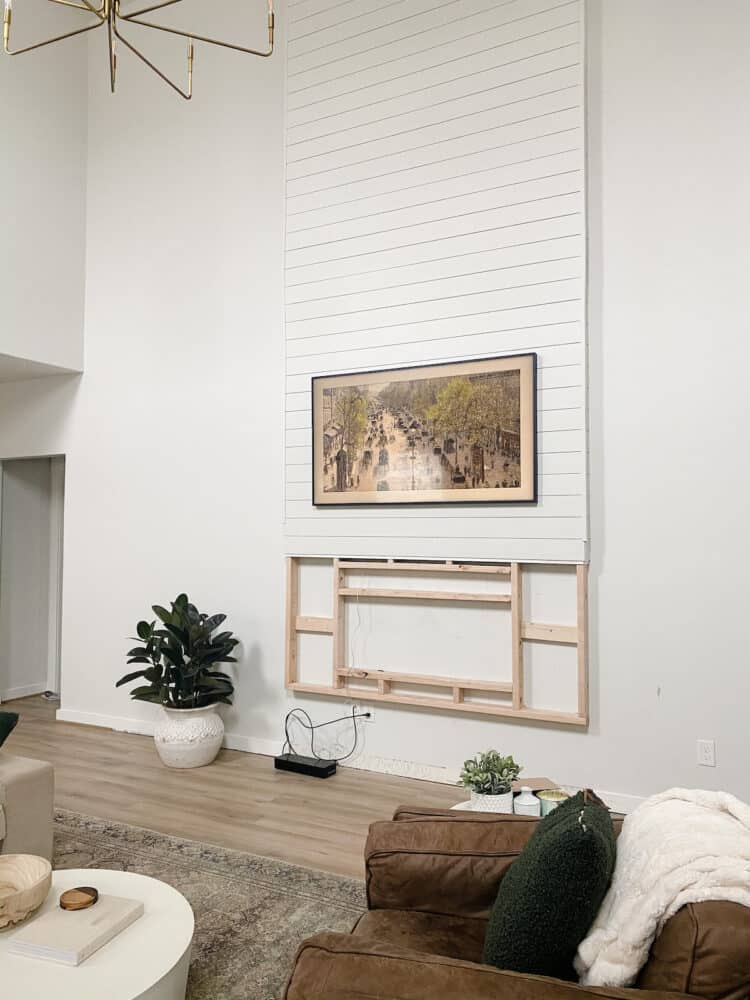
Step Three: Add Shiplap
After framing out your fireplace, it’s time to start thinking about the shiplap and/or drywall! For us, we were adding shiplap above the fireplace mantel and drywall below it. We were able to use a brad nailer to attach the shiplap directly to the framing and save a step there. If you don’t want to use shiplap, you’ll need to do drywall all the way up. I have a full tutorial for installing shiplap right here if you need some help with that step!
For reference, here’s what our fireplace looked like once we had added the shiplap but before I added drywall.
Step Four: Install Your Electric Fireplace Insert
Where exactly this step goes will depend largely on how you plan to plug your fireplace in! For us, the cord was going to be hidden under the hearth and behind all of the drywall. So, we had to install our fireplace prior to covering up our framing. It might be different for you if your plug is in a different spot, so be sure to take that into consideration.
As far as installing the insert, I’m going to (once again) encourage you to check the directions that come with your specific fireplace! Every one will be slightly different, but if you’ve followed the directions so far, it should be a breeze.
For our fireplace, we just slipped it right into the opening we had built and drilled it into place. We left the rocks and faux logs out of it for now and waited to add the glass cover until everything else was complete.
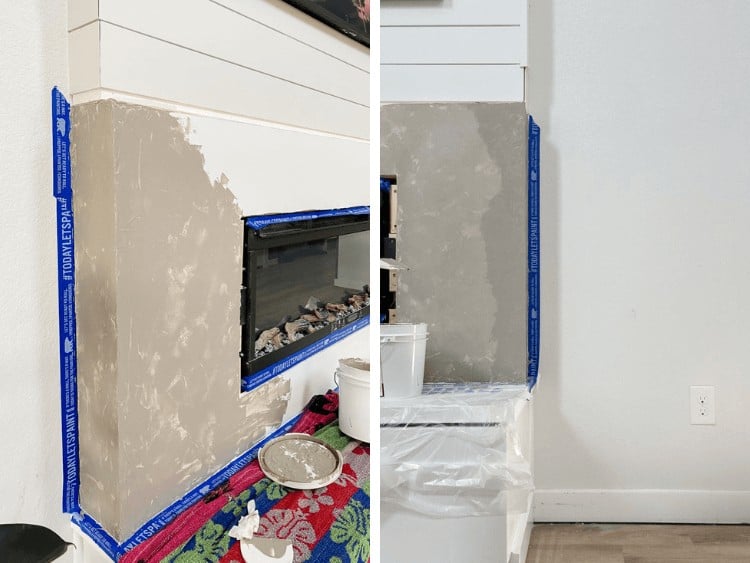
Step Five: Install Drywall
To install the drywall, you’ll simply use a utility knife to cut out a hole for the fireplace insert to fit in (again, the directions for your specific fireplace should give you dimensions for this!). Then, screw the drywall into your framing using drywall screws.
You’ll use drywall tape and joint compound to cover up all of the seams. This part of the process is tedious, but not too stressful if you’re adding Roman Clay, because it doesn’t need to be perfect! Here’s how it works:
- Apply drywall tape to the joint, then use a drywall knife to apply a layer of joint compound over it.
- Apply joint compound over all of the screws as well.
- Allow it to dry (usually for 24 hours), then sand an apply a second coat.
- Typicall you need to repeat this process a couple of times. Drywall mud can take forever to dry and it’s just a slooooow process. Check the directions for the specific brand you’re using!
- Once you’ve applied and sanded your final coat, you’re ready to move on!
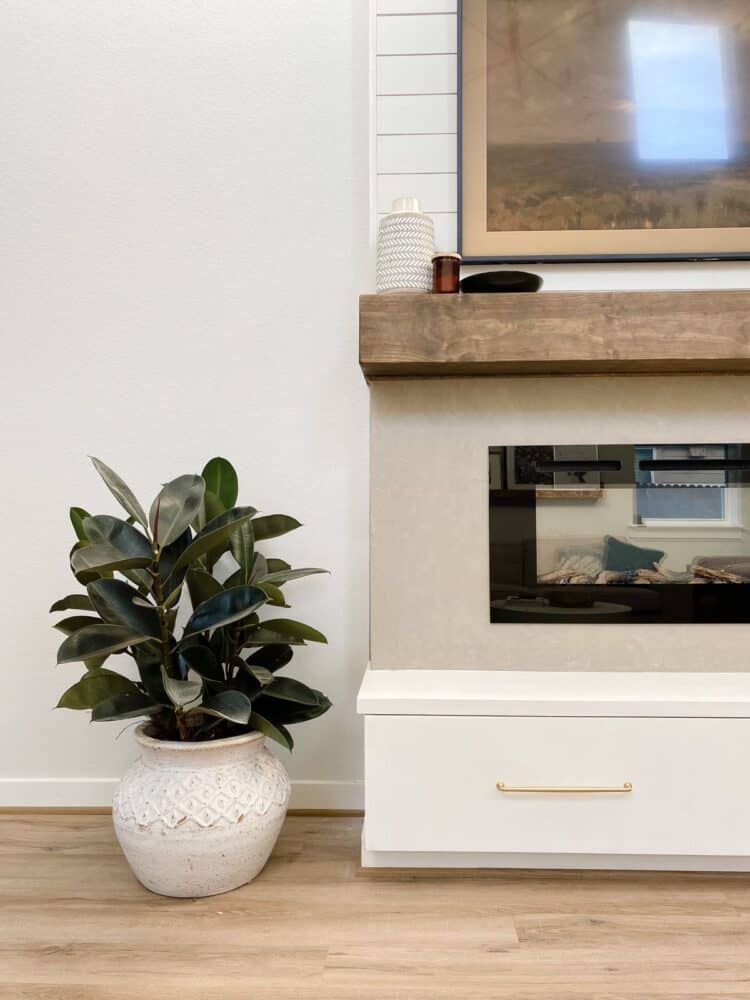
Step Six: Apply Roman Clay
Once the drywall is complete, you’ll want to prime it before you do anything else. Even if you aren’t painting it, adding primer is key! Drywall tends to really soak up materials, so getting a good base layer on there is incredibly helpful.
Once the primer has dried, the fun can start. I used Portola’s Roman Clay in Charleston.
You can watch it all come together right here in this quick Instagram video, if you’re a visual person. It was honestly really simple to use! After priming the drywall, I just used a plastic putty knife to apply it in a random pattern. A small amount goes a long way – I ordered 2 kilos and have a ton left over. You want it to have some movement and even a few raised portions, so don’t stress too much here. Slight imperfections are actually the key to making this finish look awesome.
You have to let each coat dry overnight, then you’re ready for the top coat. This isn’t a required step, but since I have kids and we fully plan to use the raised hearth as a seat, it was an important step for us. Three years later, I’m really glad I added the top coat. It’s still in absolute pristine condition with zero chips!
The Roman Clay has the most beautiful finish. It’s similar to concrete, but has a more traditional and warmer feel to it. It’s velvety soft, has really subtle movement and texture, and is the perfect finish for our fireplace.
Step Seven: Add a Mantel
And finally, it’s time to wrap this whoooole thing up with the most important part: a mantel! I mean, where else are you going to hang the stockings come Christmas?!
We used the exact same process that we used for the DIY mantel at our old house, with one small twist. We wanted the mantel to feel like it wrapped around the entire fireplace, so it could cover the transition between the shiplap and the Roman Clay. So, when we built it we cut the side pieces so they’d extend all the way to the wall.
The finished result is gorgeous, and I’m so glad we decided to wrap it. The one issue we ran into was that since we cut the side pieces at a 45-degree angle (so the mantel seams were all mitered), it was also mitered on the part where it meets the shiplap.
We simply cut a small piece later to piece into that 45-degree cut. We glued it in place, then filled it with wood filler and stained to match. I’ll give a closer look at this on my Instagram stories (I have two fireplace highlights in my profile!), if that description is too confusing for you!
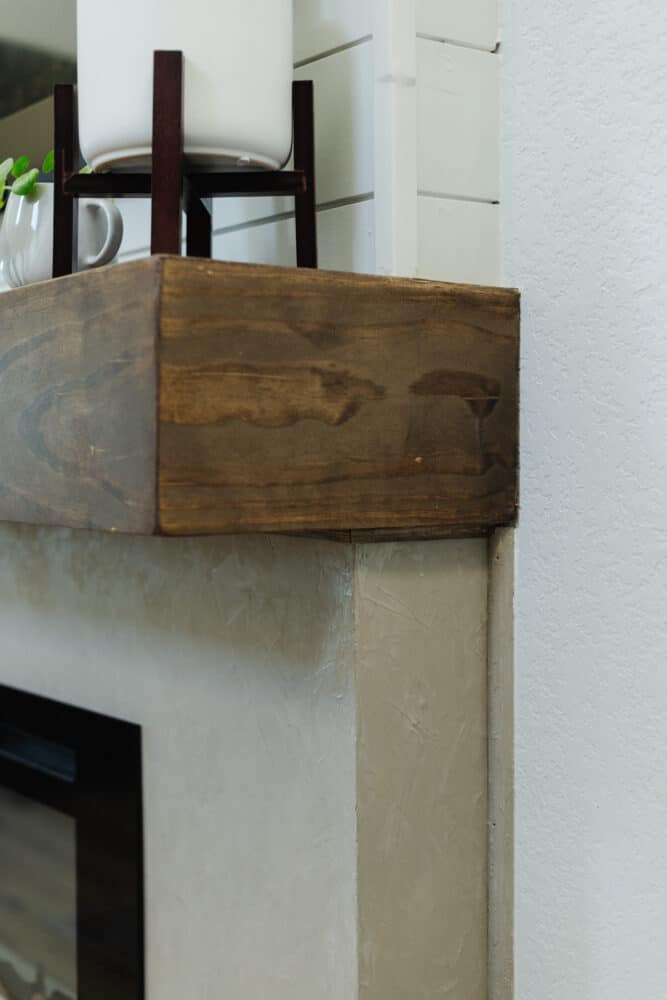
I stained the mantel with Varathane’s Dark Walnut (my go-to for a nice, deep brown) and it pairs perfectly with the Roman Clay. I loved the matte, slightly rustic finish on the wood, so instead of sealing with a polyurethane, I decided to just go with a finishing wax. It was much faster (only takes about 10 minutes to dry), and left the finish looking exactly how I wanted it to.
We hung the mantel by drilling a 2×4 board into the framed wall 3/4″ lower than we wanted the top of the mantel to be. Then, we slipped the mantel into place over it and drilled through the top of the mantel into the 2×4. You can’t see the screws at all (since the mantel sits above eye level), and it feels nice and secure – especially since the bottom part rests on the fireplace framing, which sticks out about an inch from the rest of the wall.
Step Eight: The Finishing Touches
Of course, no giant project like this is complete without a few (annoying to complete) finishing touches.
Here’s a quick rundown of the little details I added that went a long way towards making this look like it’s always been here:
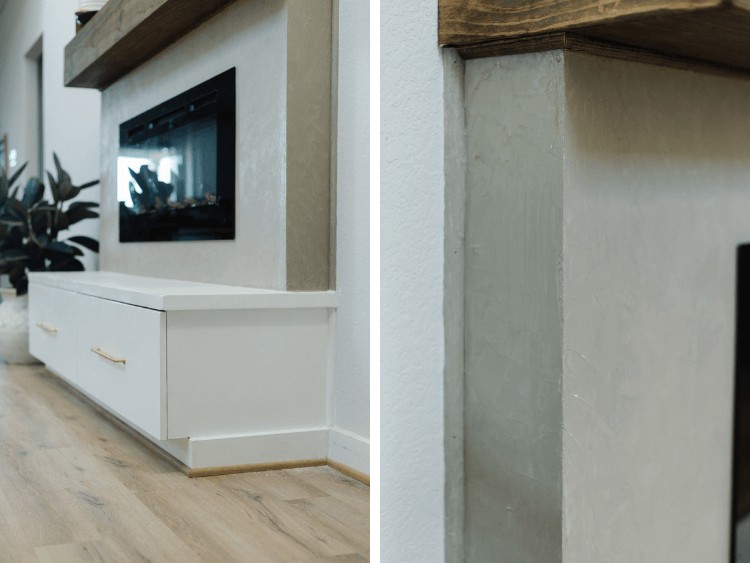
- I re-used the baseboard and shoe molding that was originally here (plus a little extra) to wrap around the base of the hearth. Paired with painting the hearth the same paint color and sheen as all the trim work in our house, it really looks like it was meant to be here!
- I used some quarter-round molding (painted with the Roman Clay) where the drywall meets the existing wall on the bottom portion of the fireplace. This is largely because our drywall work isn’t perfect and we wanted it to look seamless. Installing that little piece of trim covered up any gaps and made it feel really finished.
- I also used a small piece of wood trim under the mantel to cover up imperfect drywall edges there too. This is stained the same color as the mantel itself, and really blends right in to create a very polished look.
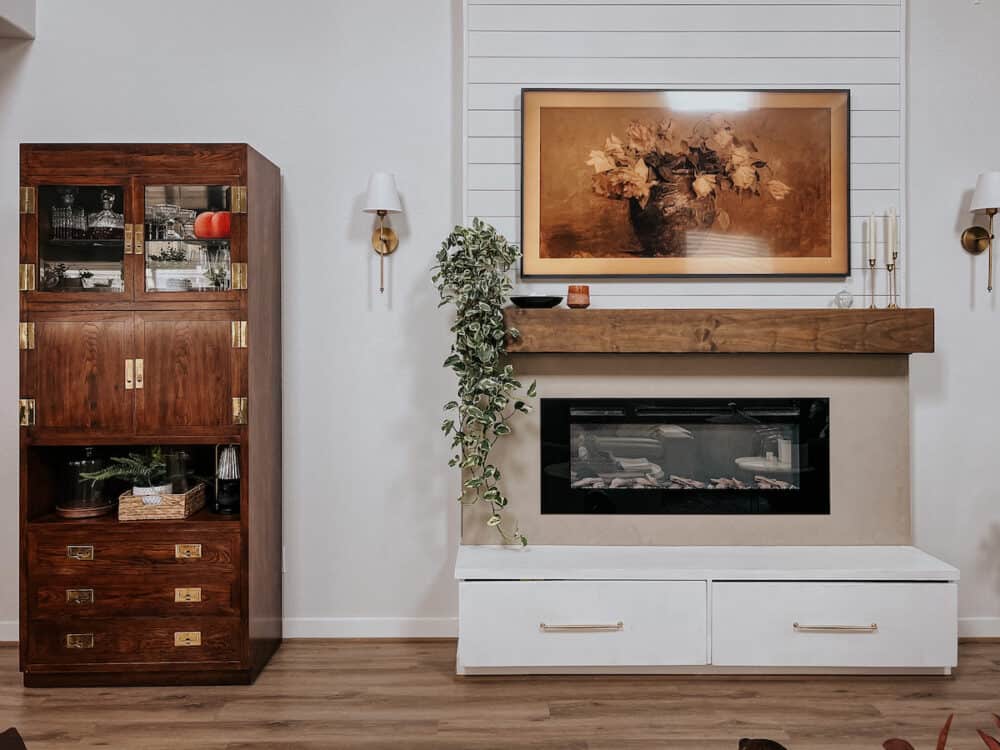
And that, my friends, is how we took our living room from this:
To this.
I’ll wrap it up with the questions I know you’re asking: how much did it cost, and where can I get everything.
How Much Did it Cost?
Including the cost of renting the scaffolding, the entire fireplace project cost right around $1,500. It certainly wasn’t cheap, but it was far more affordable than hiring it out!
Here’s a (general) breakdown of the costs:
- Hearth supplies: $150
- Electric fireplace: $400
- 2x4s (for framing) and shiplap: $350
- Scaffolding rental: $200
- Mantel: $100
- Roman Clay: $100
- Trim and other random supplies (paint, screws, nails, etc): $200
Fireplace Sources
- Electric fireplace
- Shiplap
- Roman Clay
- Drawer pulls
- Mantel stain
- Samsung Frame TV
- Paint: Sherwin-Williams First Star
Need any other sources or have questions? Drop them in the comments below and I’ll do my best to help!
Looks so good!
The base cabinetry, is it custom? An IKEA hack?
I built it! You can see all of the details here: https://www.loveandrenovations.com/diy-raised-hearth/
Gorgeous- How is the Roman clay holding up? Does it chip,dent or otherwise get marked up- similar to drywall? Does it look closer to a concrete finish or a faux painting technique? Thanks
It’s held up great! Looks exactly the same as the day I finished – no issues at all. It looks closer to a concrete finish than paint.
It’s beautiful, I’m so impressed with this project! Wowsa!!!
Curious why you decided to go with an electric fireplace versus gas? Thanks.
Because installing a gas fireplace on our own is basically impossible!
Congratulations, Amanda! You did an amazing job! I was following faithfully on IG and I am still surprised that it looks sooooo good! Definitly suits your living room and filled your huge blank wall beautifuly. Great job!
Thank you SO MUCH, Ana! You’re always such a great cheerleader and your encouragement means the world to me!