
Easy DIY Wire Trellis for Trumpet Vines
I love trumpet vine plants, and I wanted an easy way to help them grow on the side of our house. So, I put together this super easy DIY wire trellis and today I’m showing you how I did it!
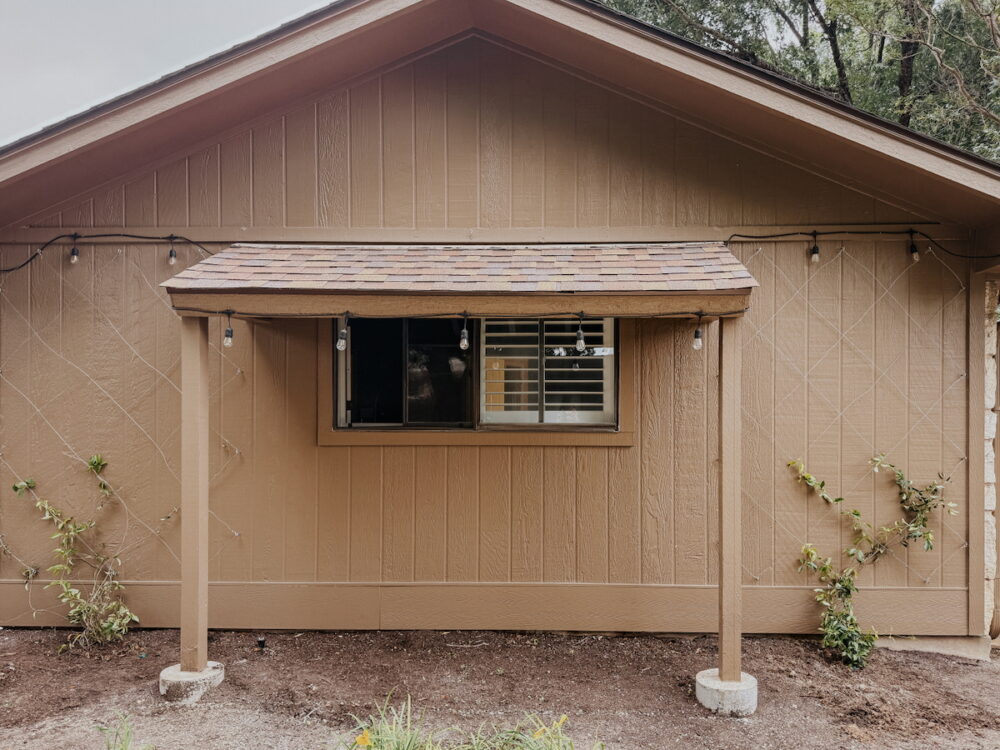
One of my very favorite things we did to the exterior of our last house was plant some tangerine beauty trumpet vines on the side fence of our house. They filled in so beautifully, and every spring they would absolutely explode with flowers. It brought me an absurd amount of joy and I knew that I wanted to add them somewhere at this house, too.
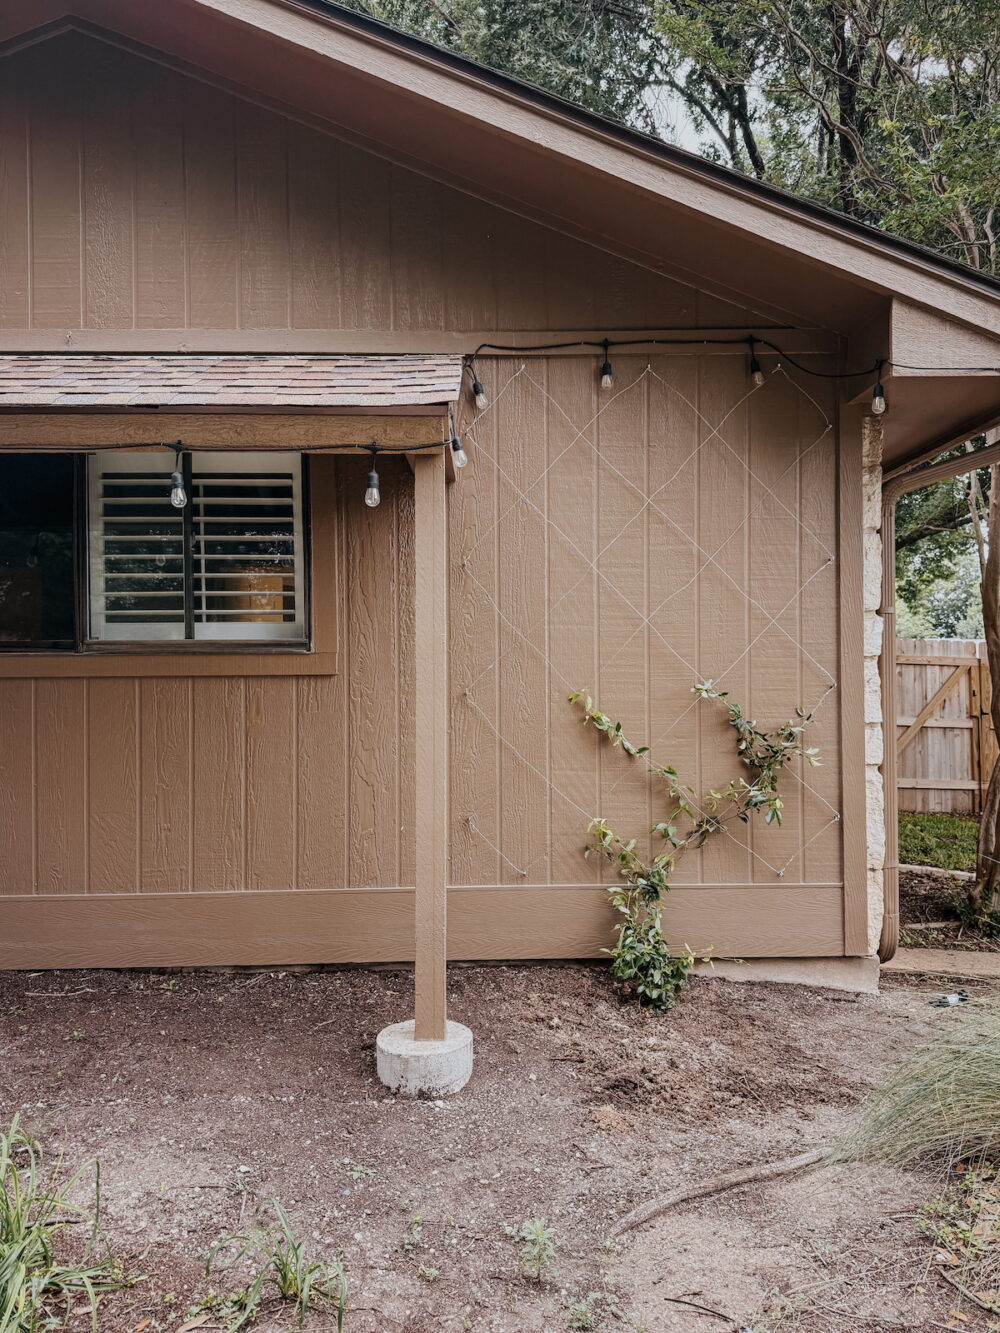
We have the perfect wall outside of our bedroom – it’s got an empty flower bed right in front of it, plenty of room for the vines to grow, and it gets exactly the right amount of sunlight. So, I decided to go for it!
What You Need to Build a DIY Wire Trellis
Note: I was installing my wire trellis on wood siding. If you’re working with brick or stone, you’ll want to have masonry drill bits and probably some masonry anchors as well!
- I used two of these wire trellis kits plus…
- A few extra eye hooks
- Tape measure
- Drill
- Clear silicone caulk
Many people also use these ferrules to close off the ends of the wire. However, Trumpet vines grow extremely thick and will grow to fully cover the wires over time. So, I’m not too worried about how the ends of my wires look because you’ll never see them! So, I skipped these and just wrapped the wire around itself. But, if you want a cleaner look on the ends, I’d grab them!
Do I Need Anchors?
If you want to ensure your wire trellis is extra sturdy, you can grab some anchors instead of just using silicone caulk. I feel fine about how ours is set up without anchors, but anchors will help ensure that none of the eye hooks pull out over time if the vines get extra heavy!
I’ll be sure to update this post over time if I find that skipping the anchors was a mistake.
Step One: Measure and Plan for Your Trellis
This was 100% the most difficult and brain-bending part of installing this wire trellis. A lot of people create cool graphics and charts or do fancy measuring to make sure their trellis is perfect. But, I’ll be honest with you – I don’t have the patience for all that. When it comes to math-related things, I need it to be as easy as possible or I’m going to quit. It’s just who I am.
So, here’s the quick and dirty way to plan out a wire trellis for your wall. No fancy graphic or big math skills required.
Important note: You don’t need to put a hook at each corner of the diamonds. You just need to do the outer edges, and then you’ll make the diamond shape using your wire! This took me an embarrassingly long time to realize.
- Measure how wide and how tall your space is. Mine was 61″ wide and 83″ tall.
- Decide how many diamonds you want to have horizontally. I knew I wanted 3, for no reason other than it’s what I thought would look good. This is where you could play around with photoshopping or drawing out the scale to help you decide, if that’s a skill you have. Alternatively, you can just divide different numbers by your width to see what goes into it evenly-ish!
A tip: I recommend doing your diamonds no less than 20″ wide – any less and things might start to look busy, and it’ll be hard to keep the vines from crossing over and filling in all the gaps.
- If you’re starting with how many diamonds you want (for me, 3), divide your width by that number to see how wide they need to be.
- If you’re starting with how wide you want them to be, divide your width by that to find how many diamonds you need!
Here’s how it played out for me:
- I knew I wanted 3 diamonds. That made it easy because I knew the mid-point of my middle diamond would be right in the middle of my wall.
- So, I noted that the mid-point of my middle diamond would go at 30.5″ on the wall.
- From there, I knew each diamond would be 20″ (yes, there’s 1 extra inch, but I was fine with having a half inch on each side left open).
- So, I needed one hook at 30.5″, and a hook on either side of it, 20″ away.

Then, you need to determine the spacing for the height of each diamond. I wanted 4 diamonds (again, because it divided easily and because it would make my diamonds a square shape, which is exactly what I wanted). So, I kept the diamonds 20″ tall, and placed my other hooks accordingly.
- Remember that the hooks are going at the MID-POINT of the diamonds, not the bottom. So, your first hook needs to be half the height of your diamond. For me, that meant it was 10″ from the top of my trellis.
- From there, each hook was 20″ down. Then, the final one was 10″ from the bottom.
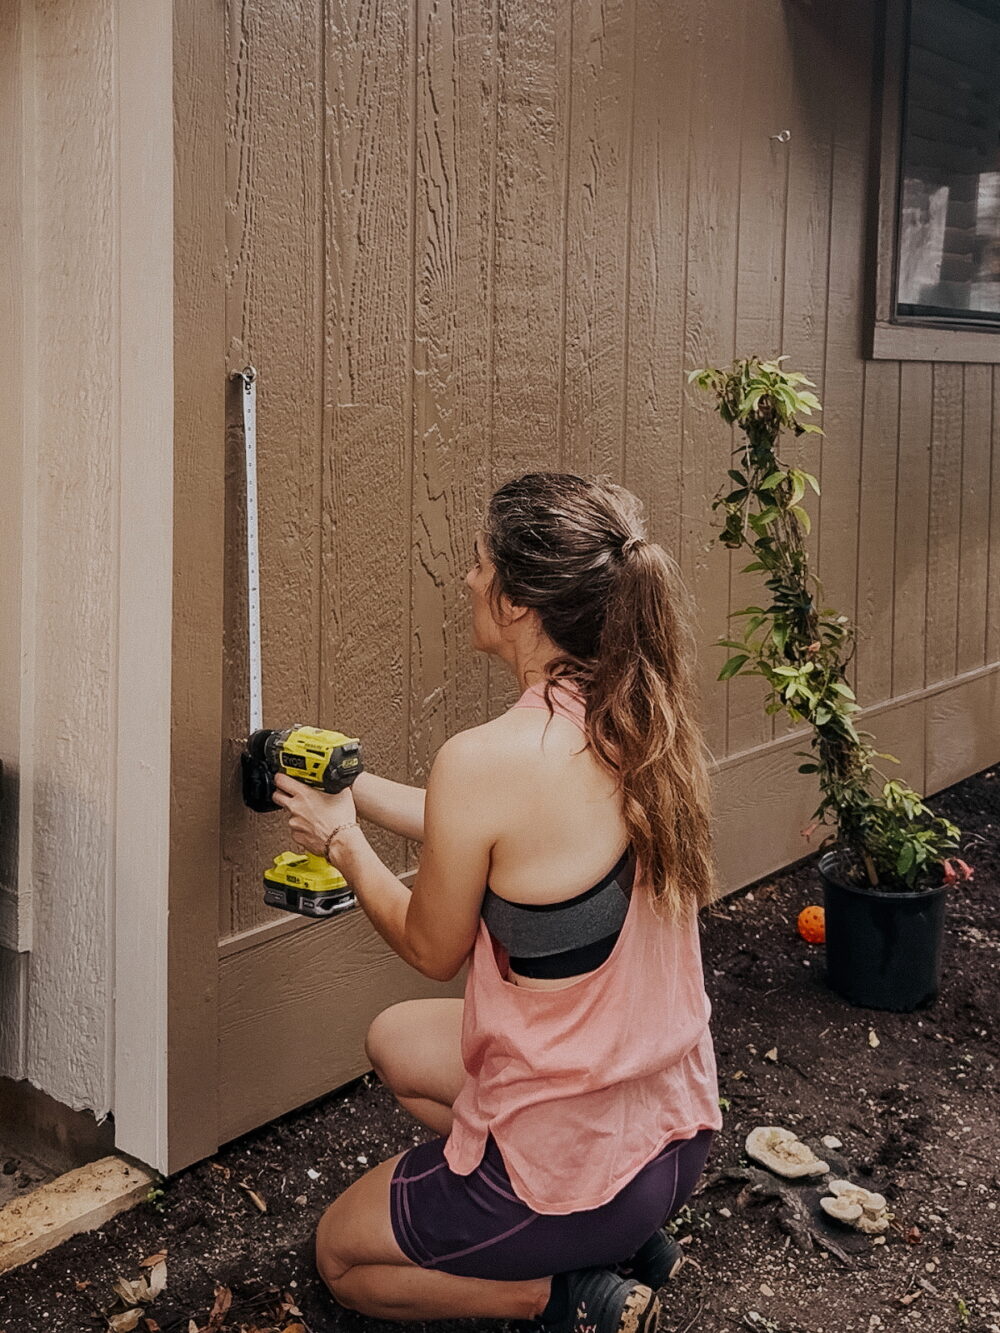
Step Two: Install Eye Hooks
Once you’ve got everything planned out, you’re ready to start installing your eye hooks! The hard part is over and it’s pretty smooth sailing from here.
Use your drill to create a hole in the wall where each hook will go. Then, fill the hole with silicone caulk and thread the eye hook through the hole. This helps spread the sealant along the length of the hook and ensures that your hole is sealed and the hook will be secured in place by the caulk!
Go around the entire outer edge of your trellis area, installing all of the hooks until you finish. For each side of my wall, it took 14 hooks.
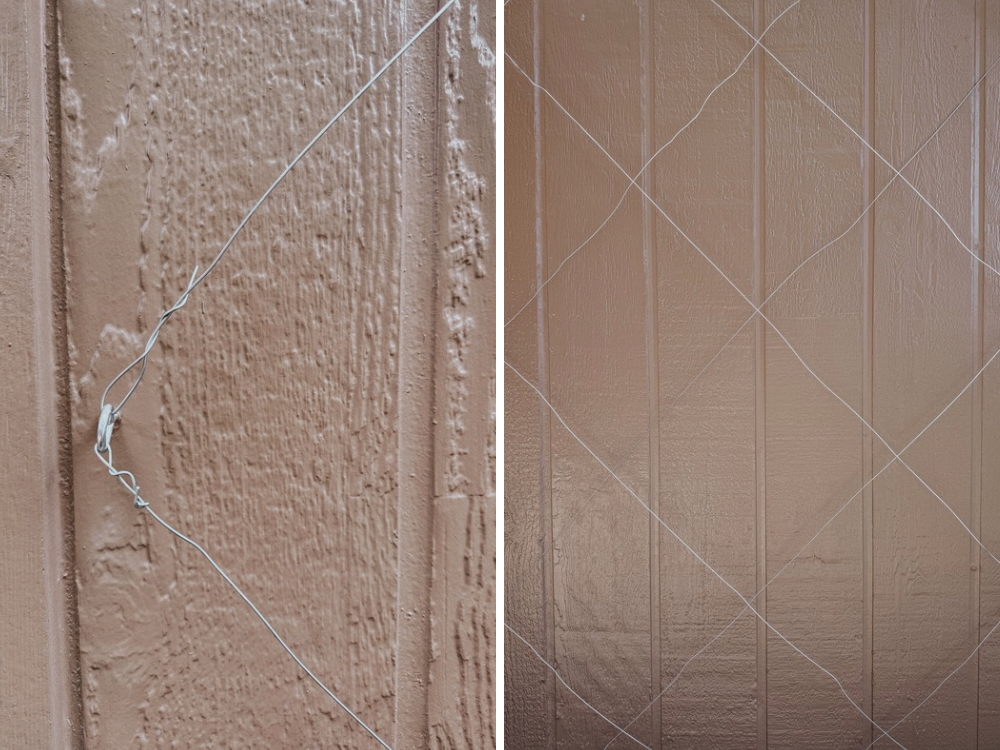
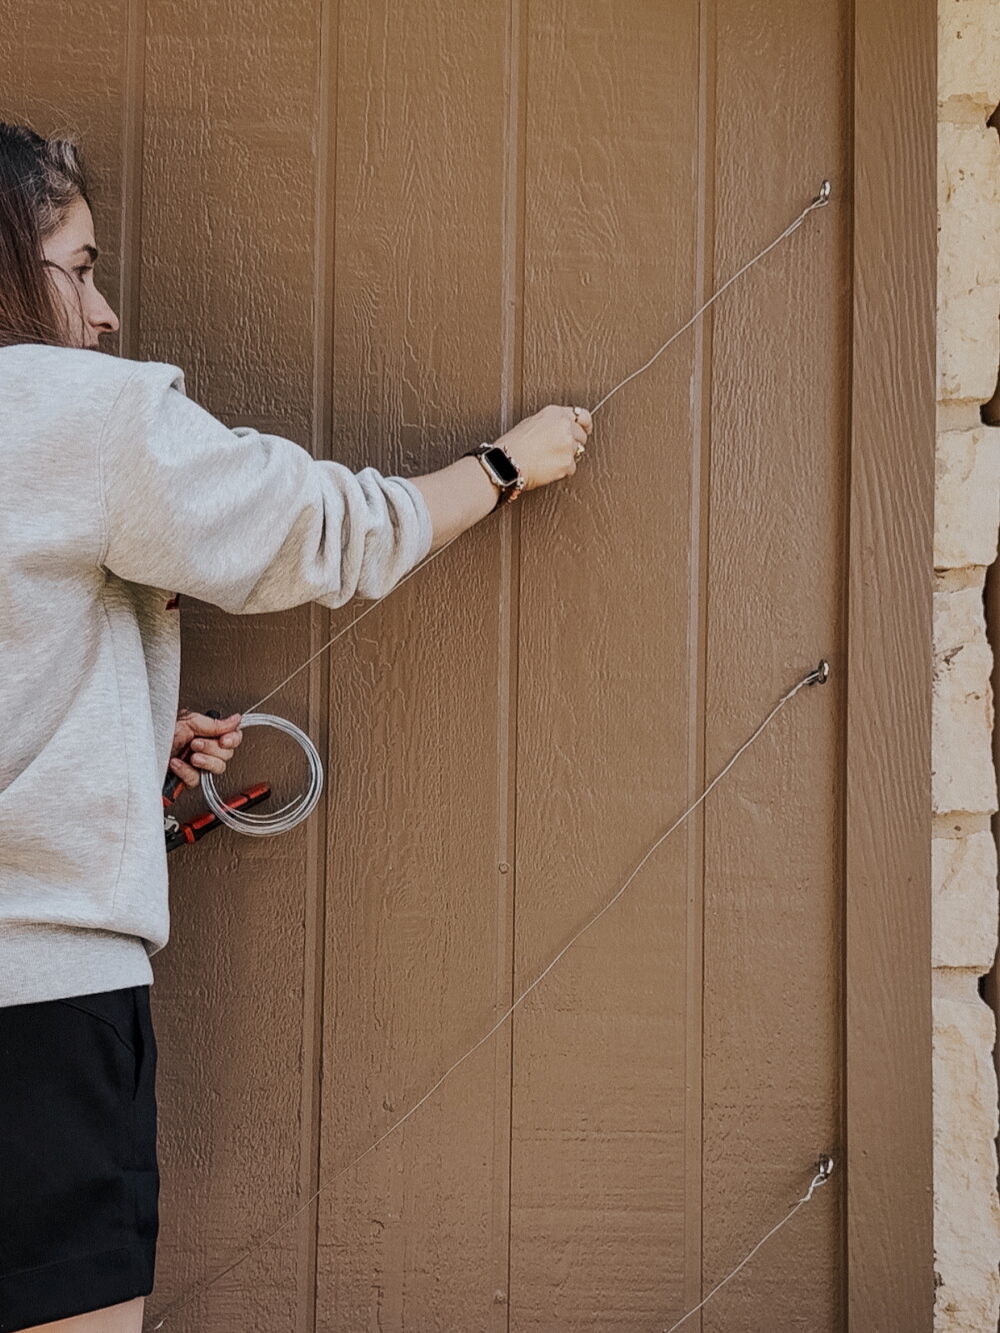
Step Three: String Wire Through Hooks
Once your hooks are installed and your sealant has had a moment to dry, it’s time to thread the wire!
Again, you can use ferrules here to close off each side, but we’re doing the fast and easy version of this wire trellis. So, I just threaded the wire through the hook and wrapped the end back around itself. Then, I pulled it to the hook across from it, and repeated the process.
You’re working diagonally here to create your diamond shapes. You want to connect each hook to the hook diagonally across from it. The hardest part here is just keeping the wire as taut as possible. We cut the wire for each length, but you could also wrap the wire around the hook and continue going, which might help it stay a little tighter!
Our wire isn’t perfectly tight, but as the vine grows up it you’ll never notice any areas where it’s a little kinked, so I’m not worried about it. If it starts to loosen over time, we’ll simply re-thread the wire or twist the hook in a little tighter to pull it straight!
Step Four: Plant Your Trumpet Vines
And finally, with your trellises installed, it’s time to plant those vines!
We went with just two trumpet vine plants. I debated getting a third and planting it under the window, but my experience is that these vines grow really quickly and fill in super thick. So my plan is to let them grow for a season or two, then as they get bigger I’ll add a trellis under the window and let the two vines I have start to grab onto it!
A Final Note:
I think this is one of those projects that can be really complicated if you allow it to be. But, it doesn’t have to be! It took me just under an hour for the first side of my trellis, and once I had the system down it only took me about 30 minutes to knock out the second side. It might not be as perfect or fancy as some of the other wire trellis projects I’ve seen, but once the vines fill in a bit I can guarantee you won’t be able to tell a difference!