
DIY Painted China Cabinet (A Craigslist Makeover)
Last updated on March 4th, 2023 at 11:40 am
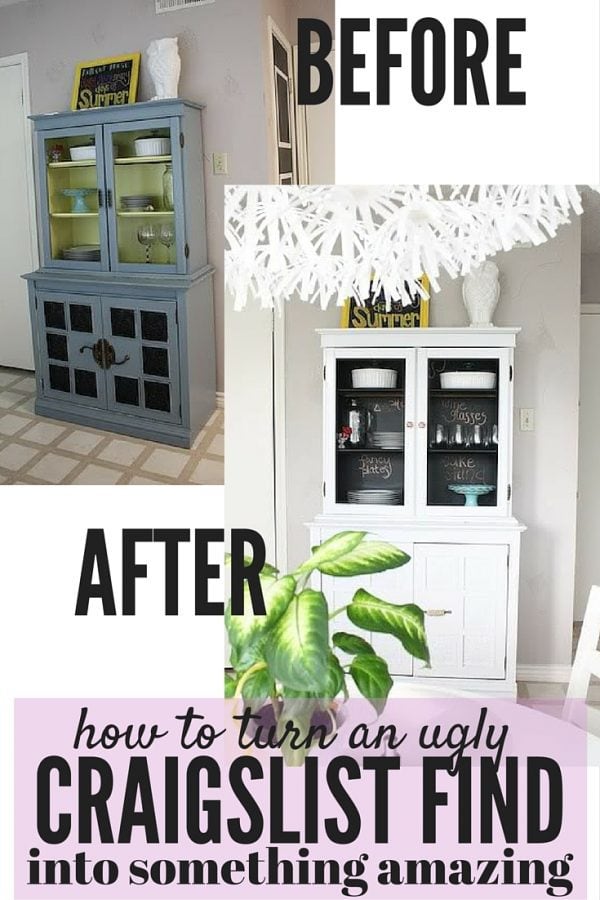
Our new painted china cabinet is the perfect addition to our kitchen – we scored it for just $40 on Craigslist and now it’s absolutely gorgeous!
Sometimes I get the harebrained idea that some horribly ugly piece of furniture I’ve found on Craigslist actually has amazing potential and that I can save it and give it a new life with a little bit of paint and love.
Does that happen to you too?
Corey always looks at me a little funny when I find something particularly offensive, but he’s learned to just roll with my craziness because I usually have a plan. Case in point: this $40 china cabinet I made him drive almost an hour to pick up.
Are you ready to see the “before”? I warn you – it’s bad…
This post contains affiliate links. Click here to read my full disclosure policy.
Ouch. I think he thought I’d really lost my mind with this one.
I knew it had great bones and lots of potential, but Corey agreed to go along with me because it was so cheap that we really didn’t have much to lose. Lucky for us, it worked out pretty well.
DIY Painted China Cabinet
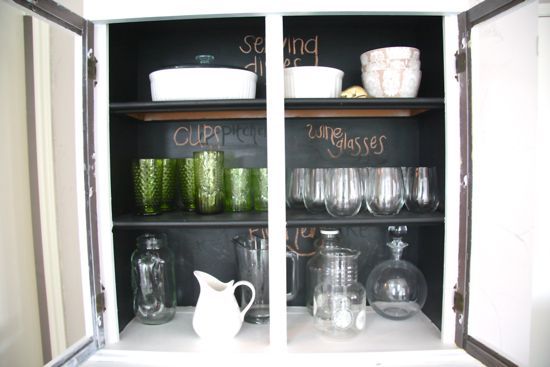
I knew I wanted to use a crisp, bright white for most of the cabinet, but I thought it would be fun to add a little bit of drama and fun with a black interior. We used chalkboard paint that we had left over from painting our pantry door – that way, we could have some fun with labeling everything on the inside of the cabinet!
I know painting a wood piece is a pretty straightforward project, but I wanted to go ahead give you a few of my favorite tips and tricks that make it all a whole lot easier.
Tips for Painting a China Cabinet
For starters, I usually try to sand the piece at least a little bit, especially if it’s already been painted. Corey and I learned in our great sanding experiment a few months ago that it’s not 100% necessary to sand every piece (all of our chairs are still looking perfect, even the ones we didn’t sand at all!), but with pieces that have been painted it’s not uncommon to have some uneven texture or spots where the paint is a bit thicker. This piece had a pretty awful paint job (as you can see from all of the photos), so Corey gave it a quick sanding for me, just enough to smooth it out and get it ready for primer and paint.
My next tip? PRIME, PRIME, PRIME.
I always (always, always) use Zinsser primer on every single thing I paint. It’s hands down the best primer I’ve ever used, and I refuse to use anything else.
Give your piece 1-2 thin and even coats of primer and follow the directions for dry time (every brand is different – I believe Zinsser calls for one hour in-between each coat and 24 hours before paint). Remember that the goal isn’t to completely cover the piece, or even to get completely even coverage. The goal is just to give the paint something to latch onto, and to make your job easier when it comes time to paint. I usually try to do at least two coats.
Once your primer is dry, it’s time to paint. Spray paint can be a quick alternative to regular latex paint if you’re in a hurry, and I used to use it as my go-to for absolutely everything, but I’ve moved back towards using latex paint for most of my furniture projects – there’s more control over the finish and the outcome, and I don’t have to worry about cracking or drips! For this project, it took about three coats of paint to cover up all of that (terrible, horrible, no good, very bad) color it used to be, but it was so worth the effort!
UPDATE: I now swear by my paint sprayer for spraying furniture! See more details on how I use it here, and click here to read a post with all of my secrets for painting furniture!
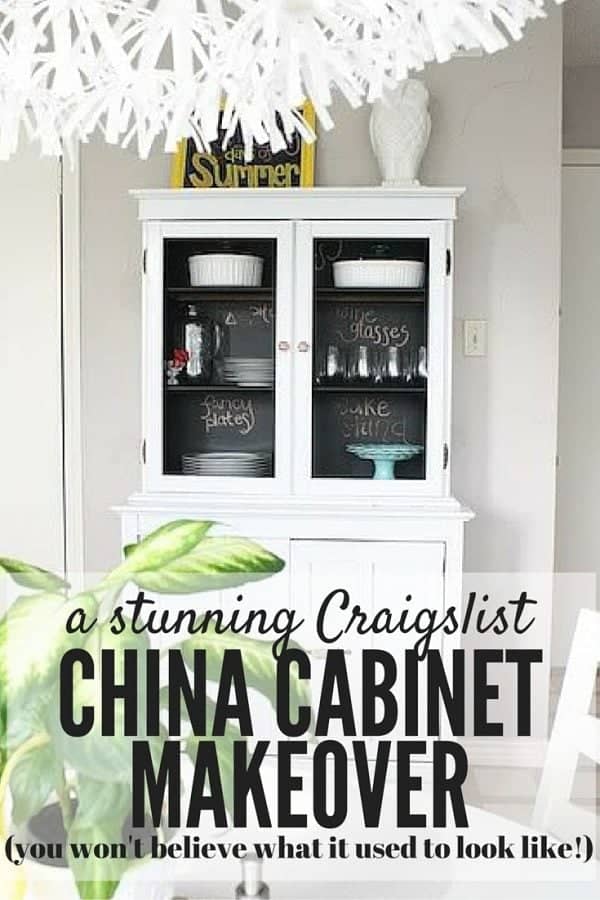
I ended up having just enough chalkboard paint for the top part of the cabinet and the drawer in the bottom part, and I did regular old black paint on the rest of the bottom – you can’t tell the difference. Since I had chalkboard paint in the top, I went ahead and scrawled a few labels in it so you can get the idea – I’m sure I’ll play around with it more later and it will be an ever-changing piece!
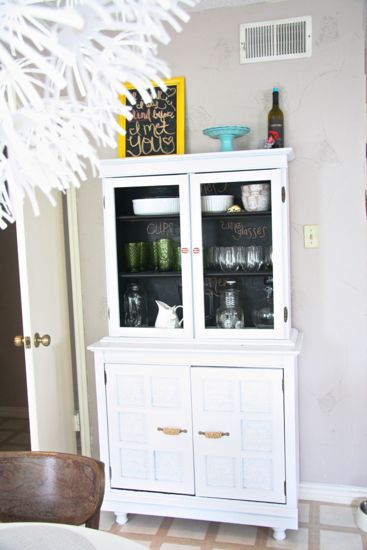
We weren’t in love with how this piece just sat on the floor without any legs, so you might have noticed that Corey and I chose to add some feet to it. All we did was use metal brackets to attach some cheap feet we found at the hardware store.
As you can see from some of the close-ups, the bottom doors fit on a bit funny and you can see the black paint along the bottom. The doors are pretty warped (and they got even worse when they were drying outside in our 100-degree heat!), and we haven’t quite decided what we’re going to do. We may try to buy some new doors, or we may build some of our own. I’m torn because I love the detail on these doors, but I don’t love seeing the black paint peeking out at the bottom! We’ll see where we land, and you know I’ll give you an update when we decide!
You can see the tutorial for how we created the Anthropologie-inspired jute rope cabinet pulls here – the hardware on the bottom is one of my favorite details of the whole piece. These cabinet pulls turned out to be so gorgeous, and I drool a little bit every time I look at them.
This piece adds so much to the room, and it fills the space SO much better than the tiny little wine rack we used to have sitting there! I love how it turned out, and it makes me even more excited for the day when we can finally retexture the walls in here and get that awful color off of the walls!
Moral of the story – even if your husband thinks you have lost your ever-loving mind, stick to your guns if you have a vision. It just might turn out perfectly.
Wow! I’ve been strolling around your blog for a while, nearly commenting several times about our similar styles. I have wood planks above my fireplace and a gray sectional. I found your site after searching for DIY artwork on Pinterest. I love the large yellow frame with the gray striped artwork in your hall. Anyway, I have the exact same china cabinet. I found it on Craigslist for $40!!! Mine was wood at the time I purchased, or I guess wood tone or veneer. I also painted mine white.
Currently, I have the top and bottom in two separate rooms. I put feet on the bottom of the top and am using it as a shallow cabinet in my sewing room. I added a beadboard back painted duck egg blue.
I LOVE the curtains you have in your living room. Do you mind me asking where you got them?
OK, I”m off to check out more of your blog : )
I see you are on instagram. I’ll snap a pic of my china cabinet and put on my instagram if you want to see. My user name is Autum Hall
Wow, that’s awesome! I love the idea of separating them – I’ll have to remember that! 🙂
The curtains are homemade, and the fabric is Tempo, Mambo from Tonic Living – hope that helps!
Where did you find the blackboard paint? And was it easy to use… did you have to prime under it?
I got the paint from Lowe’s! It was very easy to use – I typically always prime on these types of projects, but I’ve used chalkboard paint without priming in several other instances and it works just fine! I’ve had great luck with it and find it is generally pretty easy to work with! Hope that helps. 🙂
I love the blackboard paint inside. Definitely helps to let anyone who may be new to your house, exactly where everything goes.
Great find! I love how the dark cabinet wall looks with the white exterior. Definitely going to remember this color combo 🙂
Oh my gosh, it’s amazing! You guys did SO good!!
What a great use of the chalkboard paint! I didn’t think the blue and green was that bad, but the black and white definitely classed it up.
So cute. I have a plan for chalkboard paint in my near future as well.
Beautiful, and the chalkboard paint gives it that extra uniqueness…I love it! Great job 🙂
Wow! What an amazing transformation. I love the chalkboard paint idea!!! You guys are awesome, great job!!!
Wow, seriously gorgeous!! You guys are so inspirational!
This is awesome. I need to paint a few items and this will be uber helpful!!!!!
I think this is my favorite project you’ve ever done! It’s beautiful and I love the striped knobs.
Huge improvement! I love white furniture-any kind! The chalkboard paint is so much fun, too! I really love the quirky knobs you added! That splash of red goes a long way! Love it!
Wow, that looks so much better than the before! Very clean and chic. Great job you guys!
It looks sooooooo much better! I love the black-and-white look, and the twine-wrapped hardware!
OMG I am OBSESSED with the chalkboard labels for everything!! I LOVE how this came out!
I love the chalkboard paint!!
Beautiful– I just sold a huge hutch on craigslist last week. We just bought our first home and had a ton of storage in the kitchen and didn’t think we needed it. But looking at this, I want it back to paint!
Awesome improvement! Love the touch of the chalkboard paint.
wow! It looks seriously amazing!
I love that you used the chalkboard paint inside the cabinet!