
How to Re-Paint Your Front Door
Last updated on June 14th, 2024 at 03:29 pm
I’ve been slowly working on making some changes and small updates to our entry in the last few weeks. It’s a project that was high up on my 2022 goals list, and it’s high time we cross it off!
If you aren’t caught up on everything that’s happened in here so far, let me get you there:
- It all started two years ago with this little entry makeover.
- A few months after that, I added beadboard to the walls…
- …and some photos on the staircase.
It sat like that for a long time and I loved it in general but always felt like something was just a liiiiiittle off. I finally decided to do something about it, so…
- I painted the trim and bathroom door to match the walls.
- Then, I added a cute little sign to the bathroom door.
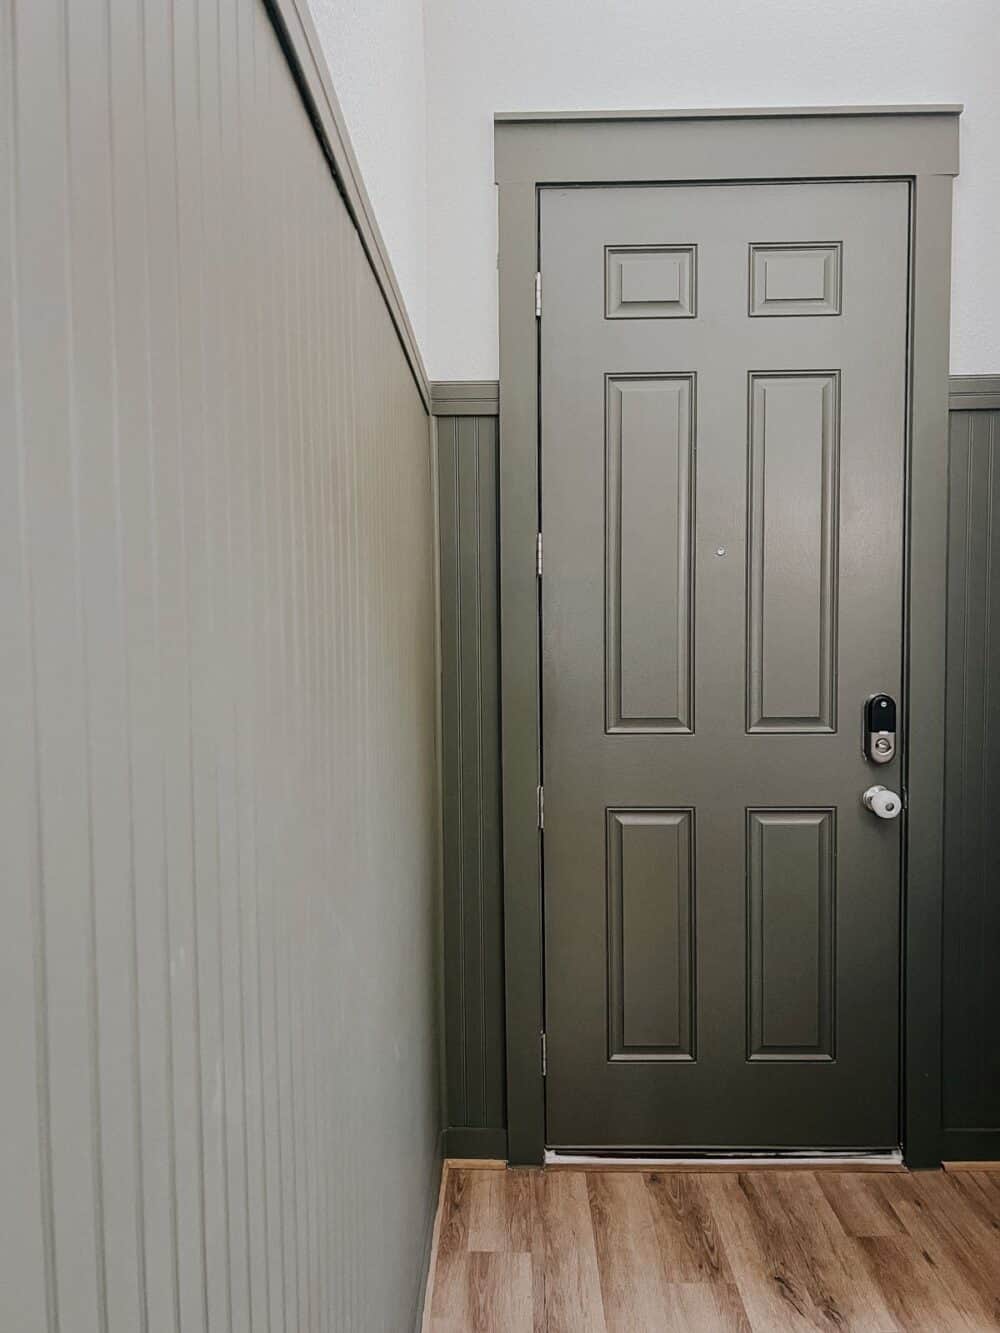
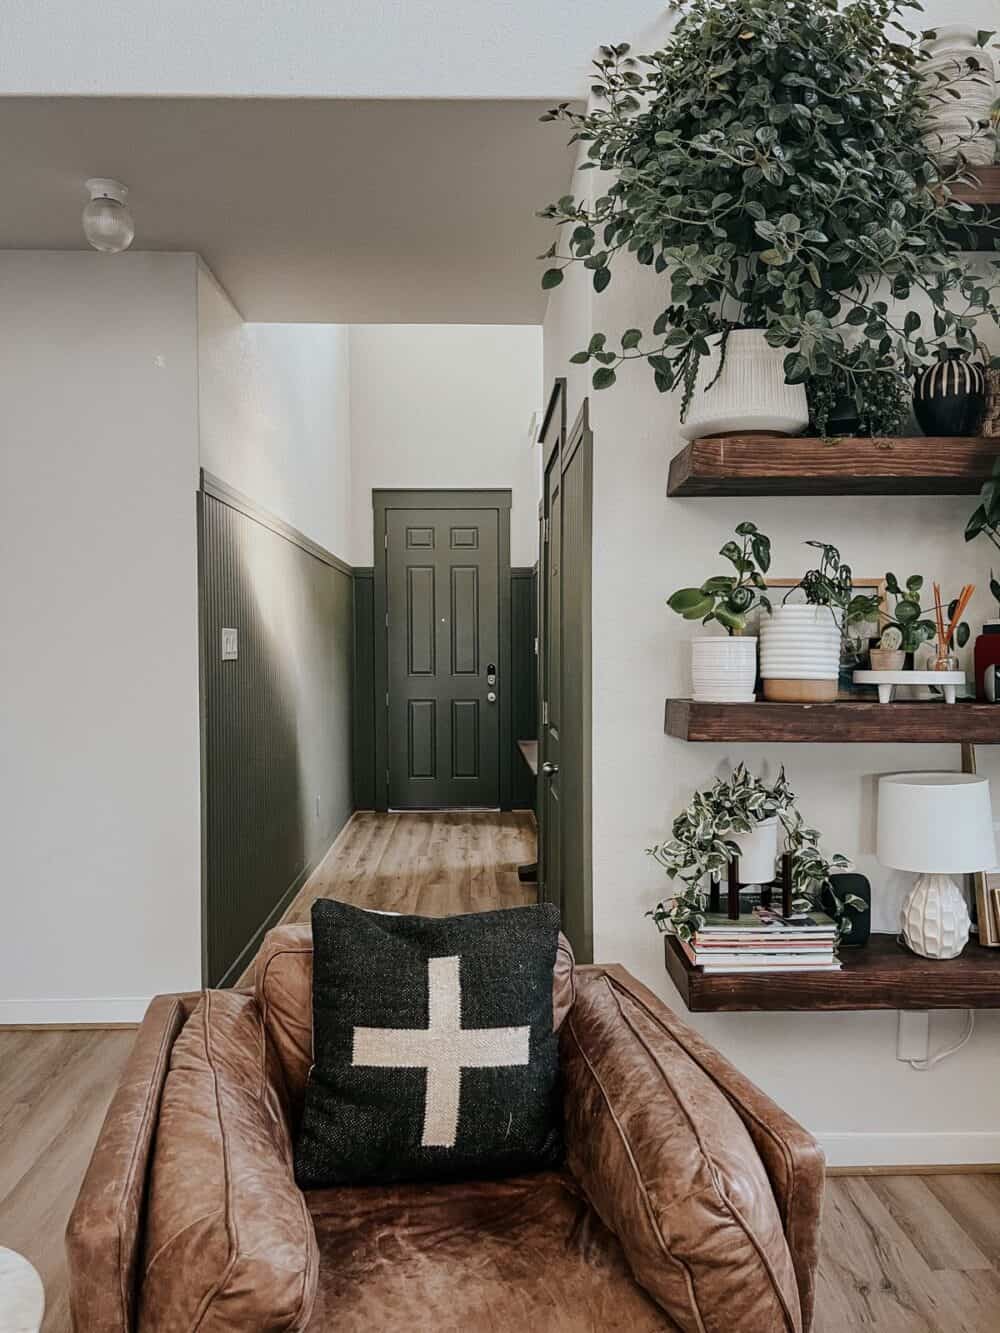
And now, after living with it all for a few weeks, I decided to go ahead and paint the front door too!
The black door has served us well for the last few years (and I love a black door), but it wasn’t working for me with the green. It needed to blend!
So, I busted out my painting supplies once again and got to work. And now, things are feeling much better.
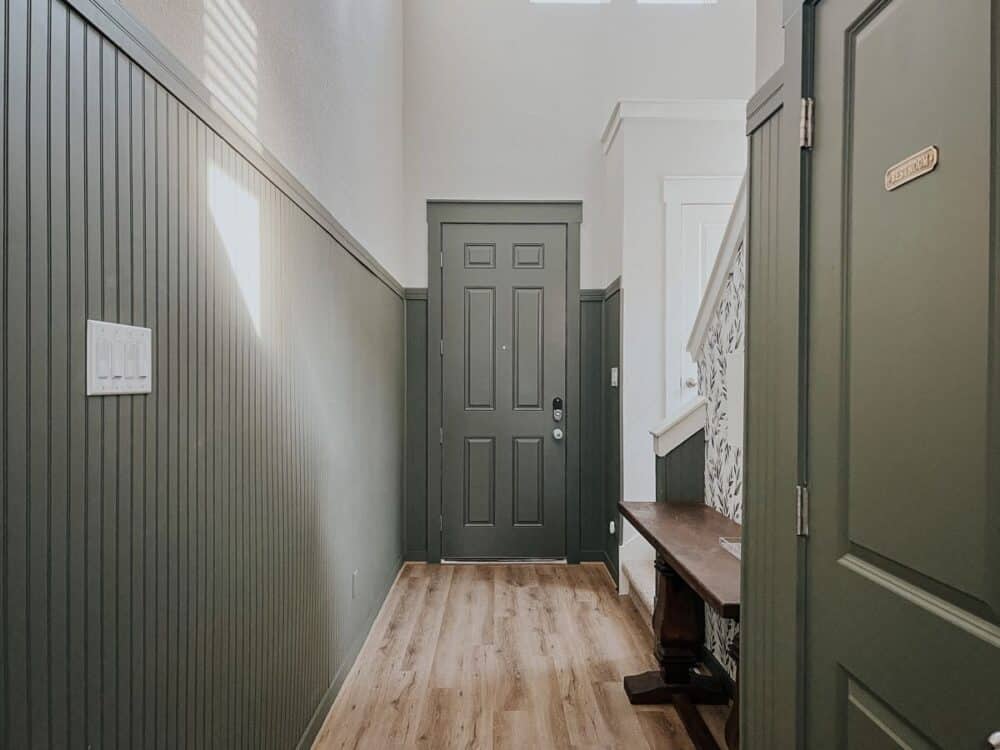
Ahhhh – it’s like I can take a deep breath in here again. It’s amazing how much of an impact it made to paint the trim and the doors in here. Things used to feel really chaotic and overstimulating in this space, and this one small change has it feeling worlds different.
There are still a lot of things I want to do in the entry, but first, let’s talk about how to paint a front door. Because it makes a huge impact with very little effort or money. And you know that’s my favorite kind of project.
Not including projects that involve plants, of course. Those are my real favorites.
How to Paint a Front Door
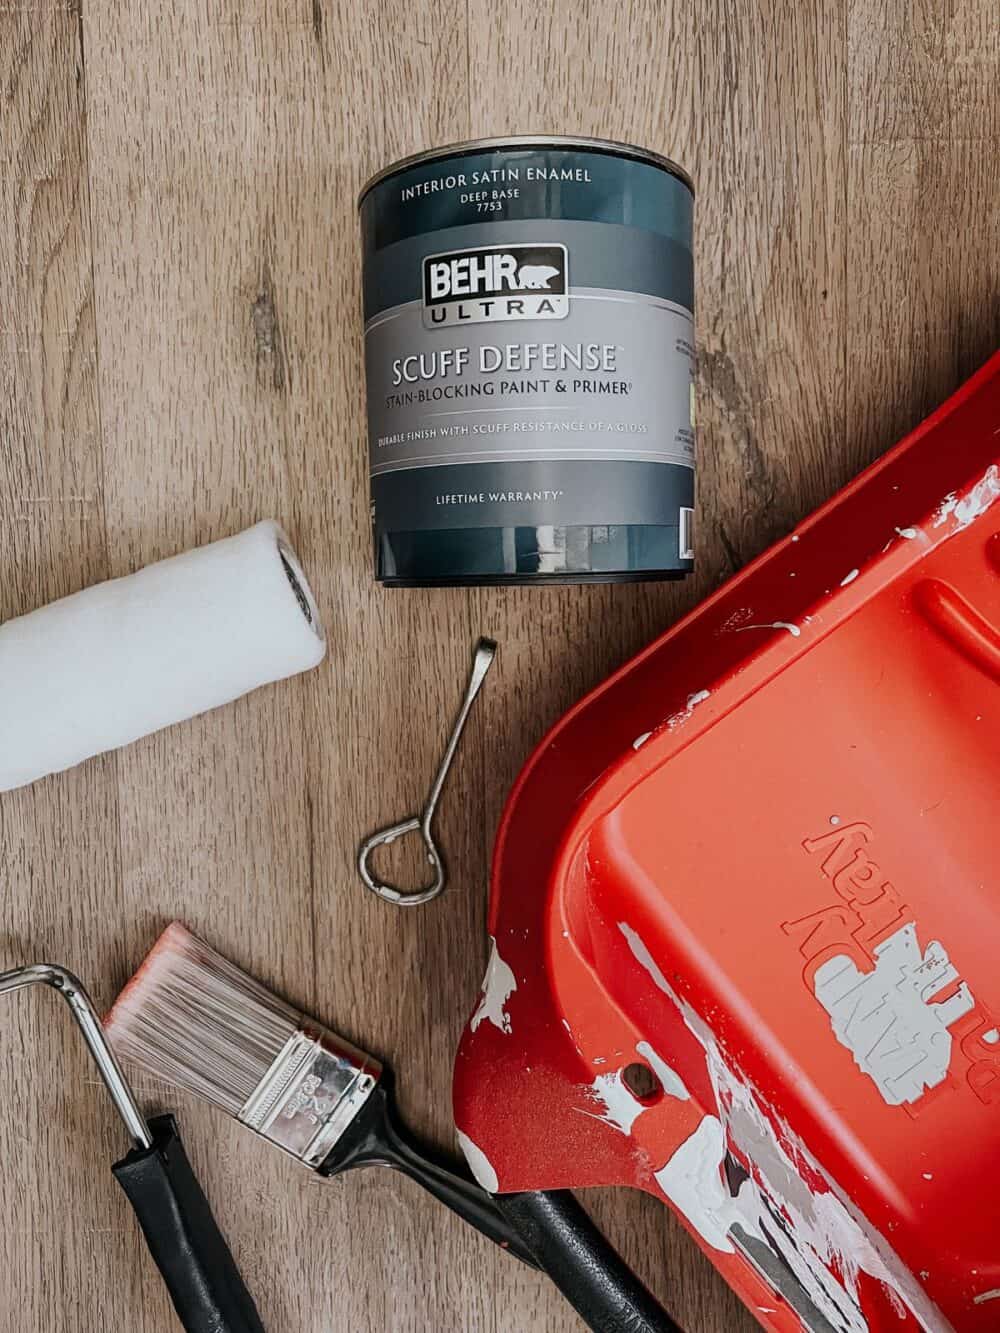
Materials Needed
- Primer (maybe, see note!)
- High-quality paint brush
- A drop cloth, to protect your floor
- Small paint roller (I like to use a foam roller) + paint tray
- Satin or semi-gloss latex paint (exterior, if you’re painting both sides!)
If you’re going to be painting both sides of your door, make sure to wait for a day that’s got good weather and no rain! You’ll need to leave the door propped open for a bit while things dry, so don’t pick a rainy day or one that’s going to be oppressively hot.
A note on priming
If your door has never been painted, or if it’s only ever been painted with latex paint and is in good condition, you can probably skip priming. It’s not a necessary step in every situation. Here are some cases where you’ll definitely want to prime:
- If the existing paint is flaking or in bad shape
- When you’re painting a light color over a really dark one
- If you’re painting with latex paint over a door that’s been painted with oil-based paint
- When you’re painting a bare wood door
If none of the above situations apply to you, you’re probably good to skip the primer step!
Step One: Clean + Prep the door
Your first step to any painting project is always the prep work. Clean any dust or dirt off the door, make sure there are no areas where the paint is flaking or peeling, and double-check that it’s all in good condition.
If your door is older or you’re dealing with some scrapes and flaking paint, you’ll want to address that first. Use a putty knife or paint scraper to remove any flakes, then lightly sand the door with 120-grit sandpaper to prepare it for paint. Be sure to wipe it down with a damp cloth when you’re done to remove any lingering dust!
Scrub the door down so that it’s fully clean and dust-free, and allow it to dry completely before you begin priming or painting.
Now is also the time to user painters tape to tape off the doorknob and hinges, and anything else you don’t want to get paint on (like the door knocker, locks, or other hardware).
step two: prime door
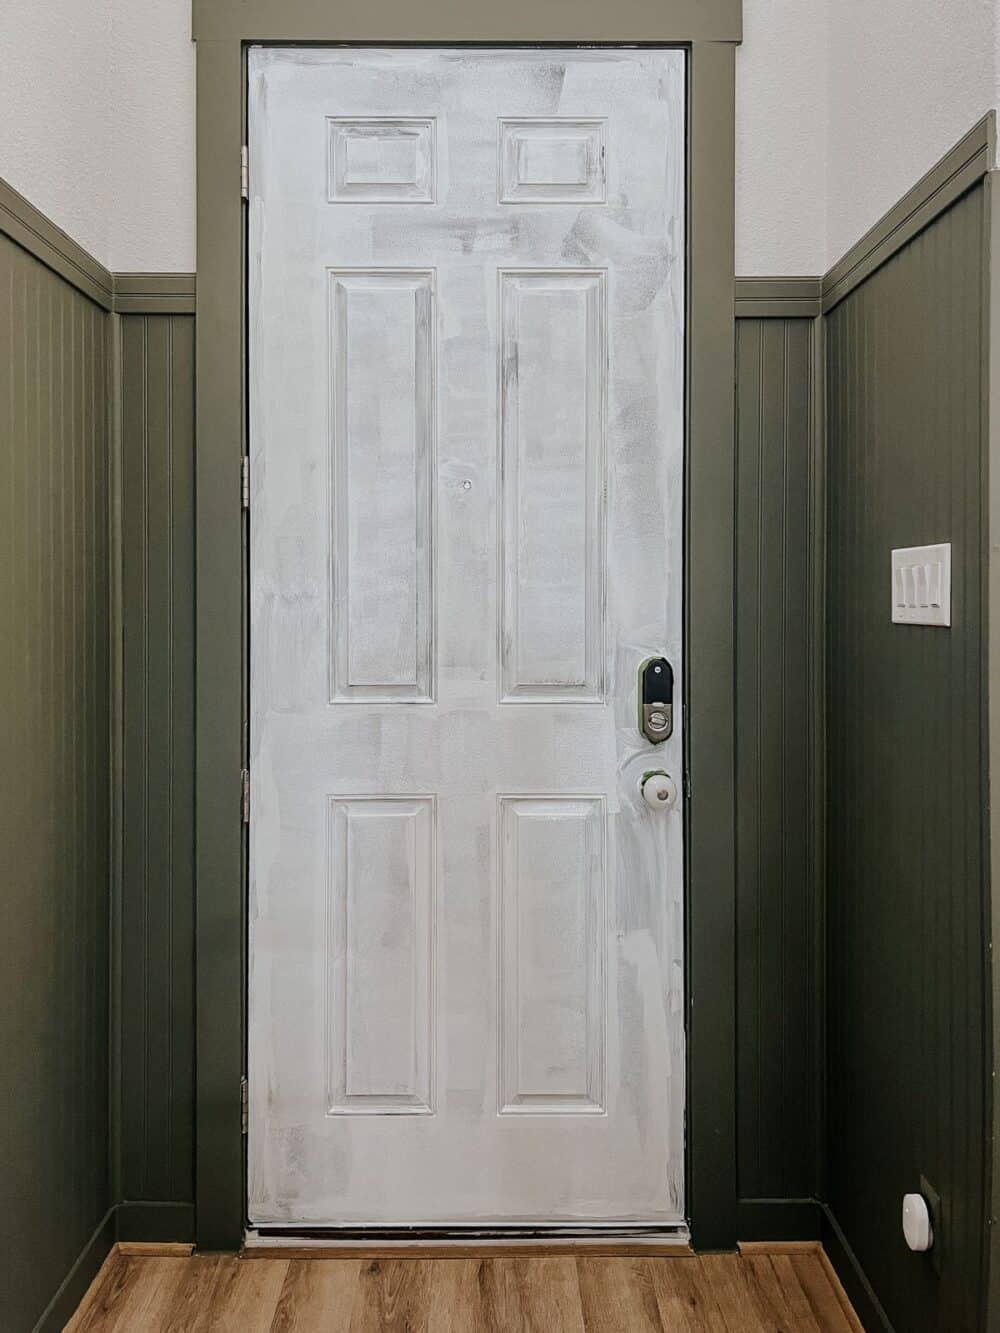
If you need to prime your door, now’s the time! One coat of primer is typically all you need, and it goes on fast! I was able to prime the inside of our 8′ tall door in about 15 minutes from start to finish.
If you’re painting both sides of the door, be sure not to miss the edges of the door and top of the door. I recommend painting those first, as it’s easier to manipulate the door and hold it still if you aren’t also dealing with wet paint on one side.
Prime the entire door, then leave it cracked for about an hour to dry. This will vary slightly depending on your primer, but mine dried to the touch in 30 minutes, and was ready for a top coat after an hour!
Step Three: Paint the Door!
Now comes the fun part – it’s time to paint the door!
If you have a paneled door like I do, there’s a generally recommended order to work in. Start with the inset parts of the panels, then paint the raised parts. Then, paint all of the vertical, then horizontal pieces between the panels. This order helps reduce brush strokes and gives the best finished look!
You’ll use your paintbrush to get in all of the inset parts of the door, and a foam roller for the rest. The biggest thing to remember when you are painting a door is that you shouldn’t overwork the paint. That’s how you get really obvious paint strokes! Instead, just brush it on and then leave it alone. Feel free to catch any paint drips, but other than that, don’t go back over areas you’ve already painted. You’ll get any spots you missed with the second coat!
I’ll also note that if you want to take the time to take the front door off, that’s also an option! You can remove the hinge pins by pushing a screwdriver under the top of them and tapping with a hammer until they come loose. Then, rest the door on some sawhorses while you work. This is a great way to make the paint job easier, especially if you have peeling paint you need to sand or places where you need to add wood filler before painting. But, that’ll leave your door frame empty until the paint is dry, so be sure to take that into consideration!
What Type of Paint Should I Use on My Front Door?
I always recommend a high-quality paint for a door – this is not the time to cheap out! I used Behr’s Scuff Defense paint on the recommendation of the paint guy at Home Depot, but I’ve also had great luck with Behr’s Marquee and Dynasty lines of paint. Front door paint doesn’t have to be anything fancy or special, but the high-quality paint will have a better durability and last you longer!
If you’re painting both sides of the door, you should go ahead and use exterior paint. Interior is fine if you’re just painting one side, like I was here.
A glossier sheen of paint is pretty standard for a front door – I have matte paint on the walls, so I went with satin. A semi-gloss finish or gloss paint are also a really common choice! Before this, mine was high gloss and I didn’t love it, so I wanted to back off the gloss as much as possible while still keeping a little bit of shine. I love the finished look, so I think it worked out!
After your first coat has fully dried, according to the dry time listed on your paint can, add the second coat. I pretty much always recommend two coats of paint. The first one will almost always look terrible, so it’s just wise to not freak out until after you take the time to add the second coat!
What paint color is that?
I used Behr’s Bonsai Trunk to paint our front door. I only needed a quart of paint for the whole thing (and I have plenty extra, so this would probably also be true if you’re painting both sides).
Let’s do a quick reminder of what the before and after is of the paint in the entry – because, I can’t get over the difference for such a small project!
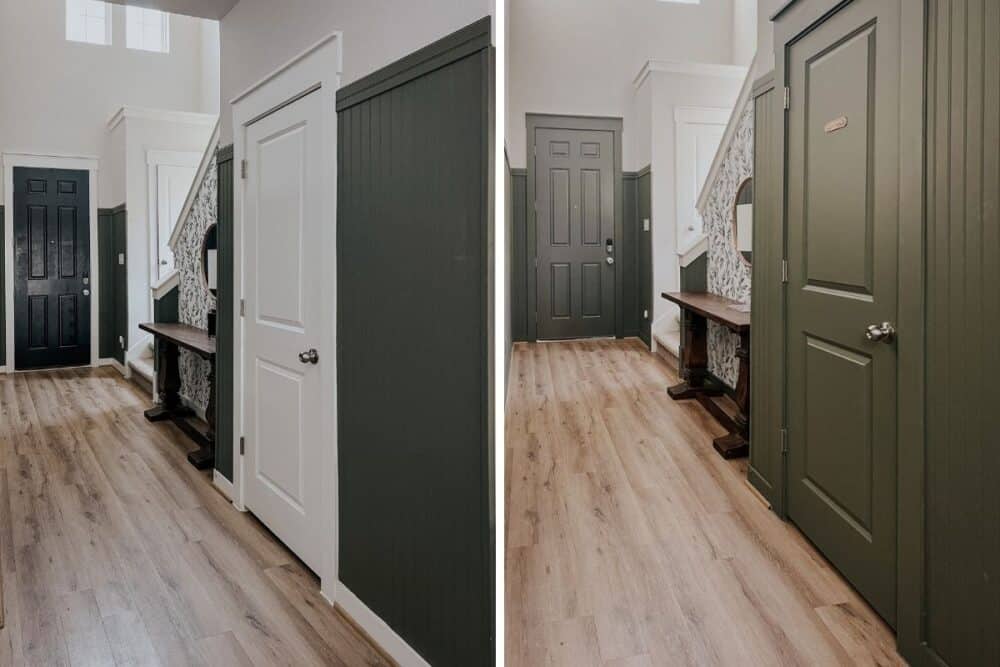
Painting your front door can add so much to your curb appeal, and make the entrance to your home feel so much more welcoming. First impressions are everything, and a fresh coat of paint on your exterior door can make a world of difference!
So, what’s left in the entry? A lot, and I’m still deciding! Currently on my short list is:
- Replacing the light switches for brass ones
- Adding a runner
- Replacing the wallpaper
- Restyling the entry table (I think long term, I may replace it with something antique, but I’m in no rush for that)
- Adding something to the long, empty stretch of wall on the other side. It feels too blank, but I don’t want it to end up too busy. So, I have no clue yet what I’ll do!
- Replace the photos going up the stairs
- Get a new, larger mirror
- Replace the door hardware on the powder room door, and possibly the front door too
I’m in no hurry to get it all done, I’m trying to take this little makeover one step at a time and really enjoy the process. But, I already have a new doorknob for the powder room door and I’m REALLY EXCITED to get it on! So, keep an eye out for that…and drop any ideas you have for the big blank wall in the comments below.