
How to Add Drip Irrigation to a Raised Garden Bed
Need to automate the watering in your raised garden bed? This post will show you how to add drip irrigation to your garden bed in just a few minutes!
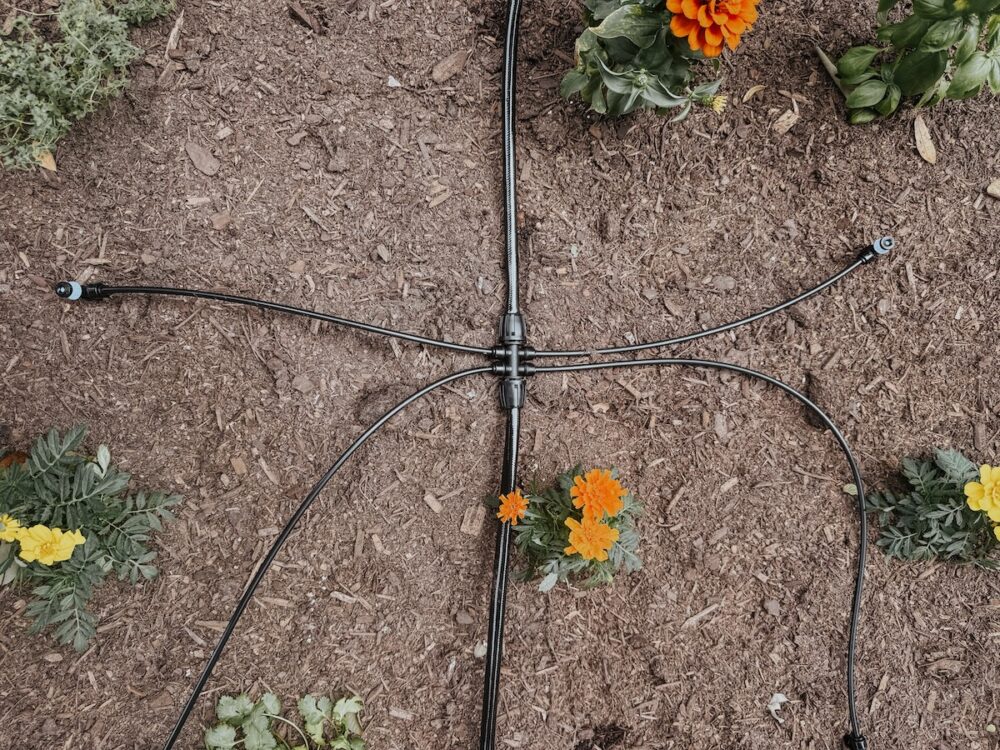
I have to confess – I’ve always heard people say it’s “easy” to install a drip irrigation line and, well, I haven’t believed them. A drip system just felt like one of those projects that was a little complicated, took forever, and seemed easy on the surface but was actually really complex. But, I’m actually thrilled to admit that I was absolutely and unequivocally wrong. Installing a drip irrigation line is really, really easy!
I just finished doing it for my brand new raised garden bed, and I’m here to share the whole process from start to finish. It took about 30 minutes to knock it out, and it was shockingly affordable too. Who knew?!
Drip Irrigation Systems: The Basics
A drip irrigation system, also called a drip line, is just an automated way to deliver water directly to your plants. It uses a network of tubes to deliver the water at a slower and measured pace, and allows you to not waste as much water as other methods can. In addition to that, when it’s paired with a watering timer, it is a completely hands-off method to watering your plants. It leads to healthier plants and a less stressed out gardener!
Truly, it’s music to my ears.
How Does a Drip Line Work?
Here’s a really basic explanation: a drip line is a system of plastic tubing that hooks up to your regular hose and delivers water to your garden beds. It’s completely customizable, and each tube ends in a tiny sprinkler that can be adjusted. You can weave it through your entire raised garden bed, delivering water exactly where it needs to go. It can cut down water use pretty significantly, and it’s really easy!
If you pair your drip line with an automated hose timer, then it will turn on exactly when you want it to, water for however long you want it to, and stop after a set amount of time. You literally don’t ever have to worry about it again!
What I Used for My Drip Irrigation System:
You don’t need a ton of supplies to get started here. For my new drip line, I used just three simple things:
- This hose splitter, so I can still access my regular hose if needed.
- This sprinkler timer
- And this drip irrigation setup
Keep in mind you might want a slightly larger drip irrigation set if you have a bigger garden. The main line on this one was pretty much the perfect length for me, but I’ll need to get another set when I set up my other raised garden bed.
If you have a larger garden, or are setting up multiple beds, you can buy extra hose! If you’re wondering what all the set comes with, here’s a rundown of what’s included:
- A 1/2″ irrigation tube (aka the main line)
- A 1/4″ irrigation tube (the drip lines)
- 4 “barbed tees,” which are how you connect the smaller tube to the larger one.
- A faucet connector, which includes a filter to help prevent sediment entering your water stream.
- 8 each of two different types of sprinkler heads
- A main line end closure, to cap off the tubing.
- And 10 plugs for any of the 1/4″ lines you aren’t using.
Oh, and it’s probably obvious but you’ll also need access to an exterior hose hookup!
What Does It Look Like in Action?
I’ve got lots of photos coming your way, but if you want to see a visual for how it looks when it’s running, just hit play on the video below!
How to Set Up a Drip Line for a Raised Garden Bed
Alright, now that you know what a drip line is and why you might want to use one, let’s get into the details of how to set it up. This is the part I was really intimidated by, but it was shockingly simple.
Step One: Attach Hose Splitter
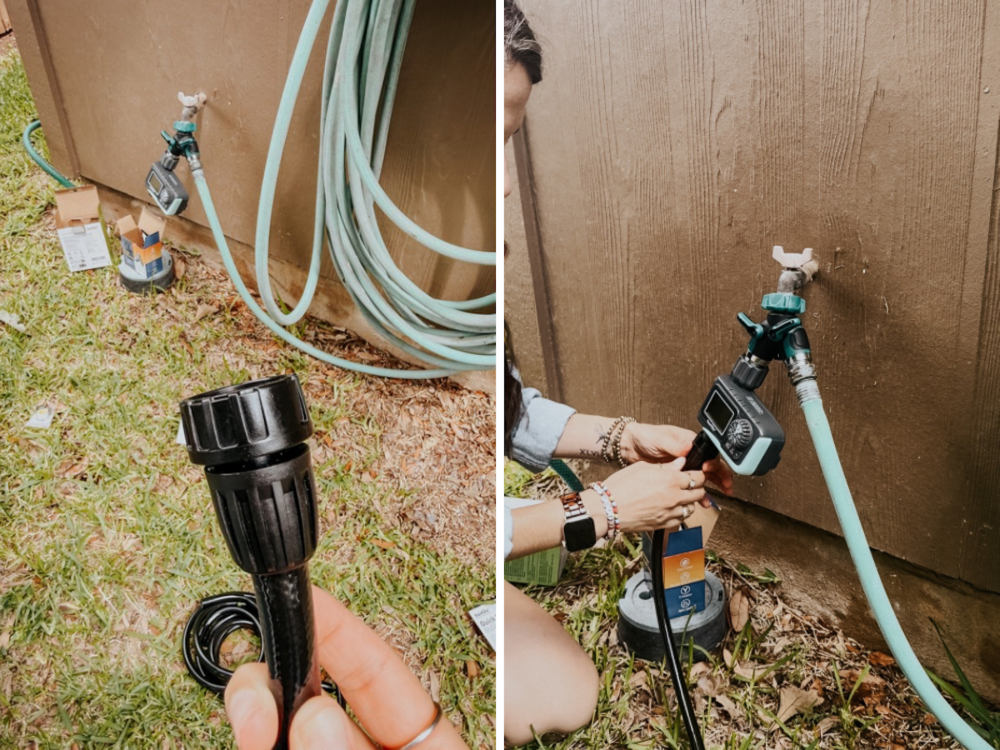
First up, if you’re using a hose splitter you’ll want to attach that first. If you are okay with dedicating your hose hookup entirely to this purpose, you don’t need one! The hose splitter I used came with some teflon tape – be sure to wrap that one or two times around the hose attachment to help seal it completely.
After you’ve attached it, be sure to test it out before you move on. Make sure there are no leaks and that water flows freely through both valves!
Step Two: Attach Hose Timer
Once your splitter is set up and working, you’re ready for the watering timer. Follow the included directions to set it up and test it – mine had me run the manual mode a few times to set it up!
Just like the hose splitter, it should come with some tape that I recommend using. You’ll attach this to one side of the hose splitter just like you’d attach it to the main line. Be sure to check for a good fit before you move on to the next step!
Step Three: Attach Main Drip Line
Now you’re ready for the fun part. Take the larger 1/2″ irrigation tube that came with your drip line and attach the faucet connector. It should have two pieces – one slips right onto the tube, and the other twists into the first piece. It’s very straightforward.
Once the connector is attached, you can attach the main irrigation tube to the connector on the water timer.
Again, take a second here to turn on manual mode and make sure it all works and there are no leaks! I promise it’s easier to test it a bunch of times during the process than to try and undo all of your work to find an issue when you’re finished.
Step Four: Map Out Your Drip Line
At this point, you want to make a plan for what your drip irrigation system will look like. My set came with two types of drip emitters – one does a large stream (up to 10 feet) and the other does a smaller “vortex” of water (up to 20″). I wanted the smaller, more concentrated ones.
I laid out my main line in the bed and decided that using all 8 of the vortex drip emitters that came with my kit would be perfect.
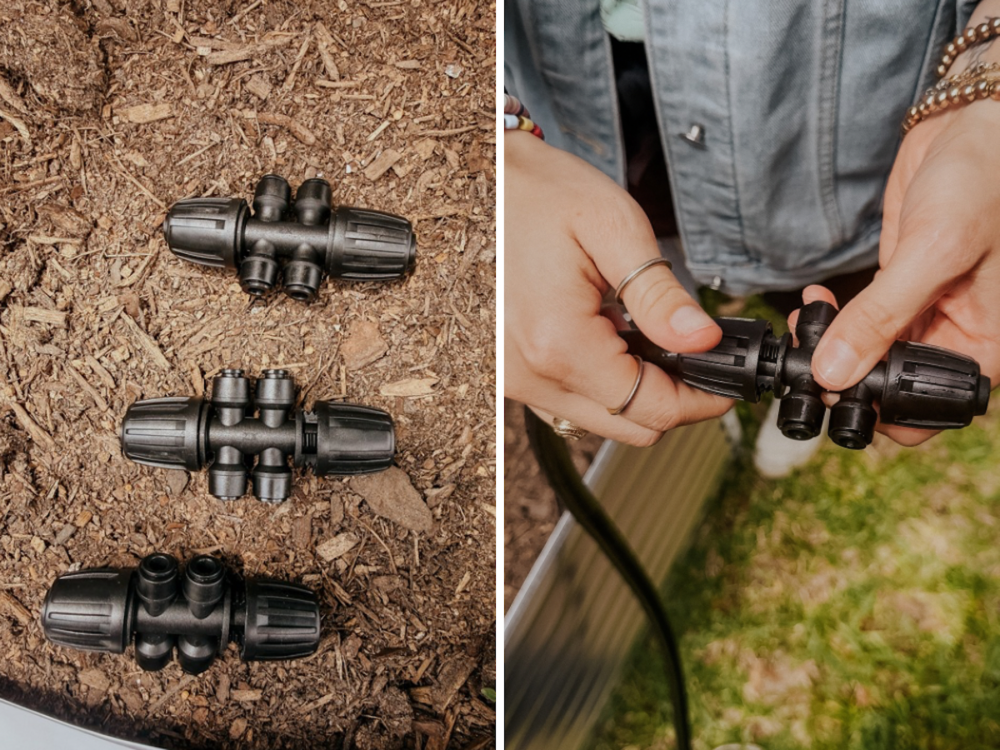
Each time you want to branch off for the smaller lines, you’ll be cutting the main tube and adding a barbed tee connector. This takes that main tube and splits it into four smaller tubes that branch off!
So, for my 8 mini sprinklers, I needed two barbed tees.
Step Five: Attach the Splitters (Barbed Tees!)
Decide where you want the drip line to break off the first time, then cut the hose using scissors. Attach the hose to one side of the barbed tee. You’ll use the same process you used to attach the faucet connector.
Then, grab the cut end of your hose and attach it to the other side. You can continue going along and attaching as many barbed tees as you need to using this method!
When you reach the end of your drip irrigation system, you’ll add the main line end closure. This seals the end of the tubing and finishes everything off!
Step Six: Add 1/4″ Tubing + Drip Emitters
Once your main line has been run, you’re ready to attach your 1/4″ tubing and the sprinklers themselves. The tubing just plugs right into the plug on the barbed tee, and the other end plugs right into the drip emitter. No tools required – just push it into place.
The drip emitters have a stake at the end, so press them into the soil right where you want them.
Continue working in this way until you’ve run all of the drip line that you need for your garden!
Step Seven: Test & Adjust
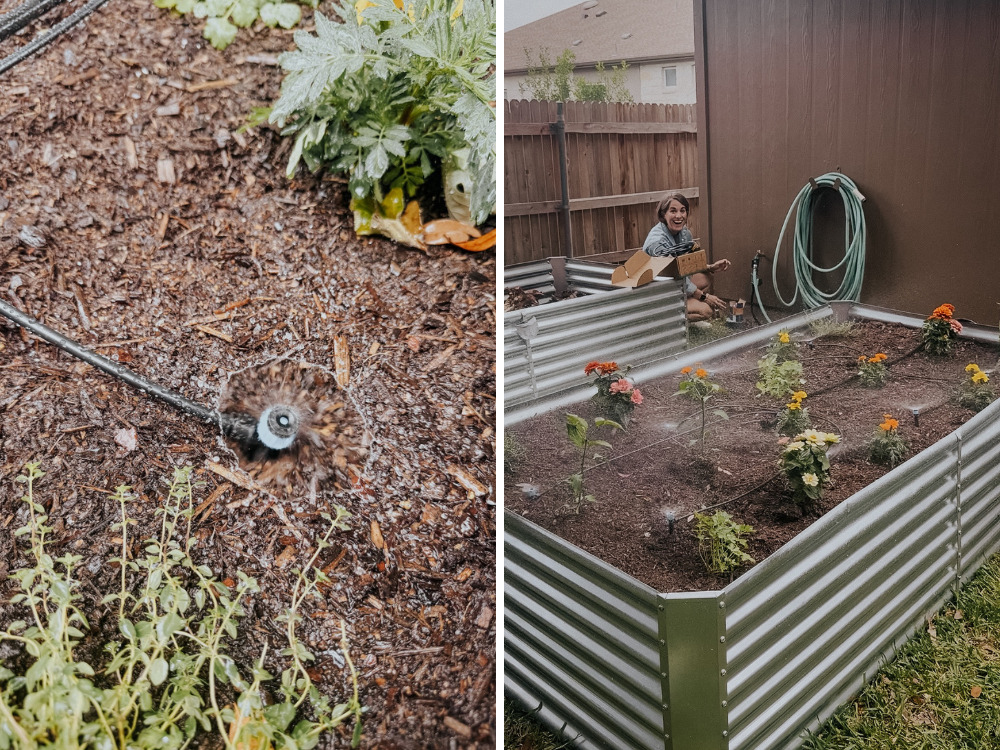
With everything set up, it’s time for your final testing and adjusting! I recommend you start by just turning the system on and seeing how things look. My drip emitters were all set to the highest setting so it was a little intense! But, it’s a good time to make sure they’re all working and nothing is leaking.
Then, go around to each of the mini sprinklers and adjust the flow to where you want it. If they’re close together like mine, you can have a smaller vortex of water. If they’re further apart, you’ll want the water to spread a little further!
Spend some time tweaking and adjusting until you’re confident all of your plants are getting the water they need!
Step Eight: Set Up Water Timer
The final step in the process is setting up your water timer so that it’ll run without you having to worry about it! This was really clearly laid out in the instruction manual for my sprinkler timer but basically you just need to decide:
- What time of day you want the watering to start
- How many minutes you want to water for
- How many days you want to go between waterings
Once you’ve set that, just leave it set to “on” and it’ll do the rest of the work for you! I’ve got mine set to water every 3 days right now, but once it gets hotter here in Texas I’m sure I’ll be watering daily!
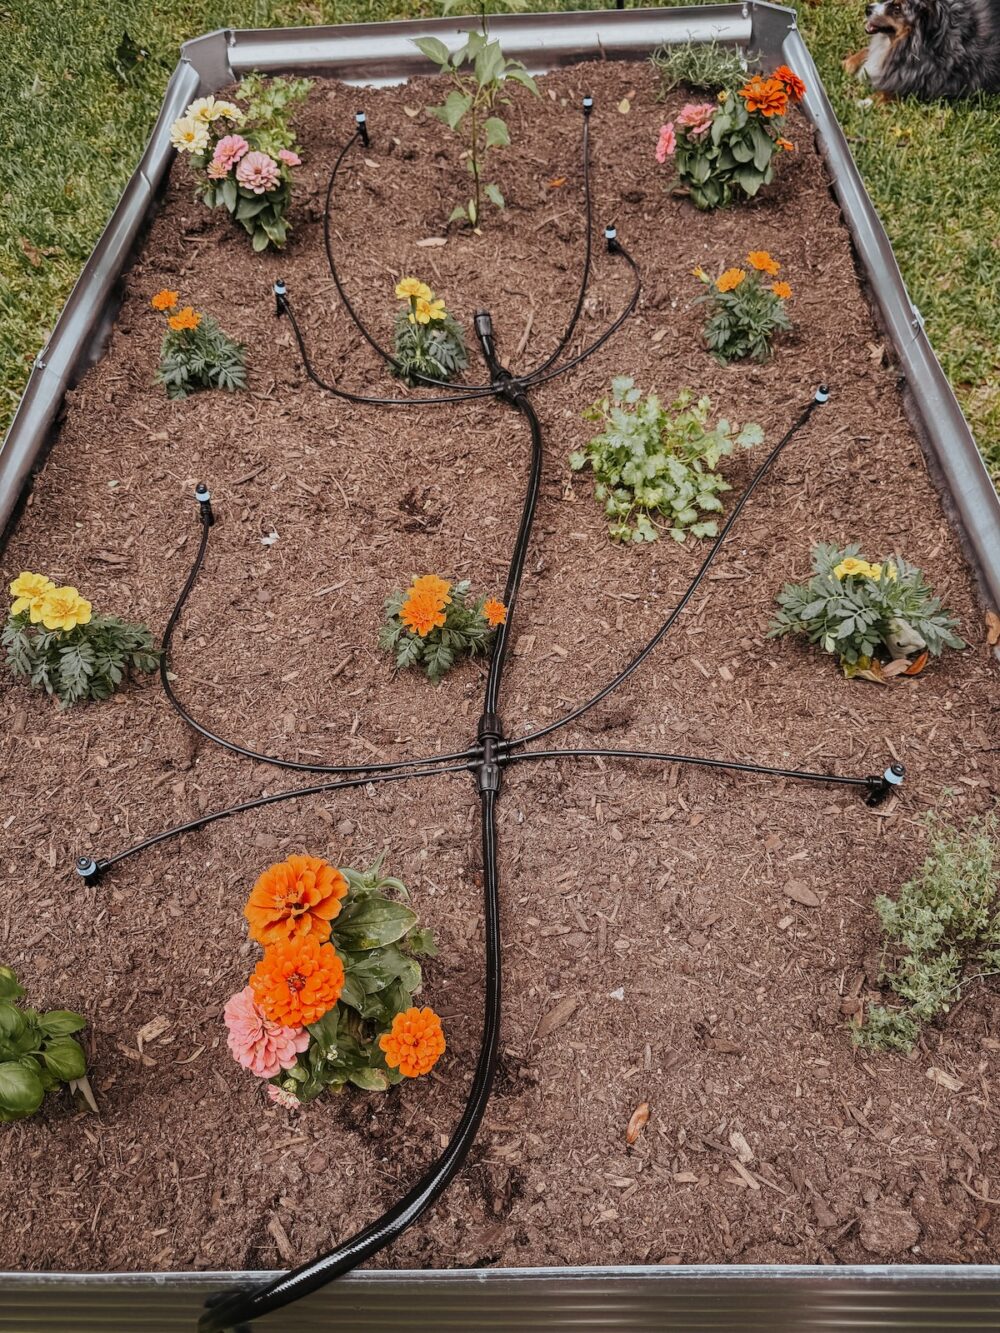
And that’s all there is to it! Drip irrigation for raised beds is a much simpler setup than I ever could have anticipated, and I’m so glad I took the time to figure it out. Now, let’s just hope this helps me keep my garden alive a little longer than I usually do.