Beginner-Friendly Little Free Library Plans
If you’re looking for some simple and beginner-friendly Little Free Library plans, I’ve got you covered! I’ve just finished building a library for my best friend to put in her yard for puzzles, and today I’m sharing all of the details of how I did it!
I’ve been seeing Little Free Libraries all over the place lately, and they make me smile every time. It’s such a fun idea to foster a sense of community in a neighborhood. Plus, who doesn’t love being able to share their books when they’re done?!
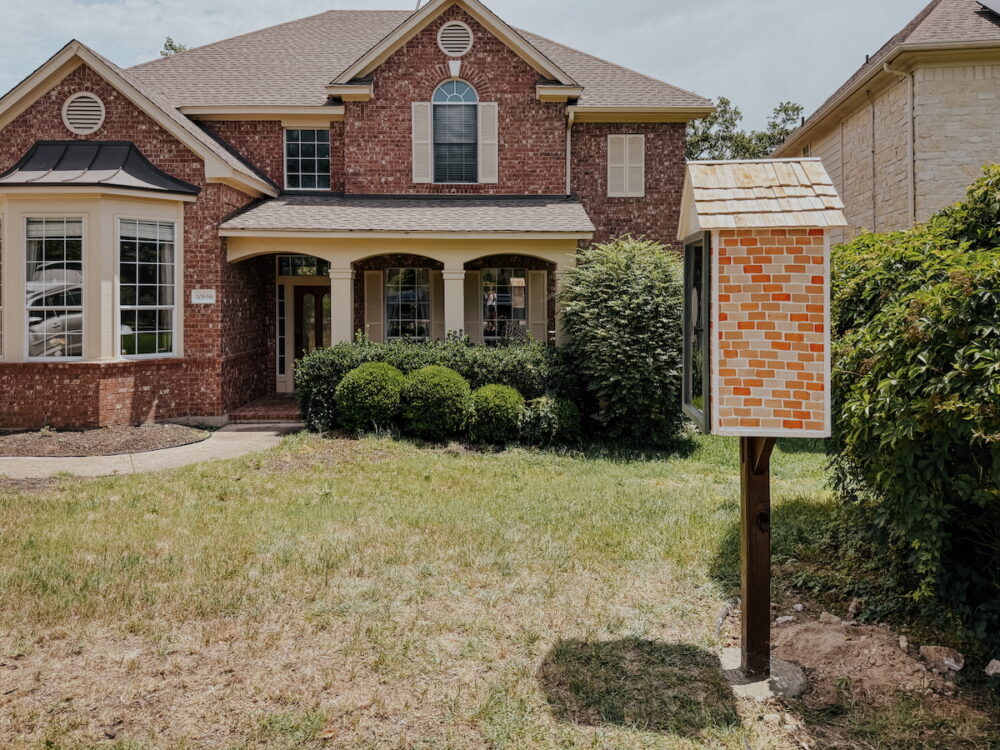
My best friend Parisa has a few Little Free Libraries in her neighborhood, and she recently asked me if I’d be willing to build one for her. But, she didn’t want to use it for books. She wanted to use it for puzzles! I was immediately intrigued because it’s a genius idea, and I agreed. I spent a couple of days working on it with my dad in his workshop (because my garage is a disaster since we’re halfway through packing for a move) and the finished result is gorgeous. Today, I’m sharing all of the details of how we got it done.
Little Free Library Video Tutorial
If you prefer a video tutorial, I’ve got you covered! I recorded the whole process as I worked, so you can follow along and see how it all came together.
DIY Little Free Library Plans
I’m going to walk you through the general process of building my Little Free Library in this blog post. However, if you want full and detailed Free Little Library plans with measurements and a detailed cut list/diagram, you can find that right here!
How to Build a Little Free Library
Materials Needed
Note: My Little Free Library is 36″ tall at the peak, and 20″ x 15″ at the base. If you want the detailed cut list and measurements of my library, you can find them in the official build plans!
- (3) Half-sheets of pressure treated plywood
- (2) Pieces of 1×2 lumber (I used pine)
- (2) 8′ pieces of screen trim
- (1) 8′ piece of 1/2″ decorative PVC trim
- (1) 56″ piece of 4×4 pressure treated lumber
- (1) Piece of 2×4 pressure-treated lumber (you could use scrap, you won’t need the whole length!)
- Cedar shims (3 packs)
- Wood glue
- Scallop Trim
- Primer
- Paint
- 1″ foam brush
- Spar Urethane
- Roof Underlayment
- Plexiglass
- Silicone sealant
- Cabinet hinges
- (2) Magnetic catches
- (2-4) Metal corner brackets
- 1 bag of concrete mix
- Caulk
Tools Needed
- Table saw or Circular saw
- Drill/Driver + Exterior Screws
- Jigsaw with Plexiglass blade
- Pin nailer
Step One: Assemble Free Little Library Frame
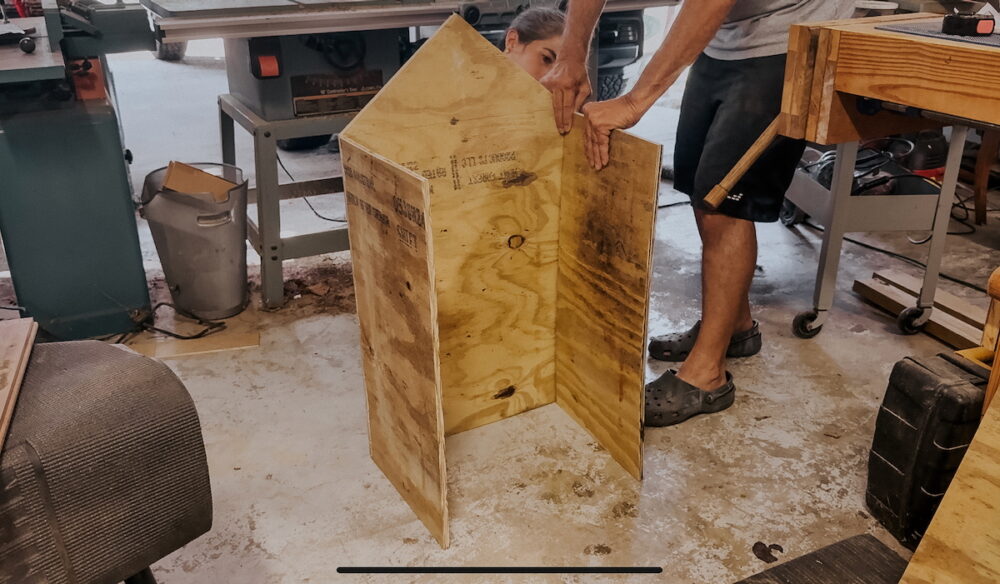
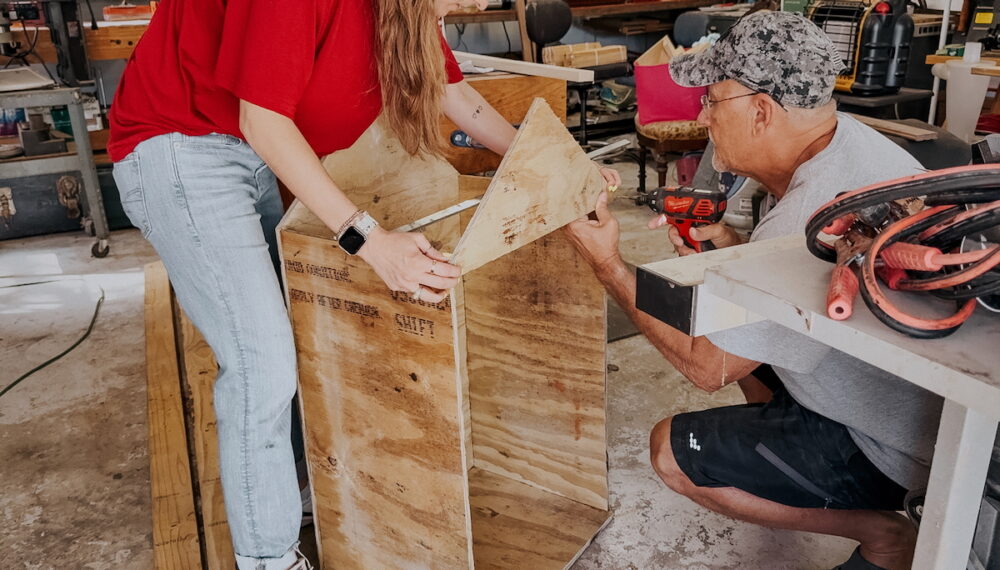
Start by cutting out your back piece, which should be 36″ x 20″ with a peak for the roof. Then, cut your two side pieces (they are 28″ x 15″).
Attach the two side pieces to the back of the Little Free Library. You want the entire base to be 20″ wide and 15″ deep, so place the side pieces on the inside of the back piece, rather than the outside. I used wood glue and exterior screws. Be sure to pre-drill your holes to avoid splitting the plywood. This isn’t the only method, but it probably is the most sturdy and long-lasting! If you don’t want to have any visible screws, you can use pocket holes (learn how to use a pocket hole jig here).
Next, attach the base of the Little Free Library using the same method. The base measurement is 20″ x 15″.
Step Two: Attach Front and Front Trim Pieces
Now, you’re ready to attach the front pieces! I cut two long and skinny trim pieces from my plywood to use as front trim, but you could also use any scrap wood you have laying around for this. My trim pieces measure 27″ long and 1.5″ wide. These cover the exposed edges of the side pieces.
As for the front piece, you’ll want it to be a total of 9″ tall, with a 1″ section at the bottom that isn’t part of the triangle. To achieve this, start by cutting a 20″ x 9″ rectangle. Make a mark 1″ up on either of the short sides, and then make another mark in the center of the long side. Connect your marks using a straight edge (or a scrap piece of wood), and cut on the line using a circular saw!
You’ll attach this piece by drilling directly through the 1″ section at the bottom and into the edges of the plywood. Again, be sure to use wood glue! Things will feel floppy and unsteady but we’ll fix that in the next step.
Step Three: Add Interior Support
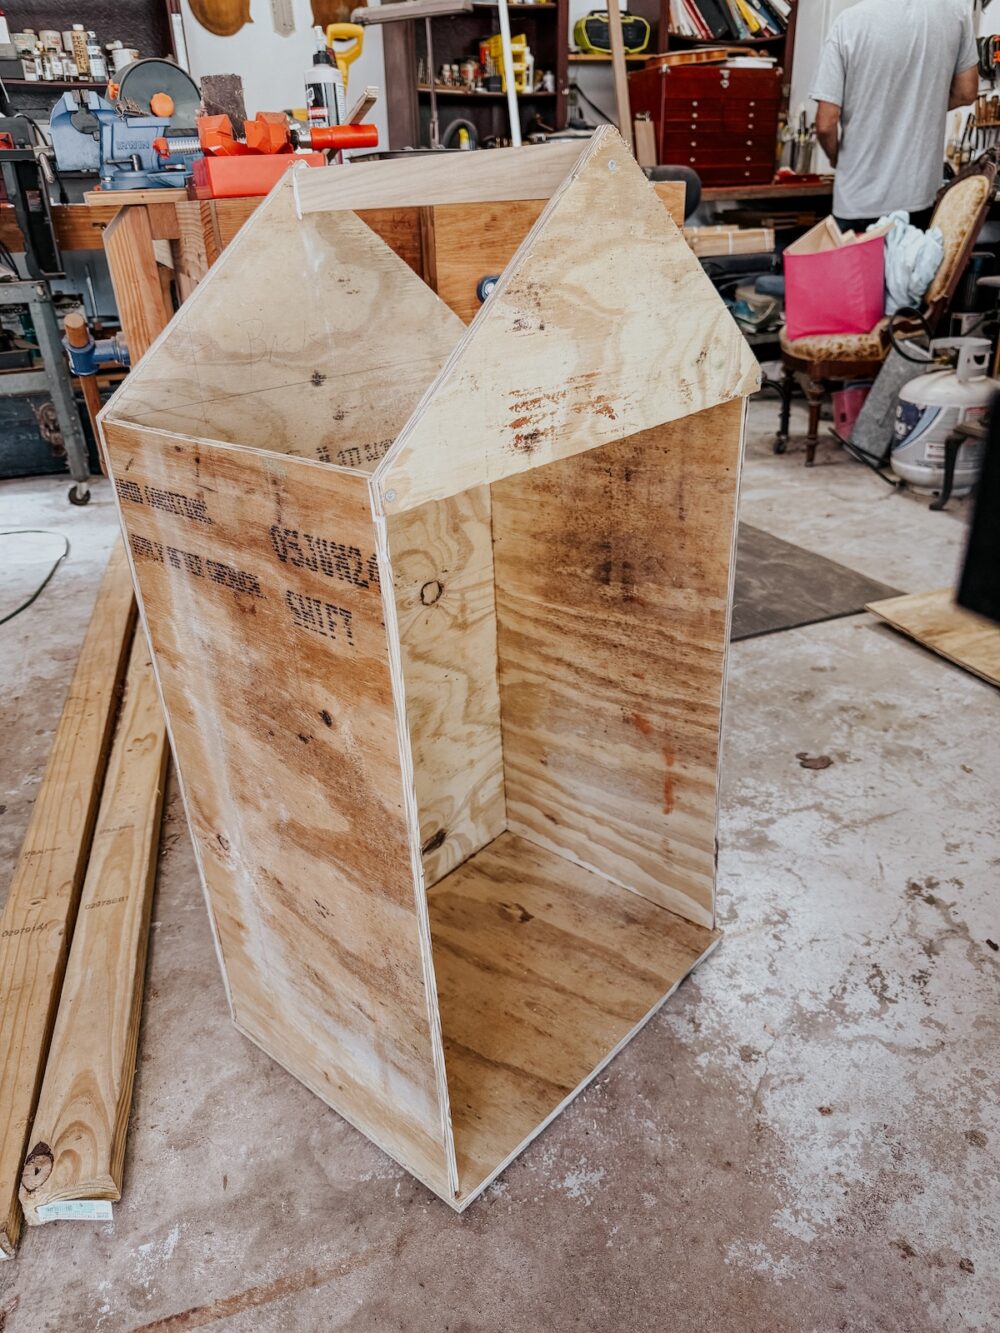
Now, you’re ready to add some support to the inside so that things don’t fall apart on you! I used a scrap piece of 1×2 pine for this, but you can use anything you have laying around. A 2×2 piece of wood is ideal. This doesn’t need to be pressure treated lumber, as long as you plan to prime and paint it later!
Cut the wood to fit inside your house (it should be right around 14″, but I recommend waiting to cut until you’ve assembled and measured your exact space). Slip it between the two roof peaks and use wood glue and screws to attach it. As with the other screws, be sure to pre-drill your holes!
Step Four: Attach Roof Pieces

The last part of the main assembly of your Little Free Library is the roof pieces! If you have enough plywood left over to cut two full pieces for the roof, that’s great. But, if you follow my exact plans you’ll have a seam. This is totally fine because you’ll be covering it up later anyways!
I cut my roof pieces to 18″ wide and about 14″ tall so that there was a bit of an overhang all around. You can adjust this to whatever works best for the look you want. Use the same wood glue and screws method here, being careful to mark where your screws should go so you don’t miss the plywood edge!
Step Five: Add Shelf
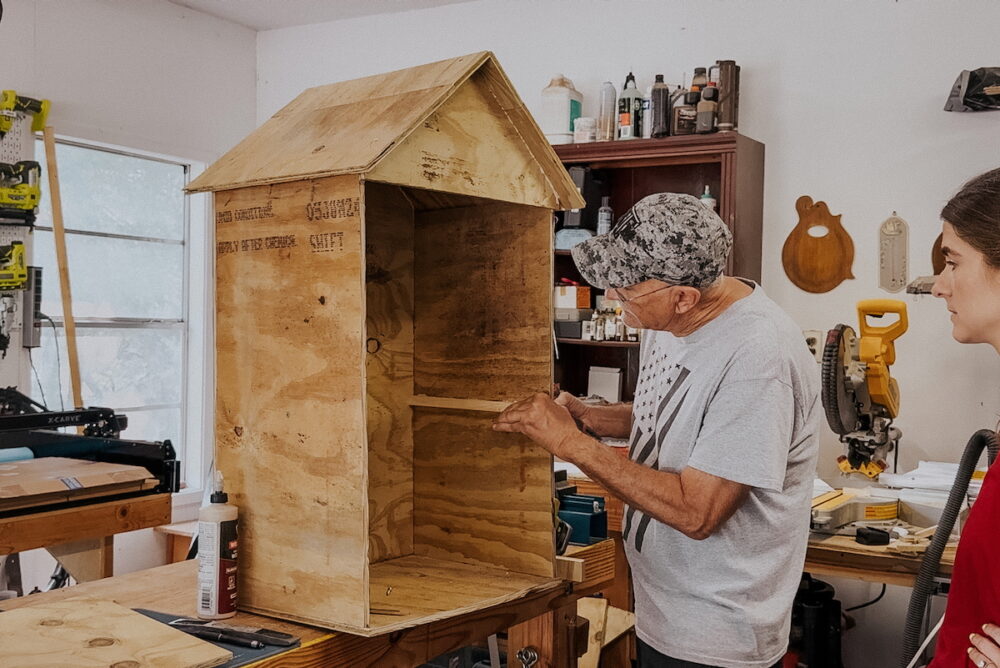
I decided to add one shelf in about the middle of my Little Free Library. If you plan to use it for books, I recommend playing around with the measurements to make sure you can fit a standard-sized book standing upright. I knew mine would be used for puzzles so I wasn’t too worried!
To install the shelf, you’ll cut two support pieces out of scrap wood. I had some pine laying around and used that. But, anything you’ve got will be fine. You want the support pieces to be at about 1″ wide, so the shelf can sit on them.
Hold the support piece inside the library where you want the shelf to sit and make sure it’s level. Then, pre-drill holes through the plywood and into the support piece. If you have a second set of hands to help you here, that’s ideal! After pre-drilling the holes, you can use wood glue and screws to attach them fully.
Finally, set the shelf on top and screw or nail it into place! If you want to make things easier on yourself later, wait to fully attach the shelf until the library is installed and on the post. For now, just set it in place.
Step Five: Add Trim + Decorative Details

Here’s where you get to get a little creative – my favorite part! Things will probably be looking a little, um, less than cute right now. But, no worries, trim will fix that right up. You can add whatever trim you like to make this fit your desired style, but here’s what I did:
- I attached PVC screen trim on the visible plywood edges on the sides and bottom.
- I added this PVC trim along the roof line.
- I attached some scallop trim on the front roof peak.
- And I added some PVC screen trim on the front of the shelf piece as well.
For all of the trim, you can use wood glue or construction adhesive and pin nails to attach. If you use the scallop trim, you’ll end up with a gap behind it as you stack it on top of each other. I shoved a wood shim behind the trim to have something to nail into, and it worked great!
Add as much or as little trim as you like before moving onto the next step!
Step Six: Prime + Paint
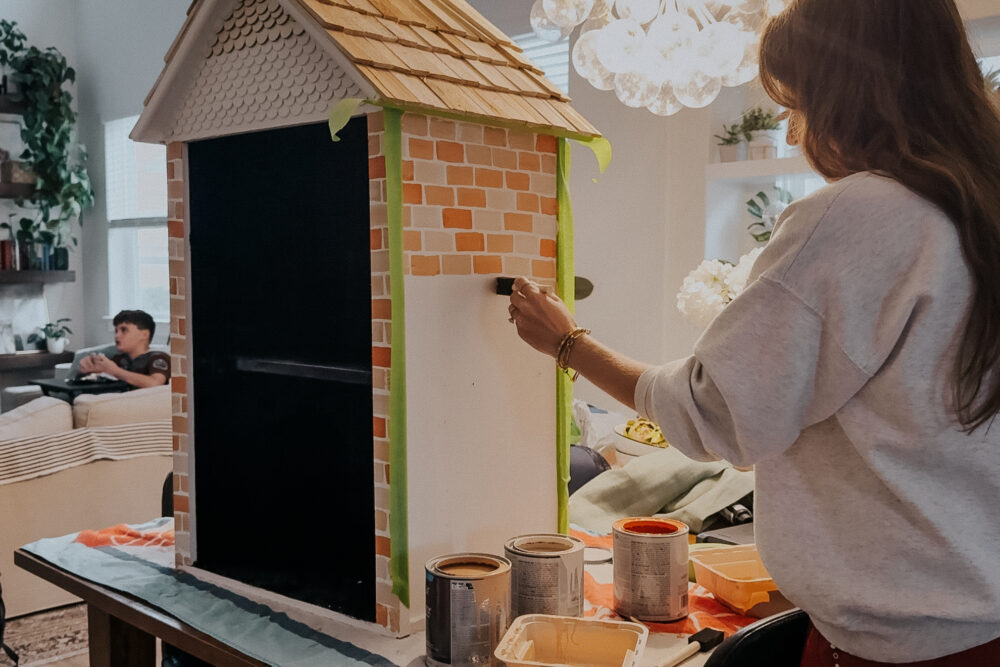
Start by caulking all of the seams and using wood filler on any nail holes. This will make a big difference in the finished product, and will help it last longer! Then, prime the entire Little Free Library (this is my go-to primer). Once that has dried, you can paint.
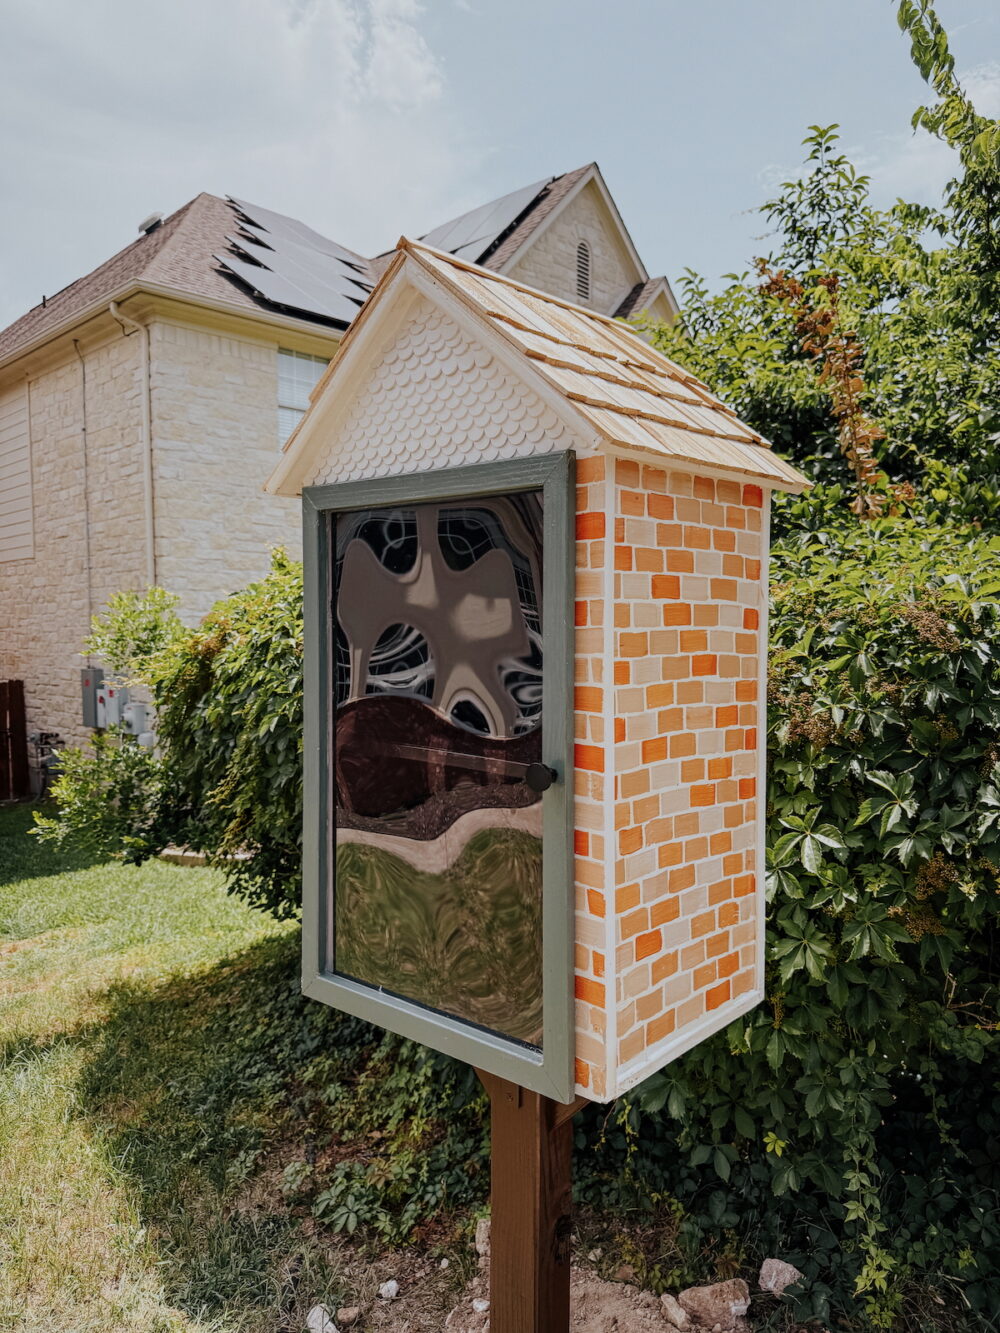
I used black spray paint on the inside and Behr Exterior paint in Weathered White on the outside. Once all of the paint was dry, I painted on a faux brick pattern. I was really nervous about painting this (I’m not very artistic), but it ended up being really easy! I just grabbed three different brick-ish shades of paint and used a 1″ foam brush to paint the bricks.
The paint colors I used are:
- Sherwin Williams Yam
- Valspar Vienna Beige
- Valspar Sand Storm
I mixed a little bit of each Yam and Vienna Beige with some of the Sand Storm, not stirring fully so that the color was a tiny bit swirled. That left me with a total of 5 paint colors to work with. I just dipped the end of one foam brush into a color and dragged it along the library to make a brick shape. Then I grabbed a fresh foam brush and did it again with another color. I didn’t let myself overthink this or get too fussy with it. I let the colors mix, I didn’t go in any particular order. The more random it looks the better!
Once your paint has dried, you’ll want to seal it with some Spar Urethane for a really long-lasting finish.
Step Seven: Finish Roof
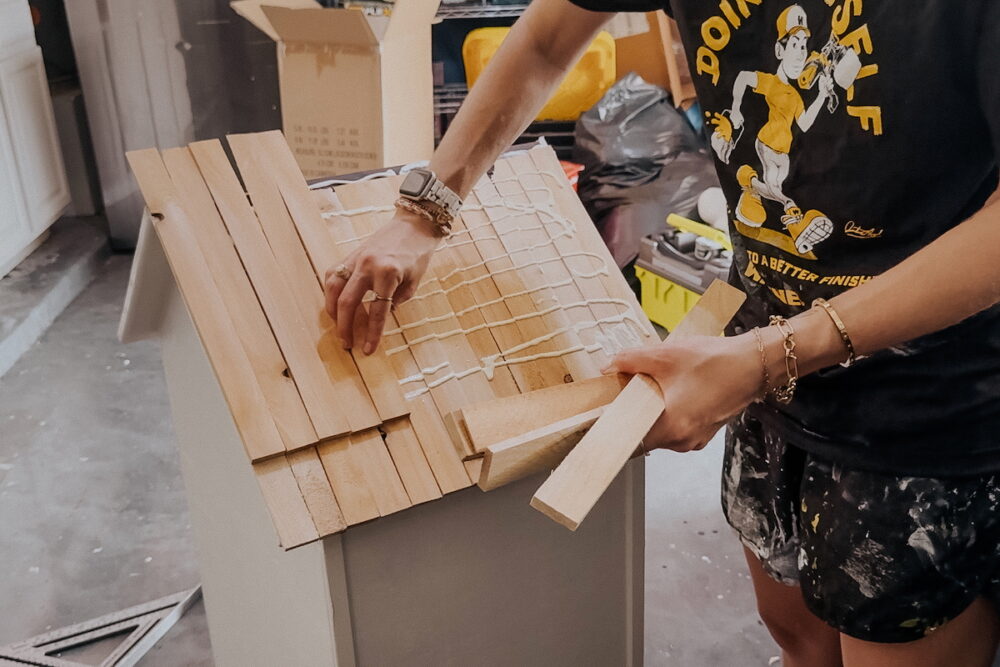
You can finish off the roof in a number of different ways but I knew from the beginning that I wanted to do a cedar “shingle” roof. I grabbed three packs of cedar wood shims and used those to create my roof.
You’ll want to start by laying down some underlayment – if you can find someone who has some scrap so you don’t have to buy a full roll, that will save you some money! To install it, just cut the underlayment to fit on one side of the roof and then use a staple gun to attach. Repeat on the other side, making sure the seam on the roofline is completely covered.
Once you’ve got your underlayment down, you can move on to the shingles. This is an imperfect process (shims are not a uniform size or shape!), so if that’s going to annoy you I recommend using regular shingles or a different method.
For the first layer of shingles you’ll need to use construction adhesive to attach them. I added some pin nails to each of the shims to hold them in place while the adhesive dried. Then, attach another row using wood glue and pin nails. I left about 2.75″ of each row visible when I was putting the next row on, but I didn’t measure at all – I just did it by eye! I added four rows of shingles to my roof. Once you reach the second row there will be a big overhang at the top. Don’t worry about it! Just keep going until you reach the last row. Then, use your jigsaw to cut off the excess. You can watch what this looks like in the video tutorial!
After you’ve finished adding all of your cedar shims and your wood glue is dry, cut a piece of wood corner molding to fit along the top ridge of the roof. Use that to cover up the seam. You can attach with wood glue and pin nails!
Finally, you can stain the roof if you’d like, or just go straight to sealing with a Spar Urethane. I used a spray can, because it was much easier than trying to brush it on the uneven surface.
Step Eight: Build + Attach Door
We’re getting close to the end! Now it’s time to create a door for your Little Free Library. I used 1×2 pine to assemble the frame for my door. I assembled it with just wood glue and brad nails. But, you can also use pocket holes if you prefer!
To make the door, just cut two pieces of your pine to 27″ with mitered edges, and two to ???, also with mitered edges. I recommend using corner clamps to help as you create a rectangle with your pieces. Then, add wood glue and nails to hold everything in place. This is a perfectly sturdy method and should hold up just as well as pocket holes would!
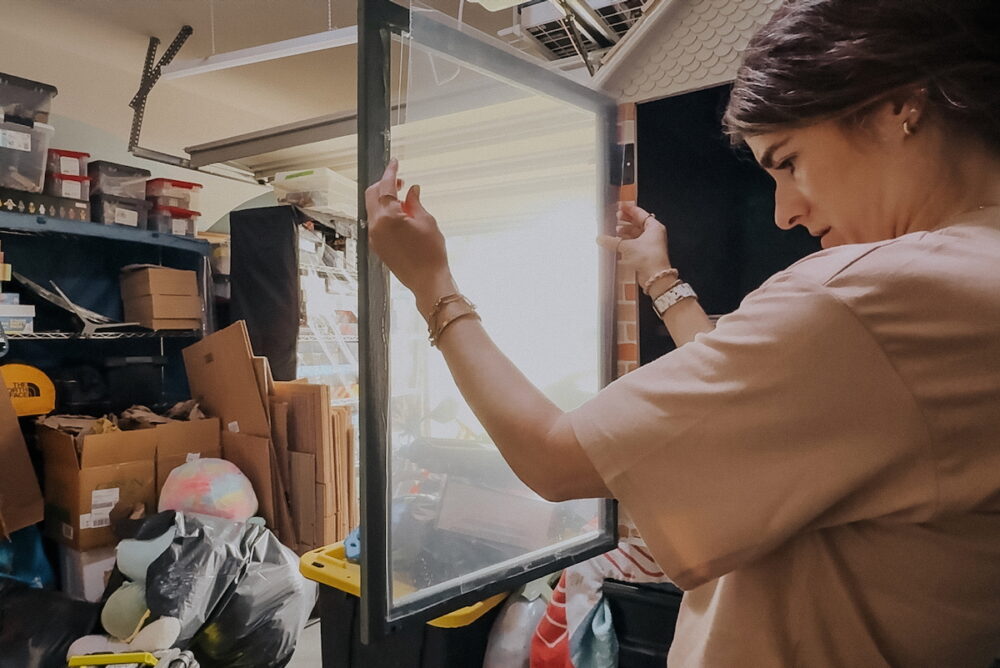
Once the wood glue has dried, you can add your plexiglass. You can use a jigsaw fitted with a Plexiglass blade to cut your sheet down to size. Then, simply pre-drill holes in the edges and screw it right into the door frame using exterior screws. If you want to use a more advanced method, you could create a rabbet in the back of the door frame using a table saw. Then it will sit flush on the back of the door. I wanted to keep things as beginner-friendly as possible, so I skipped that step!
Once the plexiglass is installed, add a waterproof sealant to the front of the door all along the edges. This will help make sure no water gets into the door!
Attach the door using two cabinet hinges. Then, add a magnetic catch to the top and bottom of the door opening to help hold the door closed.
Step Nine: Build Base + Attach
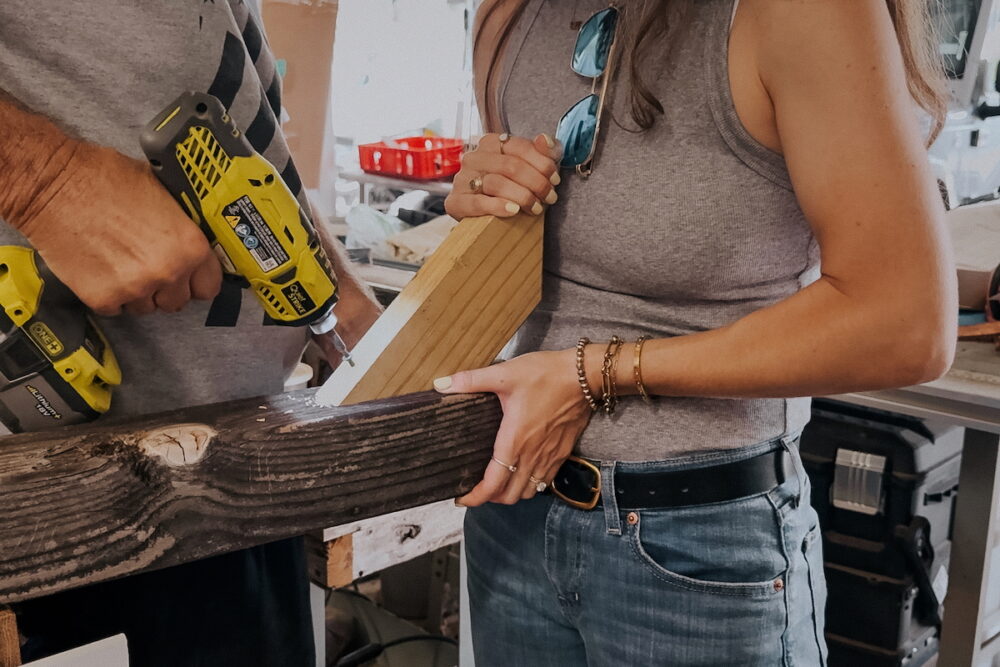
There are a variety of ways you can build a base for your Little Free Library. You could concrete it in a planter (which was a plan we considered!) or into the ground. Either way, you’ll need a post to hold it up.
We decided to have it sit about 32″ off the ground, and we wanted to have approximately 24″ of the post buried in the ground. So, we cut our 4×4 post to 56″.
Then, we cut two pieces of pressure-treated 2×4 wood to act as supports. There is probably a “correct” way to do this, but we mostly guess & checked. We held up a piece of the 2×4 at an angle from the post so that it was level with the top of the post and didn’t extend more than about 8″ from one side. Then, we marked a line where it crossed the post to show us what angle we needed to cut the bottom part at.
With the bottom part of the support piece cut, we rested a level on the top of the post and used it to draw a line across the top of the support piece to show us that angle.
We used a miter saw to cut both angles, and we used the first support as a template to cut the second one!
Both support pieces can be attached to the post using long exterior wood screws. For additional support, we used some 4″ metal corner brackets on the other two sides (attached after the library was on top of the post). If you want to make things simple, you could just use the metal corner brackets for all four sides!
I painted our base brown using some spray paint. You could leave it alone, stain it, or paint it any color you like!
Once your support pieces are in place, rest the library on top of your post and screw it in through the bottom of the library and directly into the post and supports! Add your corner brackets underneath for additional support.
We were able to use my dad’s vice on his workbench to hold the post in place while we attached the library to it. If you don’t have anything like this, it might be easier to go ahead and set your post (see next step), and then attach the library.
Step Ten: Install Your Little Free Library!

Now, you’re ready to install! Dig a hole about 24″ deep and 8-10″ in diameter. Insert your post and use Quickrete to set it. We mixed ours in a 5-gallon bucket, but if you work with the fast-setting one you can actually pour the mix directly into the hole and add water to it from there.
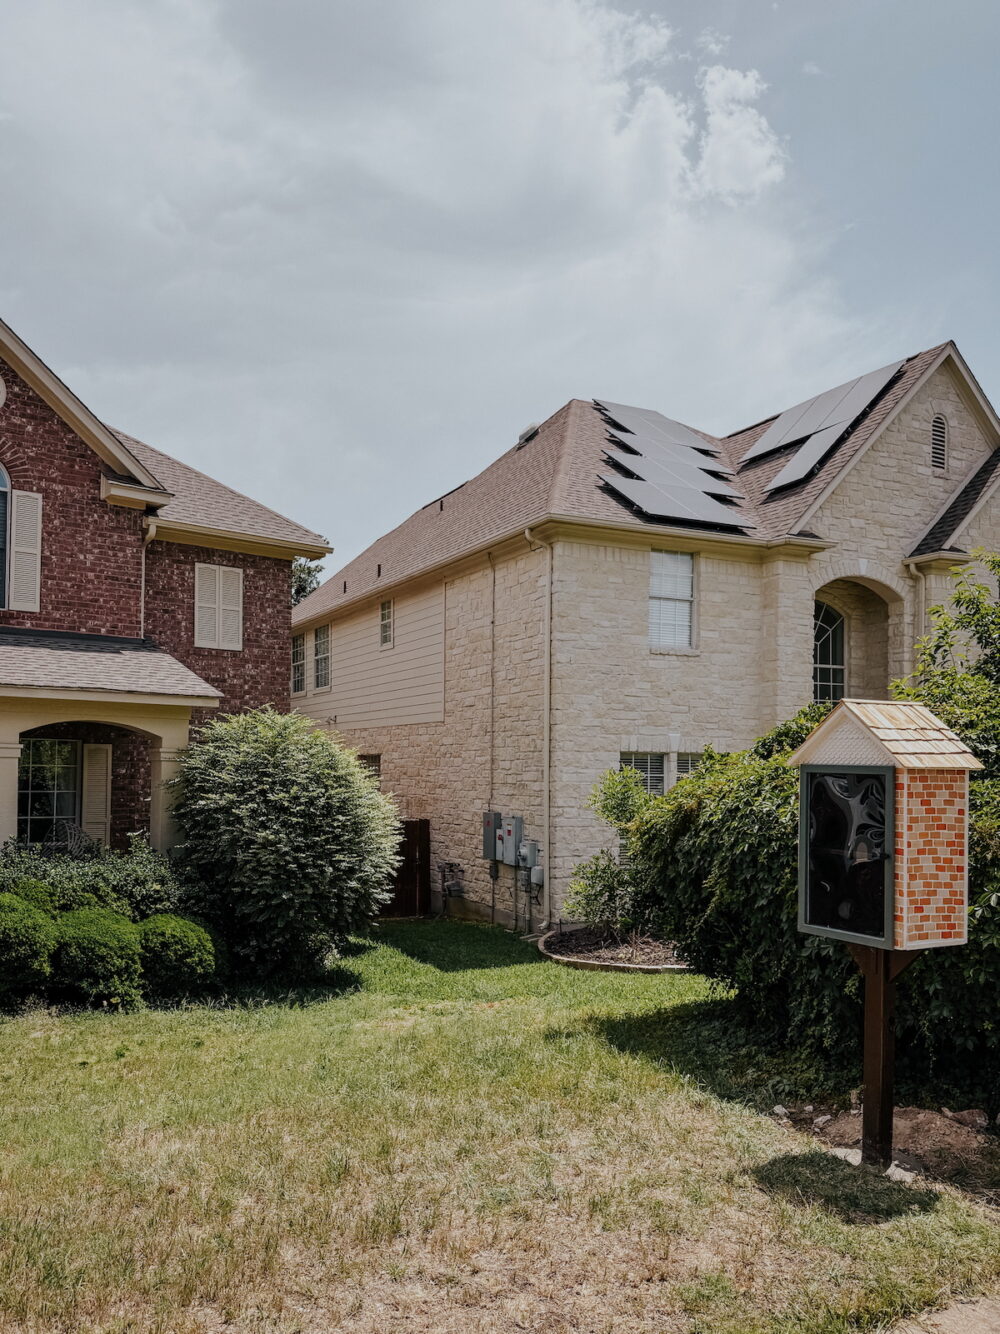
And just like that you’ve got a gorgeous Little Free Library to use for books, puzzles, or anything else your little heart desires.
This is a big, time-consuming project. But, despite the fact that it might seem intimidating, I promise it’s easy! If you want more detailed diagrams and a cut list, you can check out my Little Free Library plans right here.