
DIY Carved Wood Sign + Painted Arch Stripes
Last updated on March 3rd, 2023 at 10:36 pm
how to make a simple carved wood logo sign – perfect for a garage or workshop! This post is sponsored by Inventables.
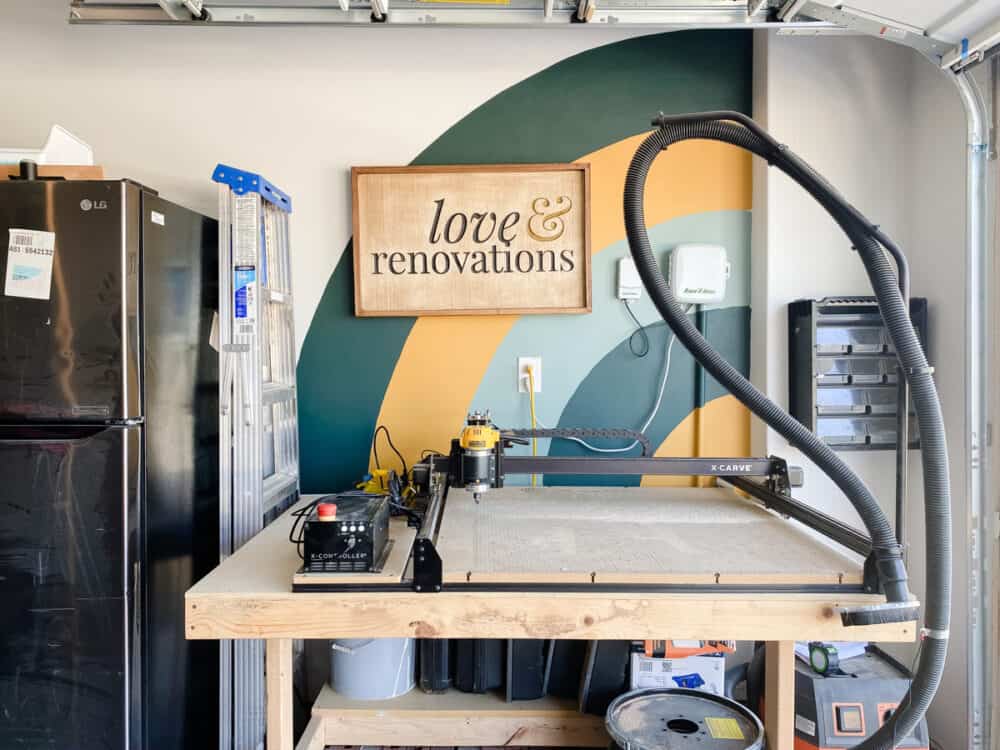
Oh heeeeeeeeyyyy. Y’all, this cute little corner of my garage is looking MUCH CHEERIER than it was last week.
And the best part? I purchased absolutely nothing for this little refresh. It was all scrap wood, leftover paint, and a little bit of creativity.
That’s my favorite kind of project.
Let me back up. You might remember that I’m slowly (very. slowly.) working on organizing and updating our garage, one little wall at a time. I started off with some board and batten and a pretty paint color (along with some serious organization) on wall one a few months back, and this past week I decided it was high time I tackled the next wall.
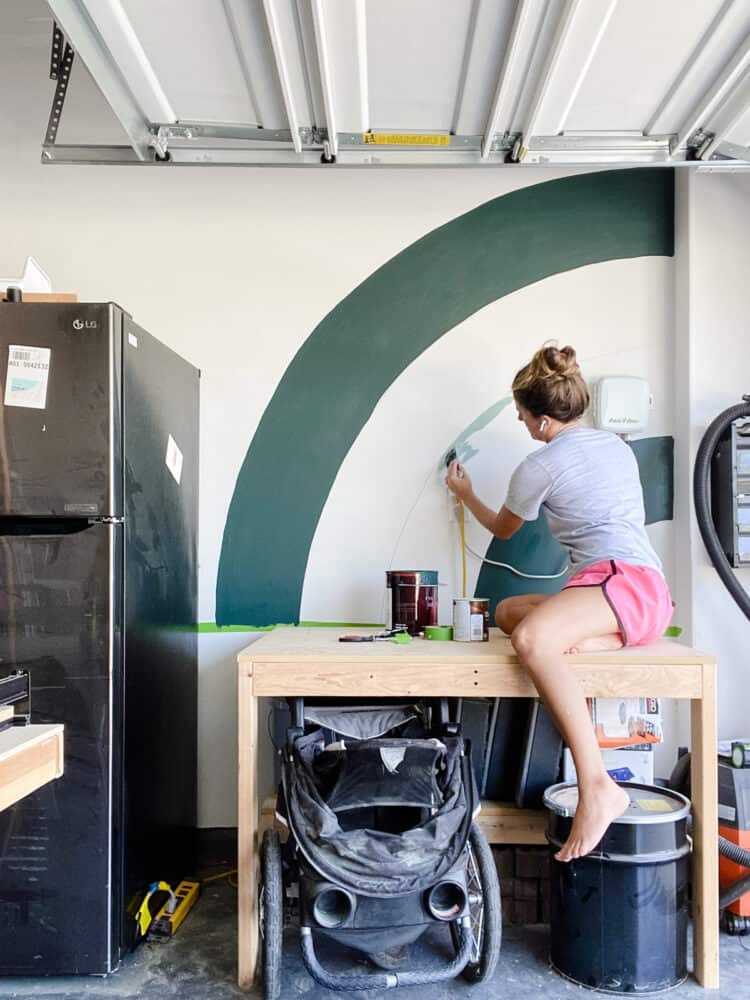
Because no organization post is any good without a solid before and after, let’s take it back to the beginning of last week, when this corner looked like this:
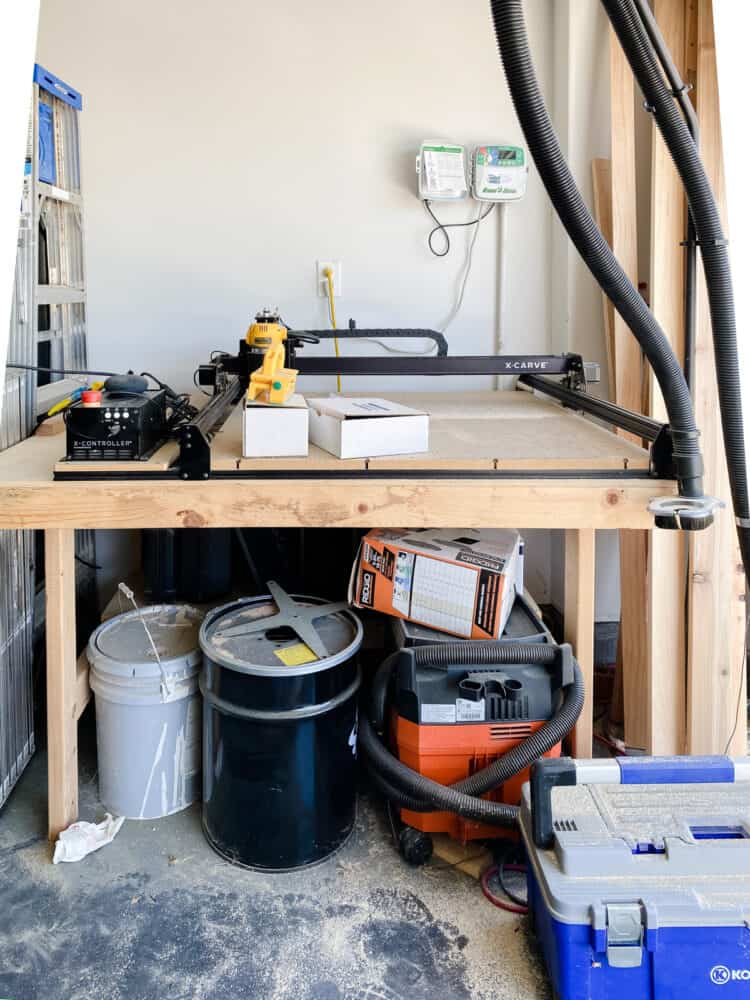
We’ve got a whole wall of shelves and bins next to the X-Carve over here and, while they set us up for success, the last time we cleaned in here we only got it about 95% organized and that last 5% is guaranteed to mess up an organizing job every single time. We also have never organized this specific corner, so it was basically just one giant hot mess that made me lose a little more of my sanity every time I had to use it.
So, to kick off the project, I spent a few hours out in the garage getting everything organized, and then I took the time to make it cute, too.
Because I’ve learned that the best trick for motivating me to keep a space clean and organized is to make it look great.
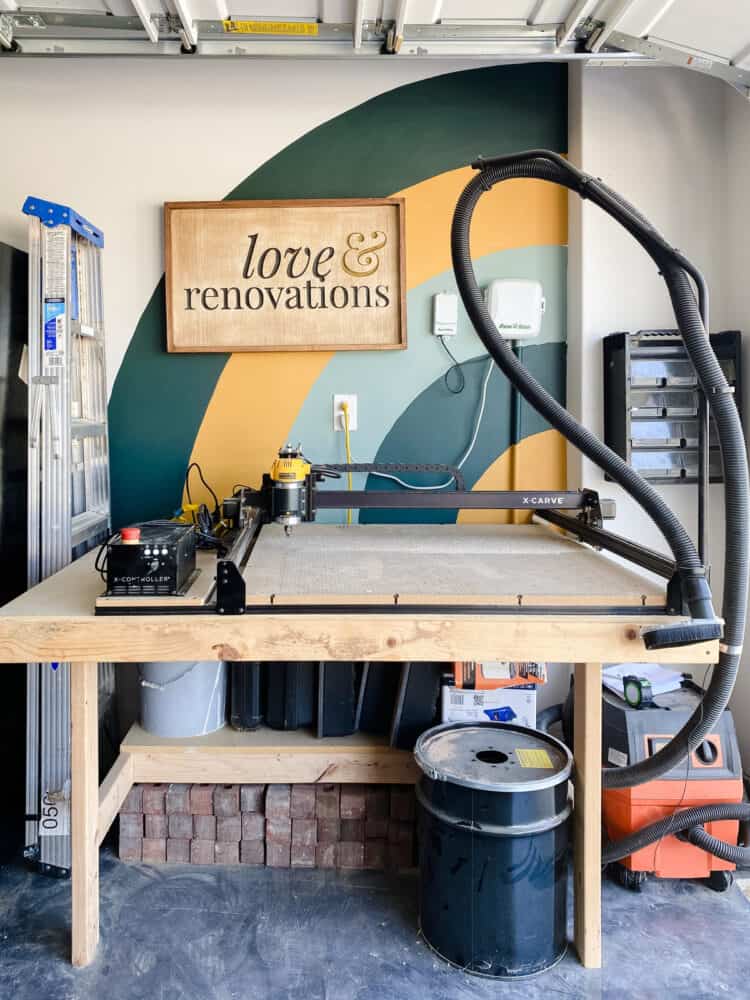
I’ve envisioned a big Love & Renovations sign hanging above our X-Carve out here since we very first moved in, so of course that was the first thing I did. I hadn’t ever carved on plywood like this (I used pine for my last carved wood sign), but I had some scrap wood laying around and figured I’d give it a shot. I was really pleasantly surprised with how well it carved! The only big thing to remember is that when you sand it, you have to be careful not to sand so much that the top layer of wood is removed – I had that happen in a couple of spots and it looks fine, but I wish I had been a little more careful. You can most clearly see where I took off too much in the “v” in “love”.

This project was so fun and honestly just so worth the extra time it took to make the garage look a little cuter.
I feel like there’s some sort of major life lesson in there somewhere. If you’ve got a space in your house that is constantly messy and irritating you, spend some time thinking about how you can make it look great. Because even the messiest and most challenging spaces will stay looking nice if put some effort into organizing and then you make them beautiful.
It’s science.
DIY carved Wood logo sign
TOOLS & MATERIALS
- Inventables X-Carve 3D Carver
- 90-degree V-Bit
- Wood board – I used plywood for this, but any type of wood in the size you want will work!
- 1×3 pine boards (for the frame)
- Power sander with 120-grit sandpaper and 220-grit sandpaper
- Paint
- Small paint brush
- Sealer (I used spray Spar Urethane, since it’ll live in my garage)
Using the X-Carve
I’ve talked a lot before about how the X-Carve works and how I use it (I’ll link all of my old X-Carve projects at the end of this post so you can check them out if you’re curious!), so I won’t get into the nitty gritty details of exactly what to do here, but trust me when I say this project is so easy if you have an X-Carve.
I used Inventables’ free design program, Easel, to make this sign. It’s really simple to use, and it only took me a few minutes to whip up this simple design.
Obviously creating a sign with a brand’s logo on it isn’t something everyone would want to do, but this is easily transferrable to a project anyone might like to do. You could carve your family’s name, a fun quote (like I did here), or any word or phrase you want! Think of this tutorial as teaching a technique you could apply to any number of sign ideas, rather than replicating this exactly.
Once you’ve carved your sign, it really starts to come alive with the personalization and details! Pull it off the X-Carve and you’re ready for the fun…
Painting the sign
Choose the colors for the inside of your letters and grab a small artist’s brush to paint them. Don’t worry too much about staying in the lines – it doesn’t matter if you get paint on the face of the board, because you can just sand it off.
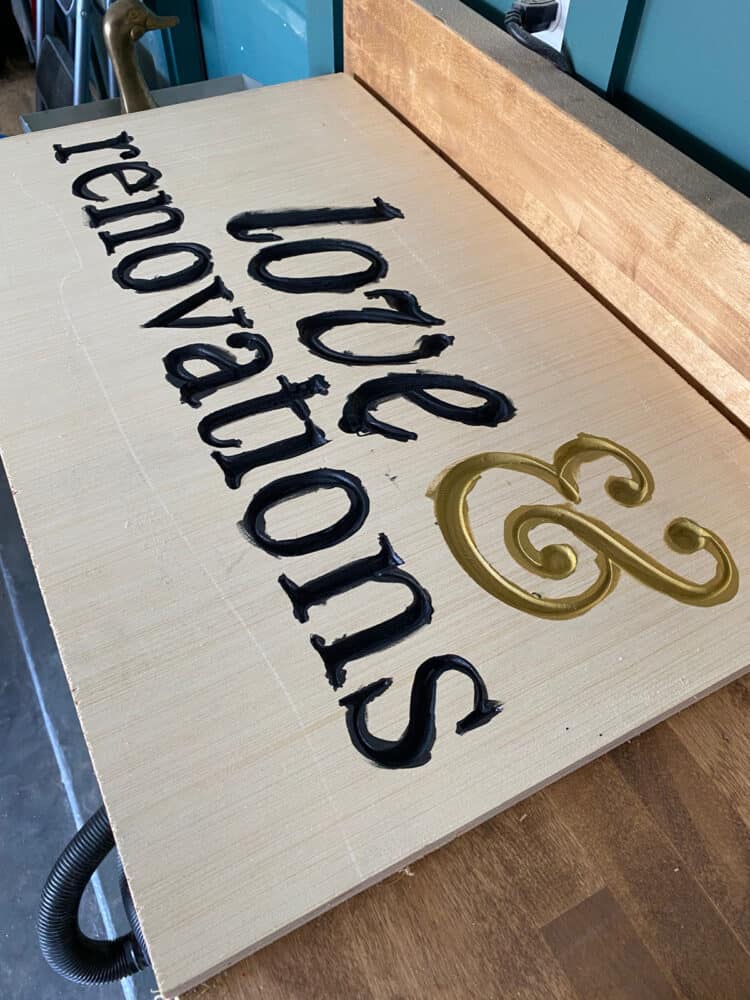
After the paint is fully dry, grab your power sander and sand the top of the sign until all of the excess paint is removed. There will be sawdust everywhere so you’ll want to clean up the sign a bit before you move on to the next step!
Adding a DIY frame to the sign
I made a last-minute decision to frame the sign, and I’m so glad I did. This extra little step really elevated the sign and made it feel so much more special.
To frame the sign, just cut your 1×3 boards to the length of the sign (I used a mitered edge, for a clean look, but you can just butt them up against each other too!), and attach to the sign using wood glue and pin nails.
I rested the sign on a couple of scrap pieces of 1×3 as I was attaching it so that there’s a lip on the front and back of the sign – this gave me a perfect way to hang the sign once it was done. The lip on the back of the sign simply rests on two nails in the wall.
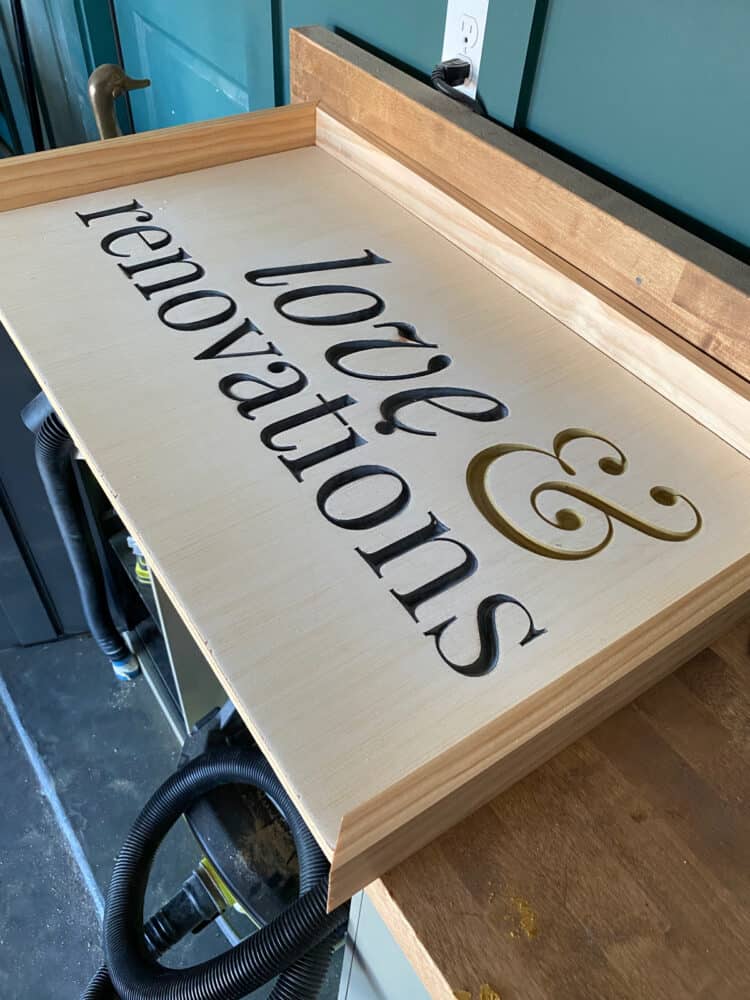
I stained the entire sign, but I definitely wished that I would have left the base of the sign raw. If I was doing this again, I’d leave the background the natural plywood color and just stain the frame. Ah well, hindsight is 20/20, right?!
It felt a little boring to just hang the sign up on a plain white wall, so I decided to paint a little mural on it first. You can see the details of how I did this in this Instagram highlight, but it was a shockingly fast project that only took me a couple of hours one afternoon to knock out. It was one thousand percent worth the effort, because it’s definitely my new favorite spot in the garage and I’m already trying to figure out where I could do something like this inside the house!

This project was so, so fun, and my brain is swimming with ideas for other DIY carved wood signs I could make. I think I’m going to start with a miniature version of this project to make a “no soliciting” sign for our front door!
If you want even more DIY wall mural ideas, click here to see what else I added to the garage!
Need more ideas for what you could do with an X-Carve? Here are all of my other projects I’ve shared so far:
- DIY Wooden Baby Toys
- Bread Boards & Cutting Boards
- Carved Wood Pumpkins
- Interactive Wooden Christmas Tree
- Carved Wood Sign
- DIY Wooden Puzzles
- 3 DIY Tray Ideas
And if you still aren’t convinced this machine is amazing, you can find even more fun ideas on the projects page of Inventables’ site!
I actually LOVE that you stained the base, too. I get why you wish you’d left it raw, but I love the slightly weathered look, especially for a garage! And I looooooooove the arches/rainbow/mural. So fun!!!
Oh my gosh! I love it!! Looks so good.