
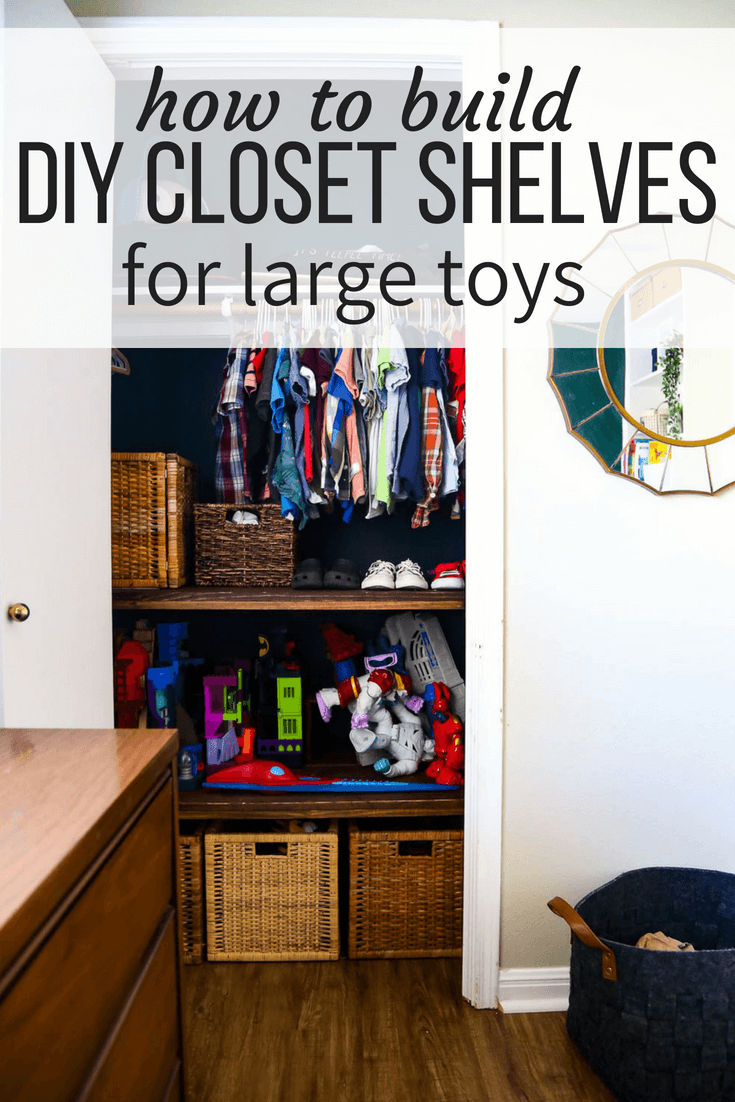
DIY Closet Shelves (AKA: How to Organize Your Kid’s Closet)
Last updated on July 24th, 2024 at 08:18 am
Our four-year-old son’s room has been a disaster since we moved into this house, and a lot of it was due to a total lack of closet organization! We built some DIY closet shelves for him and it might just change my life forever!
One of the rooms that has given me the most grief since we moved into this house in November has been my son, Jackson’s, room. In our old house, he had a super organized room with lots of shelving and organization. It was easy to keep (mostly) clean, and it was one of my favorite rooms in the house. In this house? Well, his room was a disaster. If you’ve forgotten, allow me to remind you.
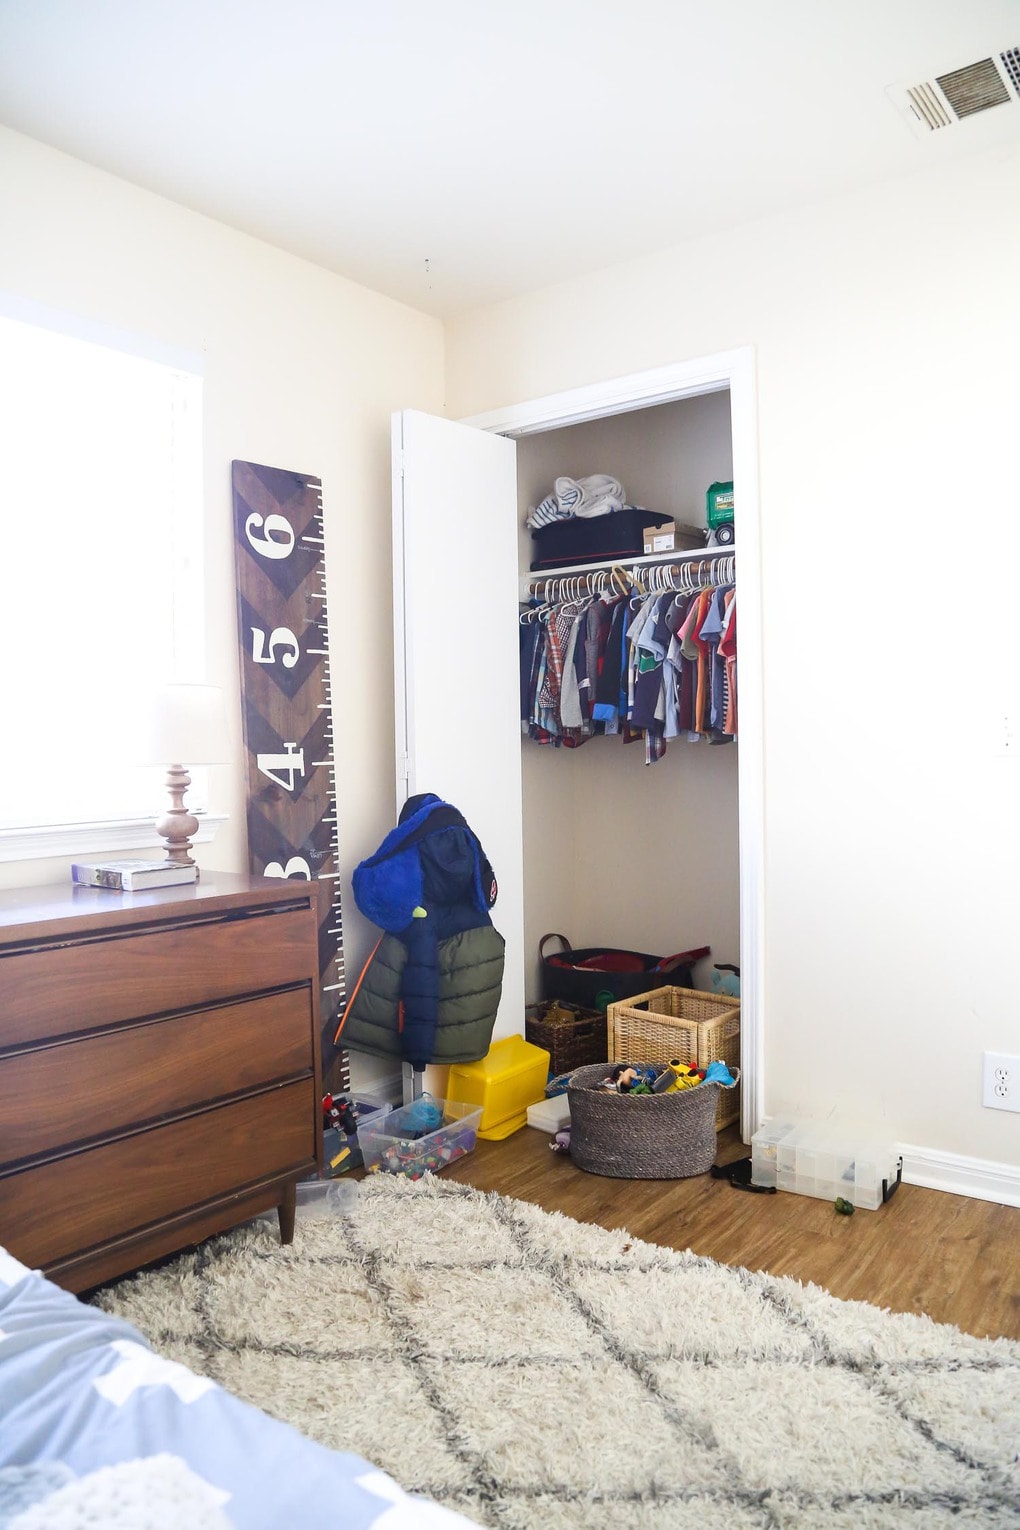
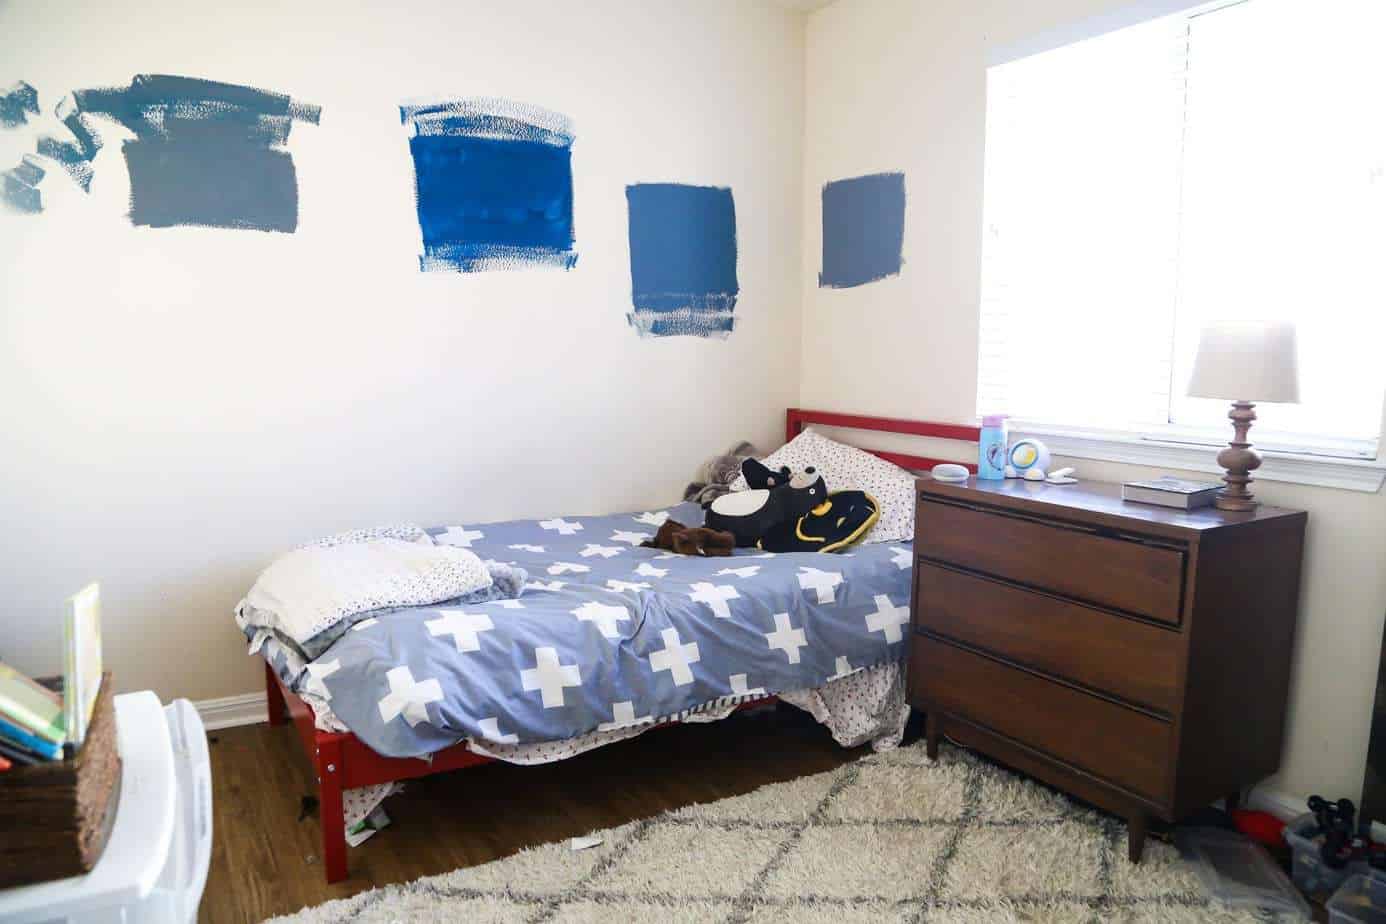
It doesn’t look that bad here, but trust me when I say there was a lot of cleaning that took place in order to get these photos. Our problem was that thanks to the built-in shelving in his old room, we didn’t have any storage furniture at all – which means absolutely zero places to put his toys. And even if we did have storage furniture, the room was so tiny (it’s slightly smaller than 10X10), we wouldn’t have been able to fit it in there!
We solved the storage problem for the most part by adding a bed with built-in shelves to help him stay a little more organized. It made a huge difference (and looked fantastic), but because we never actually finished working on his room and got everything organized, it quickly fell back into disarray. Our major problem was a lack of storage for his big, ugly toys. He loves Imaginext toys and he often will purchase hideouts with his chore money (or will get them as gifts for birthdays, etc). That means we had about 6 giant toys that had zero places to go except his bedroom floor. And when you don’t have much bedroom floor to begin with, that’s just a recipe for disaster.
We needed a solution for the toys, and his closet was seriously lacking any sort of organization (it was also a hot mess!), so we decided to build some DIY closet shelves to help corral things a bit more.
And, holy cow, did it ever make a difference!
This post contains affiliate links. Click here to read my full disclosure policy.
This was such an easy project (I did it totally on my own, 7 months pregnant, in less than a day – with a 4-year-old running around!), so I wanted to share a quick tutorial for how I did it in case you’re struggling with kid’s room organization as well.
I mean, aren’t we all?!
PSST: If you’d rather see the tutorial in video form, click on over to my IGTV channel to see a video I made while I was working on it!
How to Build DIY Closet Shelves
Materials:
- (2) 8-foot 2X4s
- (4) 4-foot 1X12’s (we used pine)
- (2) 4-foot 1X2’s (we used pine)
- Drill/driver set
- Long screws
- Level
- Stud finder
- Wood glue
- Nail gun + nails
- Stain
Directions:
Step 1: Paint
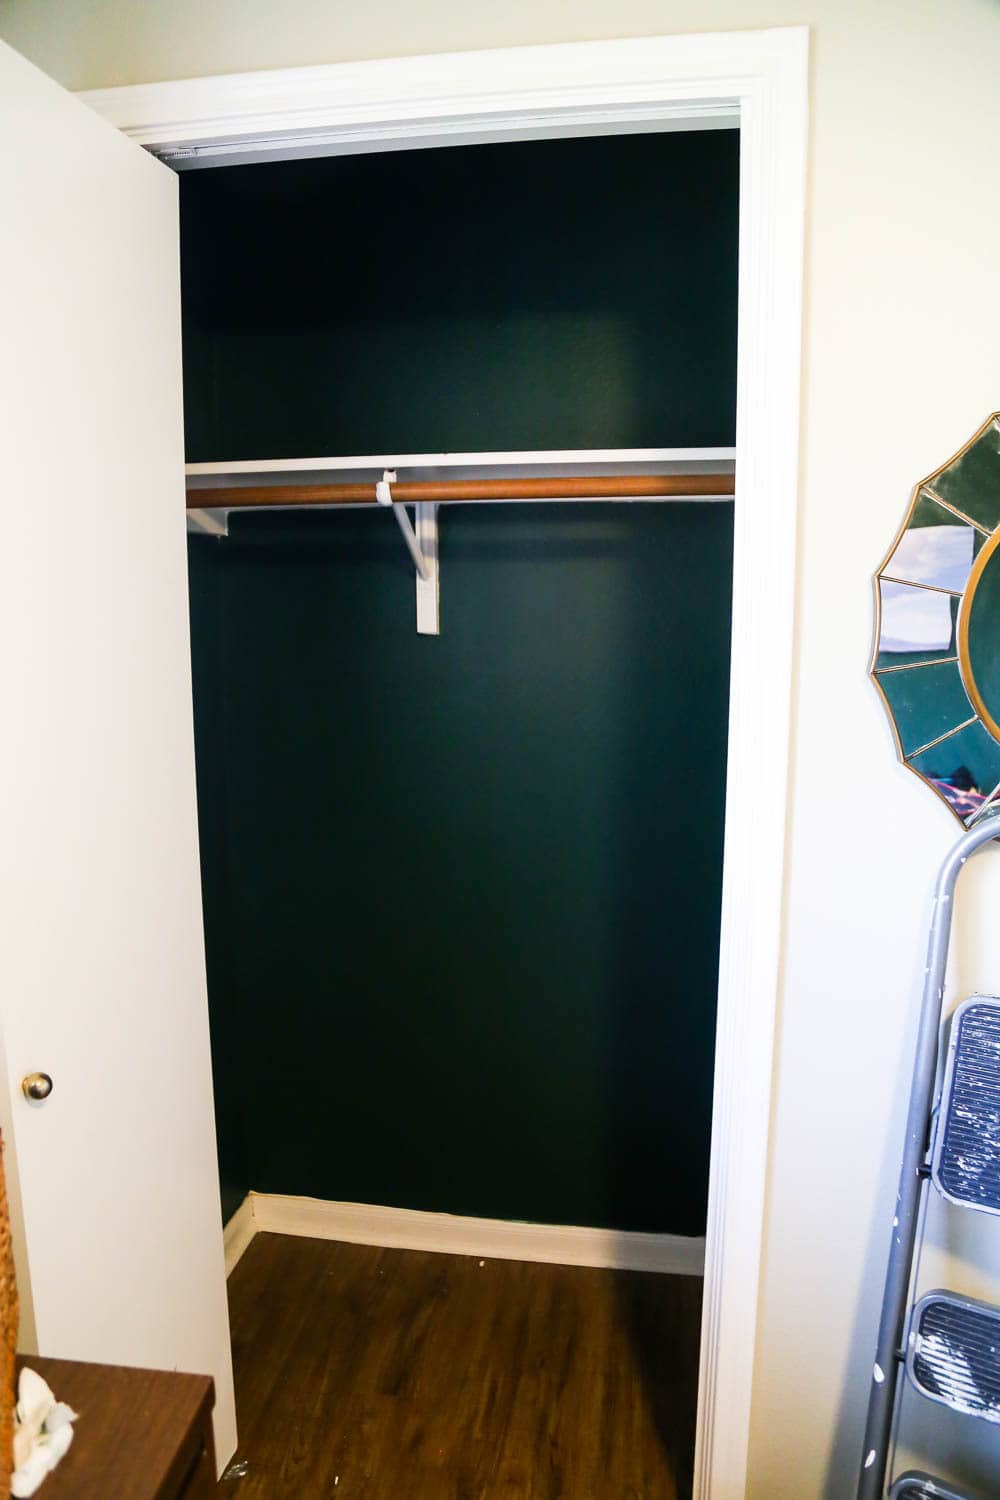
The first step for me was to empty out the closet and paint the walls. We used Behr’s Secluded Woods, which is the same color we painted the accent wall across the room. I forgot to snap a fully accurate “before” photo, but if you saw my story on Instagram when I was working on it, you’ll know it was a total disaster.
Step 2: Add Support Boards
Next up, I had to figure out how tall I wanted my shelves and add the support boards. We had a bit of a unique situation since we weren’t just building closet shelves in order to add general storage to his room – we very specifically needed to store his Imaginext hideouts (AKA: his favorite toys in the entire world), along with a few tall IKEA baskets that store other toys. We needed this space to function as additional toy storage so we could get it all off the floor, and I didn’t really care if it wasn’t “standard” or didn’t look great in the closet.
I just needed that crap out of my line of sight, you know what I mean?!
So, I measured the tallest hideout and figured that around 18″ shelf height was ideal for the hideout shelf, and since the IKEA baskets were 12″, I went for 16″ on that shelf. Don’t forget to add in an inch or so for the shelf on the front of the trim when you’re measuring – I did forget, and ended up having to break the shelf down and move it up a bit so my trim could fit!
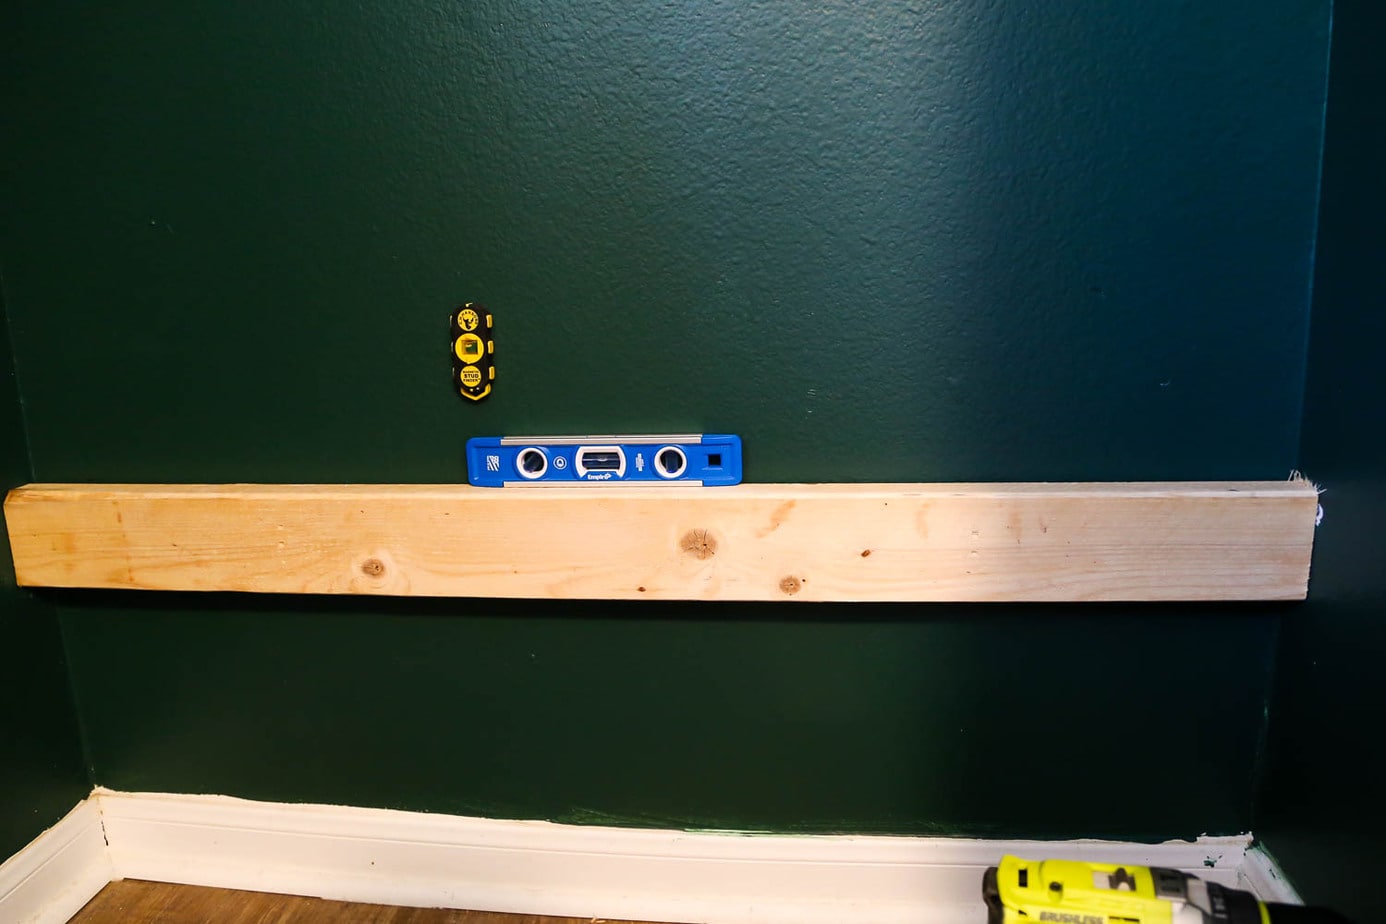
To install the support boards, here’s the process:
- Measure the width of your closet and use your miter saw (here’s a tutorial on how to use a miter saw) to cut down the board to the appropriate length.
- Measure and mark the height of your shelf in the closet using a pencil.
- Use your stud finder to locate the studs in the wall (I use this magnetic one and just leave it in place while I install the shelf to help me stay on track).
- Hold the board at the appropriate height and use the level to make sure it’s nice and straight. Once you’ve got it in place, drill a pilot hole using your drill, then screw in your first screw directly into the stud.
- Once you’ve got your first screw in place, try to find another stud – on the back wall I was easily able to locate studs for all of my screws, but the side walls I could only find 2. It’ll just depend on how large the closet is, for the most part. Continue drilling in your board until it’s fully secured (I used 4 screws on the back board and 3 on the side ones).
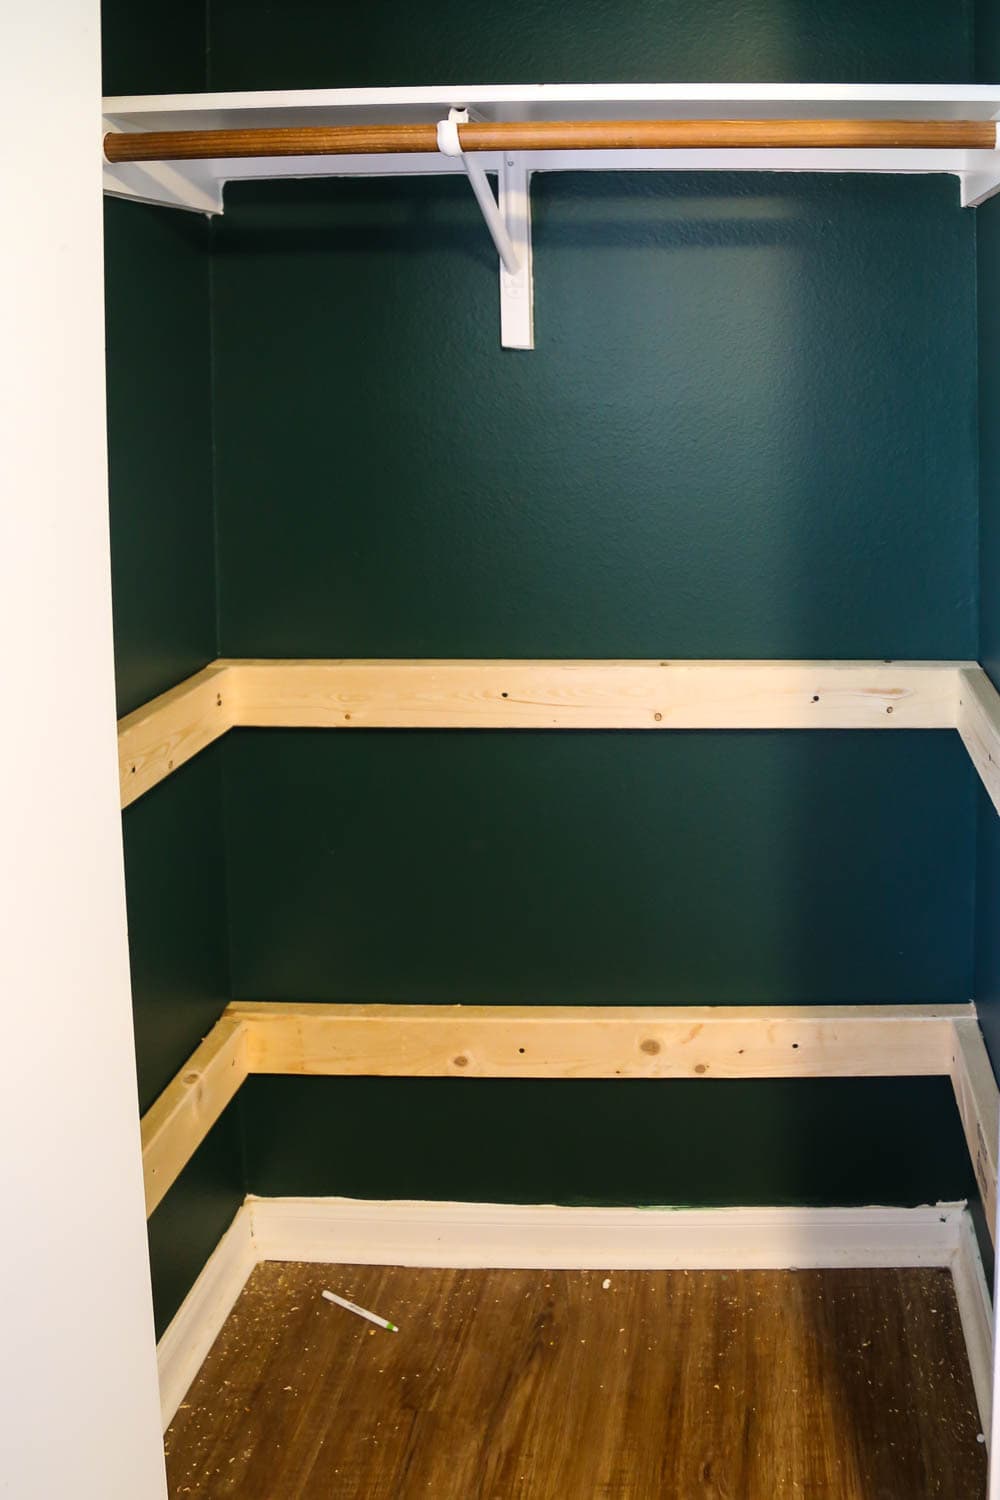
Repeat the process again for the two side boards, this time cutting the board only as deep as you want your shelf to be. And then, repeat the whole shebang for your second shelf (or, however many shelves you’re building)
Note: I talked about this on my IG story a bit but I’ll address it here too – our shelves are deep. Like, way deeper than normal closet shelves (they’re about 22″ deep, and the closet is only 24″). It looks a little bit silly, but since the purpose was to store specific toys, like the hideouts, we needed them to be large enough to fit. Obviously, this isn’t going to be necessary for everyone! Only make your shelves as deep as you need to – 12″-16″ or so seems to be about standard. As Jackson grows and doesn’t need the depth anymore, we may remove the second 1X12 board to make the shelves 12″ deep, but this is perfect for us for now.
Step 3: Install Shelf Boards
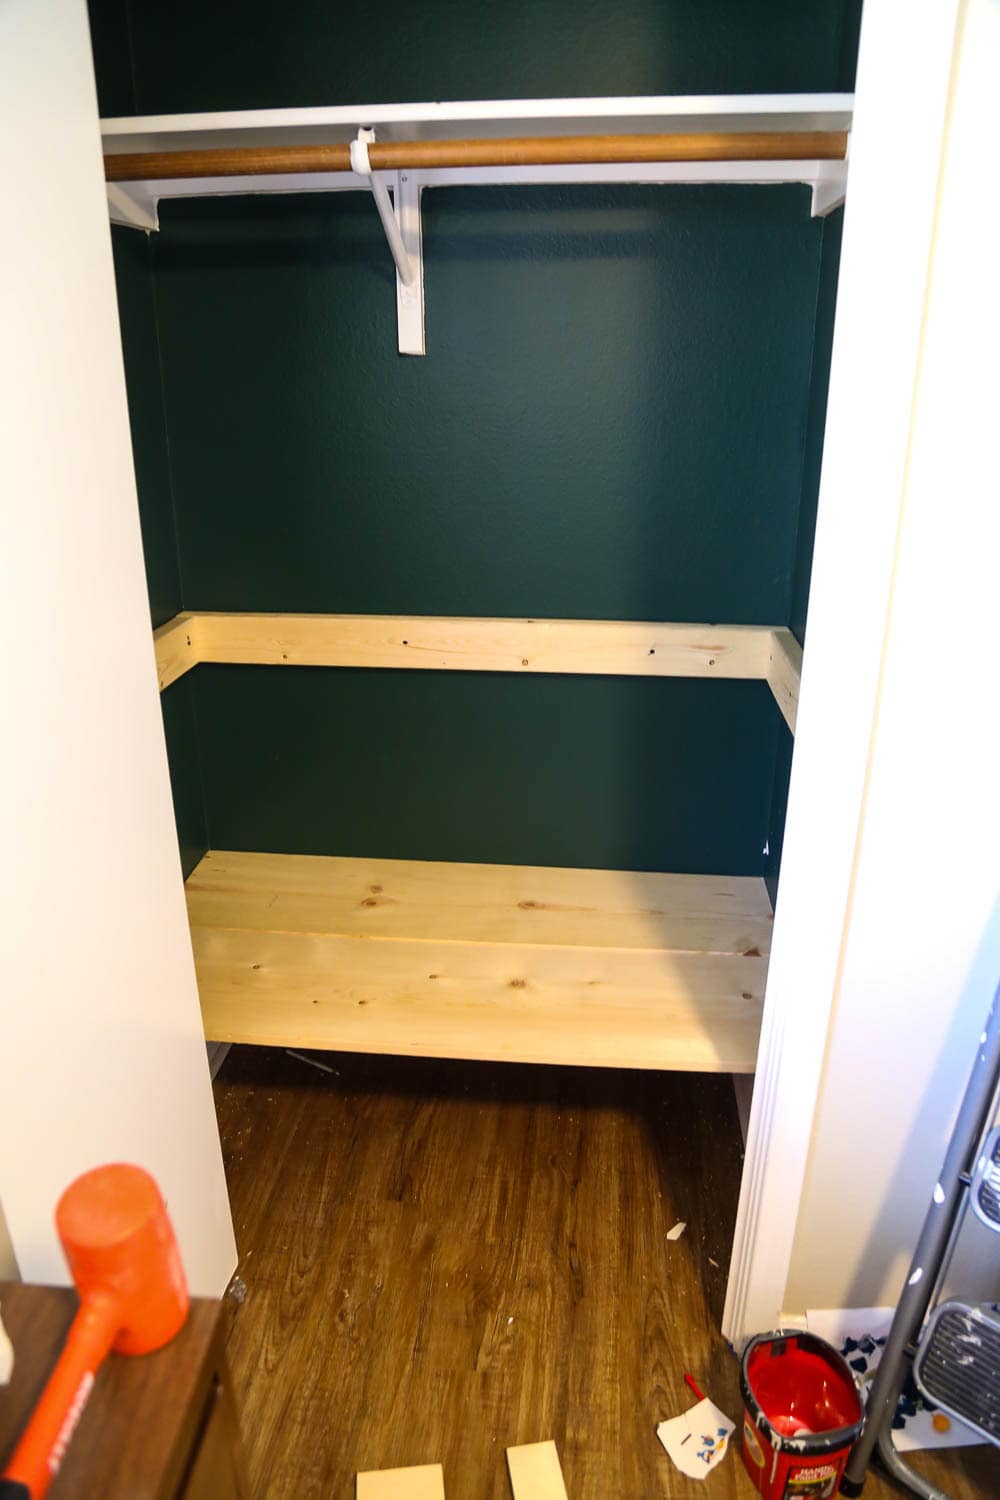
Now, you get to install your shelves! Cut your 1X12’s down to the appropriate size (note: if you’re doing 12″ deep shelves, you’ll only need 1 board per shelf. If you want them slightly wider, you’ll need to either use a different combination of boards (like two 1X8 boards for 16″ deep shelves), or use a table saw to rip down the other board), then simply lay the boards on top of the supports and drill them into place.
This is where it would be a good time to pause and make sure everything fits if you’re looking for specific toy storage for your kid’s room! Like I mentioned before, I realized that even though the hideouts fit perfectly, once I installed my trim piece on the front (which was important to me, even though it’s purely for looks!) one of them would be too tall. So, I had to move things up a tiny bit.
Step 4: Install Trim Pieces (Optional)
I don’t have a photo of this process because I was doing it in a frustrated rush after having to disassemble and re-assemble my shelves. But, we installed a 1X2 board underneath the front of each shelf to make the shelves appear a little more substantial. There are multiple different ways you can do this (see this post if you want floating closet shelves that are truly nice looking!), but we were really shooting for function over form here so we didn’t mess with it too much. I just added a line of wood glue to each board and then used my nail gun to attach.
It isn’t a required step, and it doesn’t make the shelves look amazing or anything, but I think it’s an important step to help things look just a little more polished and put together.
Step 5: Paint or Stain
Finally, it was time to stain the shelves! I think, aesthetically speaking, white shelves would have looked a little nicer and more polished in this closet. However, let us remember that this is a closet for a 4-year-old’s room and it is being used to store big, hard, plastic toys. Toys that will be dragged off those shelves on a daily basis and put back in with the force of a small rhino (because 4-year-old boys have no chill). I wasn’t about to spend a ton of time getting a pretty, painted finish if it was just going to get scratched up immediately, so we took the simpler approach and just stained the shelves (with this stain) and called it a day.
It still looks good, and the finish won’t immediately get destroyed, so I’m happy!
Step 6: Fill ‘Em Up!
Now comes the most satisfying part – you get to fill the shelves up with all of the toys that have been cluttering up your kid’s room and bask in the glory of actually seeing their bedroom floor. This was (obviously) my favorite part of the entire process. Jackson’s too – it was so sweet to see how excited he got about actually having a place to store his toys, and he’s been really proud of it so far, which has helped him keep his room a lot cleaner.
I’m calling it a win.
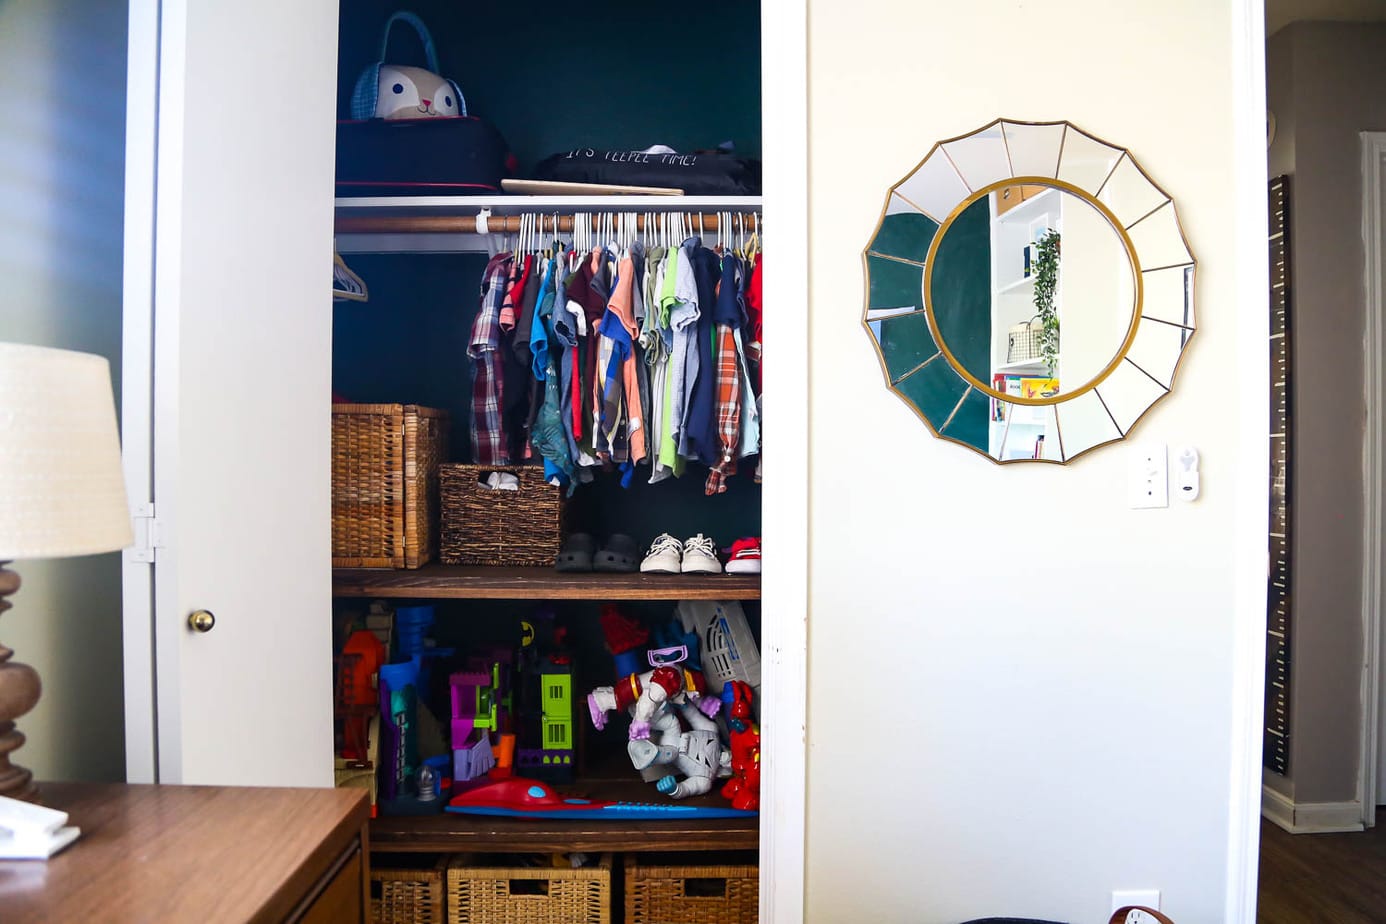
Of course, we all know that kids’ rooms are inherently messy and it’s just about impossible to actually thoroughly clean them on a regular basis, but I’ve learned that my kid tends to thrive on order and organization and actually prefers when his room is clean and he can find everything he wants. I think that with the appropriate systems in place (baskets for every category of toy and a specific spot designated for every toy!), he’ll be able to keep his room mostly clean. Within reason, of course. Don’t go thinking my kid cleans his room on his own motivation – it’s part of his daily chores to clean up his room! Previously, though, he didn’t really know what to do with half of his stuff so it was left on the floor. And I didn’t really know what to do with it either, so I let it happen.
Let’s just say this system is a little better for everyone.
I’m feeling really good about Jackson’s room now that this is all done. I’ve still got a couple of tiny projects I want to knock out (including replacing the closet door), and then I’ll compile it all into one big “room reveal” post so you can see the full transformation from start to finish!
Because we all love a good before and after, right?!
Love this solution for a small closet/small room! We have a guest room closet that’s super tiny like this and we use that closet to store a lot of stuff – we may need to implement some shelves in there! Would save me the hassle of rearranging the entire closet when I need to get one thing out.
What will you do when your son gets older and needs more vertical space for his clothes? Remove the top shelf?
Hey Jamie! It really does make things a LOT easier!
Honestly, we (likely) won’t deal with the issue of needing more vertical space while we live here, since the plan isn’t to stay here long-term (I imagine this amount of hanging space will work well for several more years). But, if it did become a problem, I would probably remove the top shelf or simply move it down! Since this particular set-up was planned to store a very specific type of toy, I’m imagining that by the time he needs more vertical space he’ll also have outgrown that toy, haha. Thankfully, since these shelves are so simple to put together they’re also really easy to adjust as needed!