
Power Tools for Beginners: How to Use a Miter Saw
Last updated on February 11th, 2023 at 05:35 pm
Want to get started with power tools and building things for your home but have no clue where to start? Let me help! Here’s a quick briefing on how to use a miter saw (and what a miter saw is!). This post was originally published in March of 2018, but has been updated!

A few years ago, I decided that I wanted to learn how to use power tools. I had been writing this blog for six years, but I hadn’t actually built anything on my own. Ever!
So, I set out to learn how to use all of the basic power tools that we owned. And guess what my first lesson was? How to use a miter saw! That’s right – this was the very first tool I ever learned how to use. It’s a great tool to have around if you work with smaller wood often (mine can cut wood up to 12″ wide) and it’s so versatile!
What sorts of projects do I use a miter saw for? Here’s a quick rundown of a few projects where my miter saw was the star of the show:
- The picture molding in my bedroom
- All of the shiplap we’ve ever installed
- The framing for our DIY fireplace
- This DIY blanket ladder
- The camper playhouse
- This geometric accent wall
You can use a miter saw for almost any DIY project you have up your sleeve. It’s a must-have for crown molding, and it’s useful for literally everything from making a picture frame to building a house. Seriously – it’s that versatile!
If you’re wanting to get into woodworking, it should be one of your very first power tool purchases.
Ready to learn how to use it?

What is a Miter Saw?
A power miter saw, also commonly referred to as a chop saw, is a tool that’s used to make crosscuts and angled cuts in wood.
There are a couple of different types of miter saws. If you want to understand the difference, you’ll need to know a few key terms:
- A miter cut is an angled cut made across the width (or face) of a board.
- A bevel cut is an angled cut made through the thickness of a board
- A cross cut is a straight cut across the face of a board.
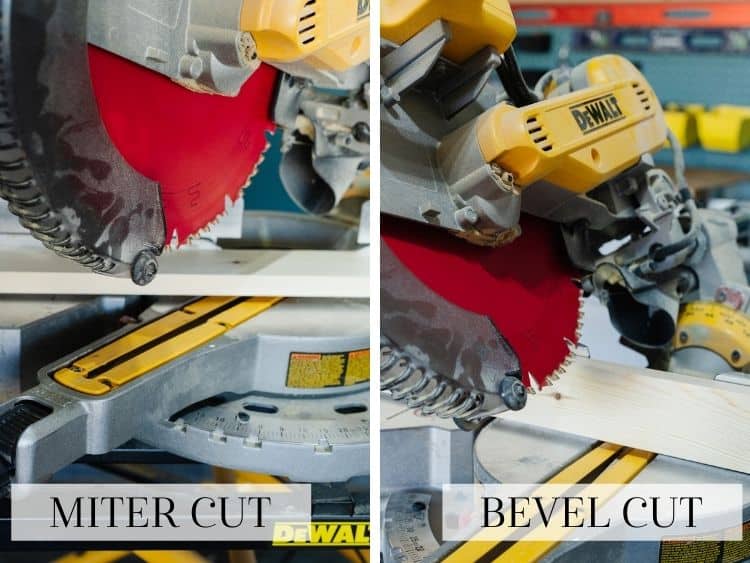
Any miter saw can make either kind of cut, just depending on how the wood is laid on the saw. If it’s laid flat (with the wider side on the base of the saw), it’ll make a mitered cut. If it’s laid on its side (with the shorter side on the base of the saw), it’ll make a beveled cut.
Once you understand the terms, it’s a little easier to understand the different types of miter saws. Let’s break it down:
- A standard miter saw has a base that swings to create angles. It can make miter cuts and bevel cuts, but not at the same time.
- A compound miter saw is able to make both miter cuts and bevel cuts in the same cut. The base of it can swivel to create mitered angles, and the blade itself tilts to create beveled angles. You can purchase single bevel compound miter saws (which only tilt in one direction) or double bevel compound miter saws (which can tilt in both directions).
- A stationary (basic) miter saw can only swing up and down and does not move out at all. It will be able to cut boards up to about 8″ wide.
- A sliding miter saw allows the blade to slide outwards as you cut. This allows for wider cuts up to about 12″.
Some miter saws combine these features – for example, the one we own is a double bevel sliding compound miter saw.
Whew, that’s a mouthful.
How to Use a Miter Saw
Super obvious disclaimer: I’m not an expert, I’m just a girl who has a husband who taught her how to use a miter saw. Power tools are dangerous if you don’t know what you’re doing. Be careful, my friends.
First up, let’s dive into the video. It’s one I created a few years back to teach you everything you need to know about how to use a miter saw, and it dives in deep to all of the different parts and details.
If you prefer, you can watch the video on YouTube right here.
Okay, now that you’ve seen the video, let’s break down some more details a little bit. This is where we’ll really get into the nitty gritty of how to use a miter saw!
Parts of a Miter Saw
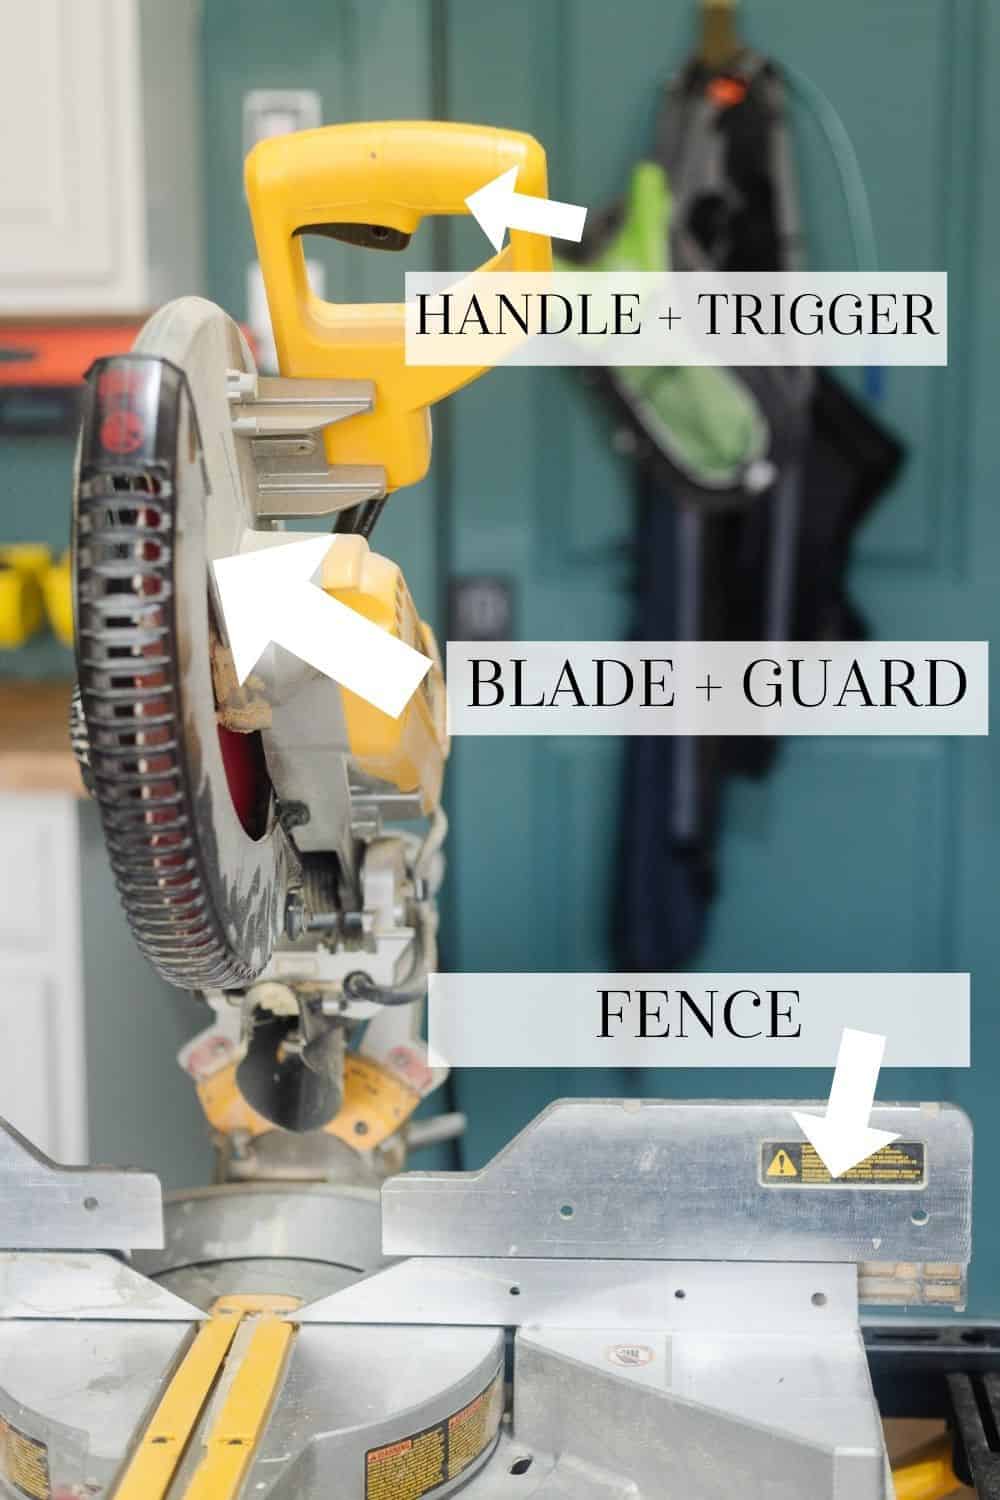
Blade & Guard
This is the part that cuts the wood. Duh. The blade guard will slowly move away from the blade as you lower it down, and will cover it back up as you release. Don’t get your fingers anywhere near this section…unless you want to lose one.
The miter saw blade will need to be replaced on occasion, just like with any tool. If you find it’s not making accurate cuts or it’s harder to get through your wood, check to see if the blade needs replacing.
The Fence
The fence sticks up from where you set the wood – it’s what you want to push the wood up against to make sure that your cuts are straight and even. If you don’t remember to push the wood against the fence, you could end up with a weird, angled cut, or the wood could go flying because it’s not being supported on both sides. You should always use one hand to firmly hold the wood against the fence, and the other to operate the saw. Alternatively, you can use a clamp to hold the wood or workpiece in place.
Handle & Trigger
This is how you operate the saw. When you press the trigger button up on the handle, the blade starts spinning. And, when you let go, it stops. Pretty basic!
Remember that it will take a minute for the blade to stop rotating after you let go of the trigger. Be sure to allow it to come to a complete stop before you allow your hands to go anywhere near it!
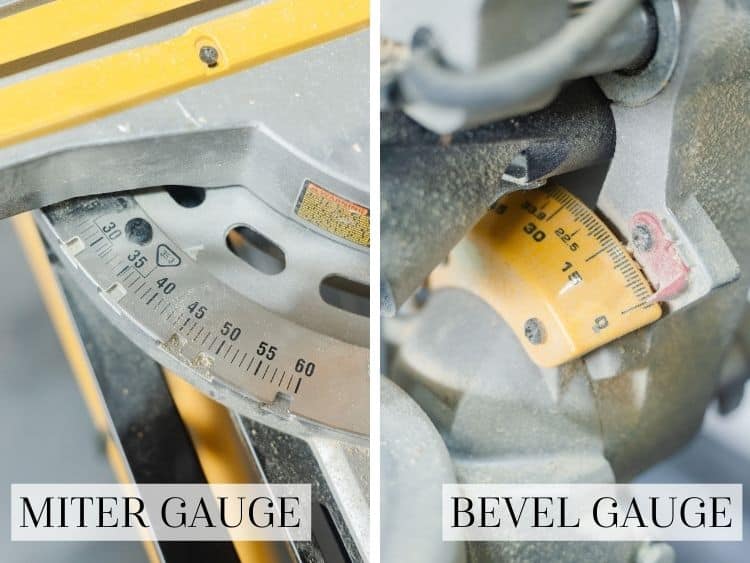
Miter Gauge and Bevel Gauge
These parts have pre-measured angle stops so you can rotate the base and the blade to create different angled cuts.
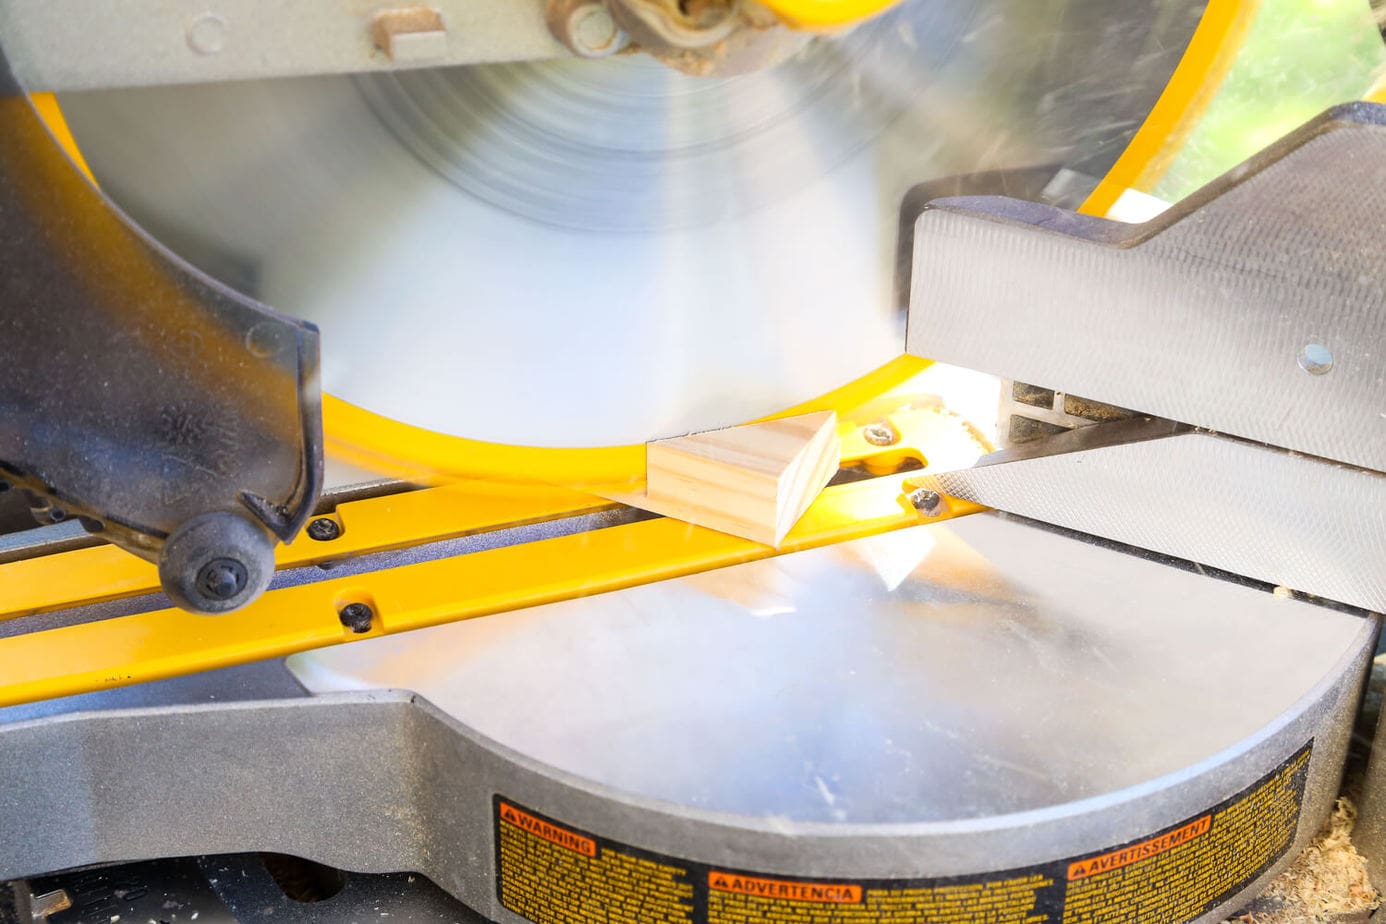
Miter Gauge: If the little red notch is pointing to 0, you’re creating a straight (90-degree) cut. If it’s at 45, you’re making a 45-degree angle. And so on and so forth. You use the lock handle that sticks out from this to rotate the table and get the right angle. We only showed straight cuts and 45-degree angles in the video, but you can make just about any angle your little heart desires! If you look at the picture above, you’ll see a few notches in the miter gauge – these are places where the base will automatically stop and lock into place for commonly used angles. You don’t have to just stick to those, though. You can manually tighten the knob at the base to achieve any angle you need.
Bevel Gauge: This helps you see what angle you are at when you’re rotating the blade to create bevel angles. It doesn’t have stops like the miter gauge does, so be sure to move slowly and pay attention to what you’re pointing at, because it won’t stop automatically.
So, now that you’re familiar with the parts, you basically know how to use it. Seriously – it’s that simple!
How to Make a Cut Using a Miter Saw
Start by measuring to find the length you want and mark it on your wood. Then, you’ll want to line your wood up along the fence and test the placement of the blade.
You’ll do this by lowering the blade down to see where it’s going to hit the wood, making sure it will hit exactly where you’ve marked.
One thing to remember: when you are measuring and lining up your wood, don’t forget to factor in the width of the blade itself. If you line it up on the inside of your cut, you’ll end up with a short piece of wood because of the blade. The first time Corey explained this to me I had no idea what he was talking about. But, the first time I lined it up wrong it instantly clicked in my mind.
So basically what I’m saying it, tuck that in the back of your mind, and it will all come back to you the first time you inevitably make that mistake.
It’ll make sense. Promise.
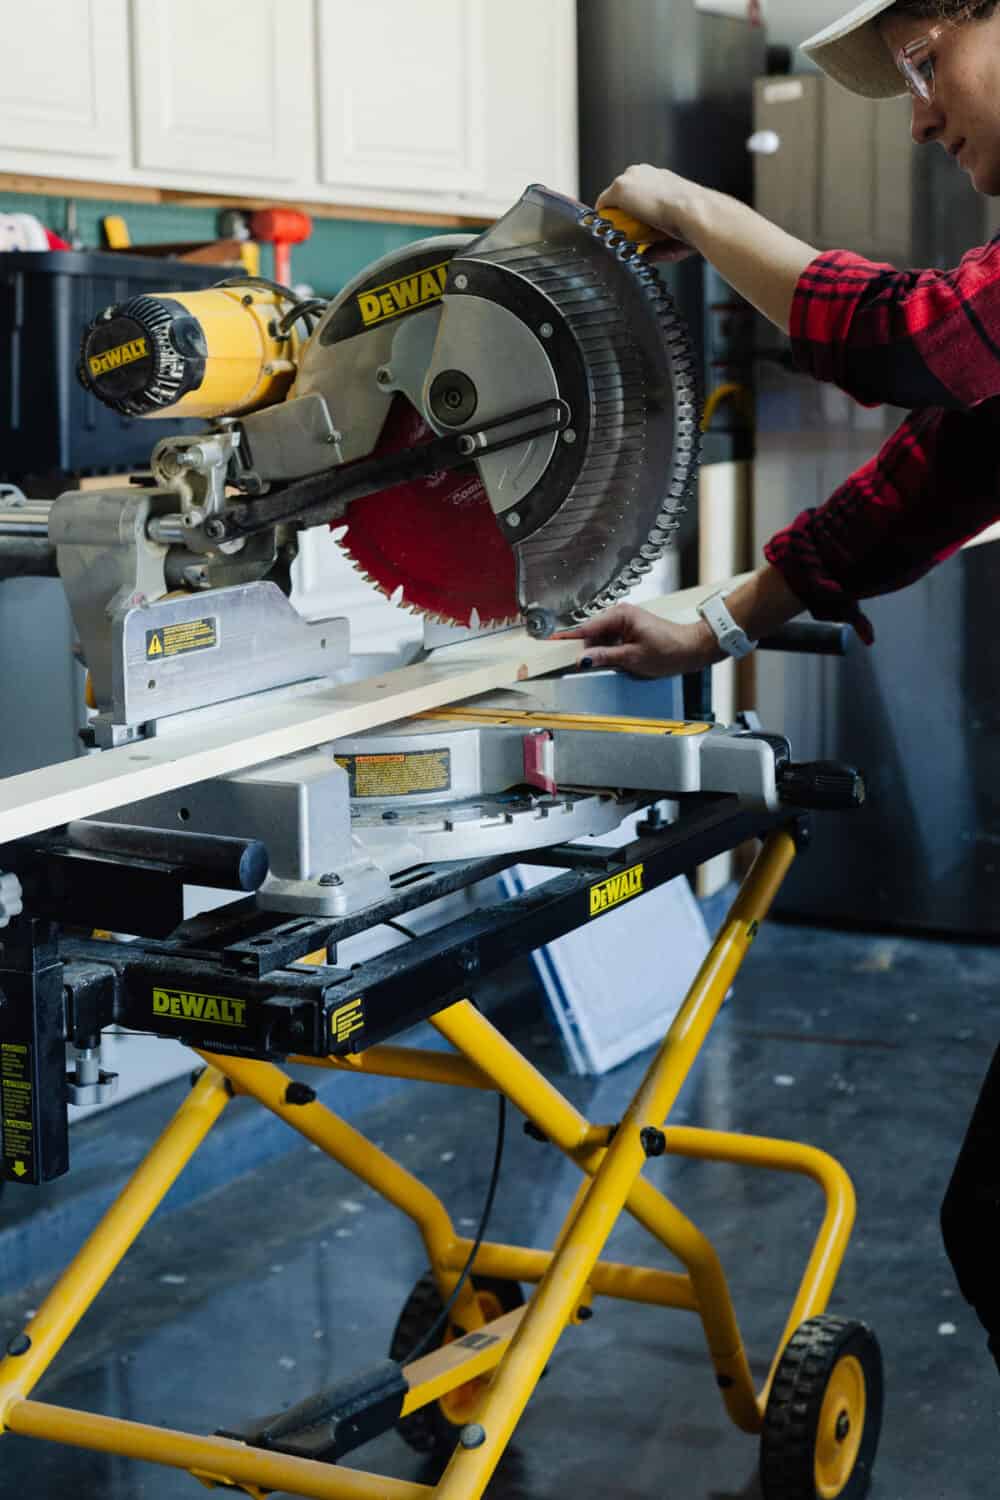
Once you’ve lined it up and confirmed the wood is in the correct spot, hold it firmly in place (or clamp it). Then, raise the blade back up, pull the trigger, and slowly bring it down to cut the wood.
You may find that you make your cuts slightly too long or slightly too short. This happens to me even after years of using a miter saw on the regular. Slight adjustments may need to be made as you work. I always recommend erring on the side of cutting too long, then cutting off tiny slivers of the wood until it is exactly the right size you need. When you’re working with a miter angle, it’s particularly important to get the length exactly right, so take your time with it.
Miter Saw Safety Tips
Let’s talk about a few super important things to keep in mind when using a miter saw:
- It’ll create a lot of sawdust. It’s not great for your lungs to regularly breathe in that much dust, so it’s wise to wear a dust mask while you work. You can also hook up a shop vacuum to the back of the miter saw and run it while you cut to have it automatically collect the mess for you!
- The saw should be unplugged when not in use, and it should be bolted or clamped to a stable work surface at all times when you are using it.
- Don’t wear loose clothing when operating a miter saw, and pull back long hair if you have it.
- Ear protection and eye protection are always a good idea when working with any power tools!
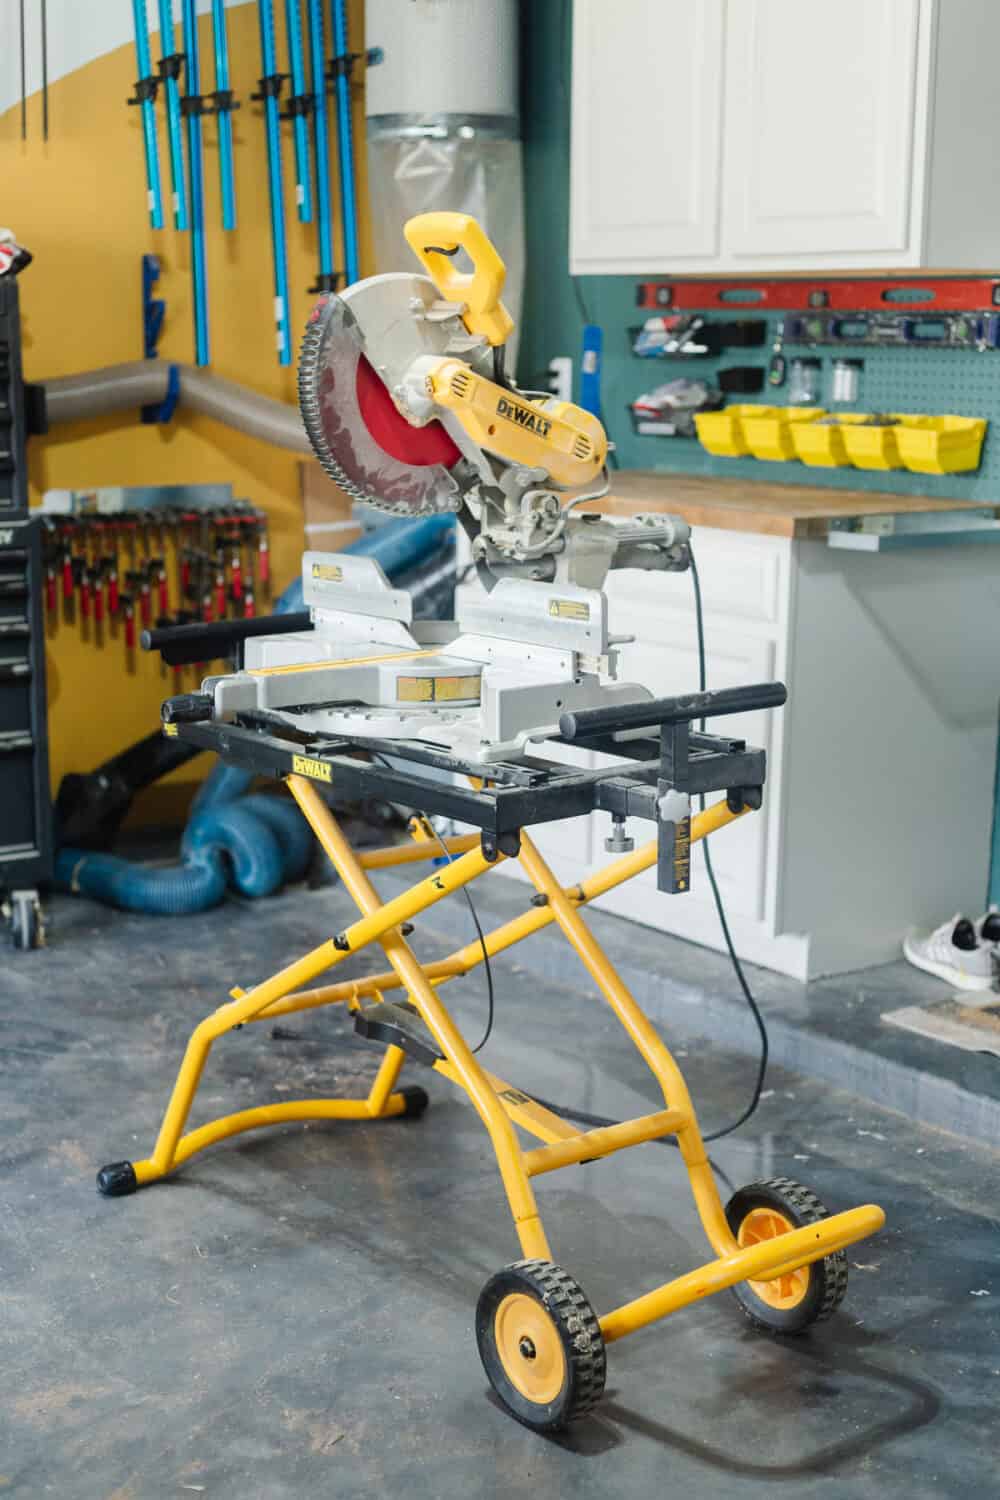
Miter Saw Mobile Stand
One more thing to note – we have this mobile stand for our miter saw, and I couldn’t possibly love it more! It folds up and rolls out of the way when it’s not in use, which gives us tons of extra space in our garage.
We used to have a dedicated spot on a workbench for the miter saw. That was a great system, but I find that I much prefer being able to scoot it over to the wall when I’m not using it.
Learning how to use power tools on my own has been the most empowering and useful things I’ve ever learned. I love that I’m able to tackle any project I want all on my own. And it’s such a good feeling to have things in my home that I created with my own two hands!
What projects do you think you’ll take on now that you know how to use a miter saw?
Power Tools for Beginners Series
If you love this post and want to learn more, I have good news! I have an entire series of posts all about how to use power tools and accomplish other super basic DIY tasks.
I’m a big believer that no question is too basic when it comes to DIY, so I try to answer them all around here. Click here to see the full list of beginner-level guides I’ve published. And, be sure to let me know if there’s anything you’d like me to add!

We have a miter daw. I can not get the table to be at 0 degrees. It’s stuck at 5 degrees.
I know the adjustment is at the back. I just can get it to move. Any thoughts?
Miter saw is quite challenging to use. This will be a great guide how to use for beginners. Proper guide and be careful to use it. Thank you for sharing this article!
Hi! Can I cut a whole piece of wood on this. I mean, can I move a piece of wood as a could do in a table saw? Is it useful at all if I want to build a cabinet?
Thank you!
I love you blog.
Hi! Depends on how large the piece of wood is. This is meant for cross-cuts, meaning making wood shorter (not necessarily narrower). For example, my miter saw can handle wood up to about 10″ wide.
I know this post was several years ago, but I’m SO interested in getting started with woodworking. Seeing your video with the miter saw made it much less intimidating! Two questions: 1) is there a miter saw that you would recommend that priced for beginners? 2) What do you put it on? Are there stands/tables made specifically for a miter saw?
Hi Lee! I recommend Ryobi as a great starting point for newbies. And, we love having a mobile miter saw stand. Our folds up for easy storage and is very simple to move around the room as needed!
Excellent post. Nice tools for everyone. The tools look very handy and comfortable. My husband was longing for a miter saw. I used to be sent him your Tutorial link.I love to check a tutorial on Miter Saw Stand.
I hear ya! I want to learn how to build on my own, but some of the tools can be a bit intimidating! Our miter saw is the one tool I feel pretty comfortable and confident with. I’m looking forward to following you along in this series 🙂
I’m excited to learn more!!