
West Elm Knock Off: DIY Furniture Project
Last updated on May 7th, 2024 at 02:04 pm
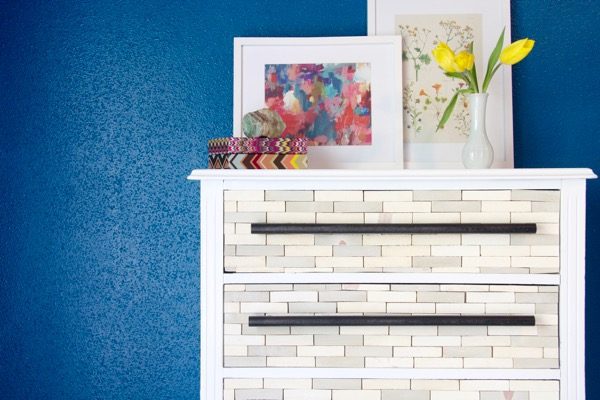
I love a good knock off project, don’t you? We took on a DIY West Elm knock off when we tackled this furniture project – a simple dresser hack! Check out how we made a wood tiled dresser inspired by West Elm’s version.
Do you ever have those moments when you’re walking through your favorite store and see something you just have to have…and then you check the price tag? And it makes you want to cry?
Because that happens to me all the time. Seriously – all the time.
I’m pretty cheap when it comes to new furniture for my home – mostly because I know that with a little patience and creativity I can make something I love just as much as what I see in the stores for way less money. And that was exactly the case when I saw this beautiful wood-tiled dresser at West Elm. It’s amazing and I longed to have one in my house, but that price tag? I just couldn’t do it!
Luckily, I’m a little bit creative and a lot stubborn, so I made one of my own. And today? Well, today I’m teaching you how to do it too.

DIY Wood Tiled Dresser
Materials Needed:
- An cheap thrifted dresser
- Scrap 1×4 wood (we used maybe one board total)
- White paint
- Gray paint
- Wood glue
- 3/4″ dowel rods (for drawer pulls)
- 1/2″ dowel rod (for drawer pulls)
Step 1: Prep Your Dresser
We started off with this beautiful antique dresser that we found at a local flea market. We loved the clean lines, the tall frame, and (of course!) those casters. Drool. Our style is a pretty good mix of modern and more traditional/vintage furniture, so we liked that using this would lead to a slightly less sleek and modern look than the original, which fits right in with the rest of our house. It was basically perfect.
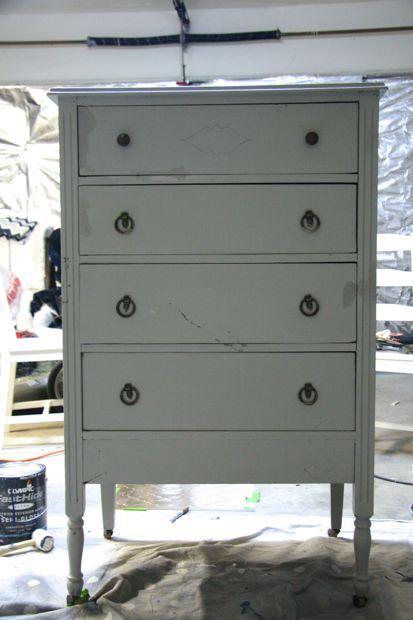
The first step for us was figuring out a way to inset the drawers a bit so that when we added the wood tiles they wouldn’t stick out. We wanted the entire front of the dresser to be flush. The West Elm one has the drawers slightly inset, but we thought a flush look would be a bit more fitting for our dresser.
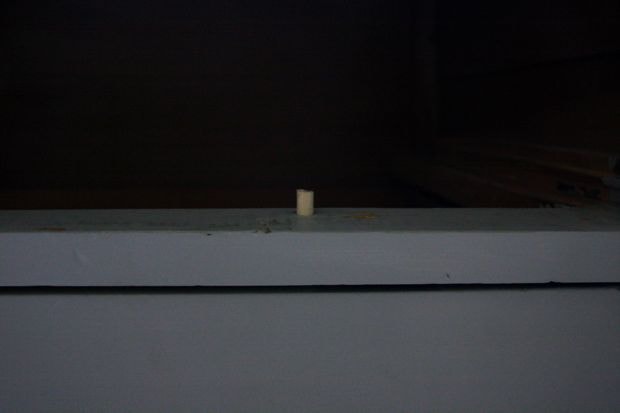
Our original plan was to just move the drawer slides back a few inches in the dresser, which would hopefully make the drawers sit the way we wanted them, but thankfully it was an even easier fix than that with this particular dresser! There were little metal pieces on the inside of the drawers that stopped them from going all the way in. All we had to do was pull those out and make some new stoppers with some little dowel rods and we were good to go.
Now is also a great time to go ahead and paint your dresser (we went with white!). You don’t need to paint the drawer fronts since they’ll be covered up, but you do want to paint everything else.
Step 2: Cut Wood Tiles
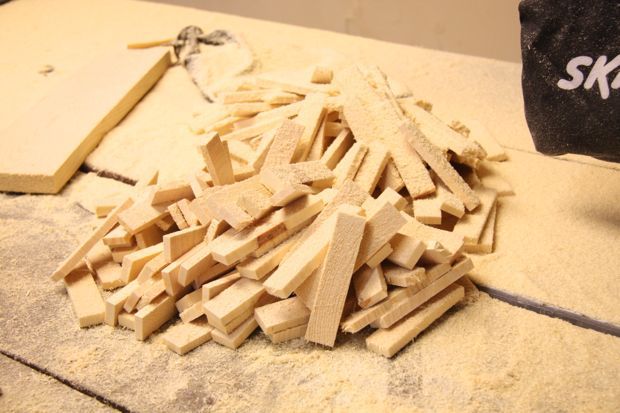
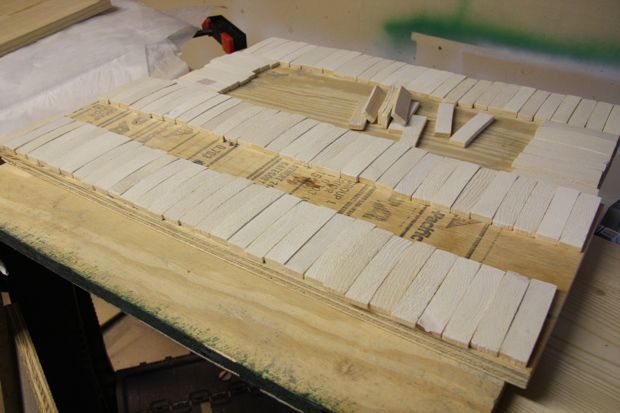
Next up was cutting all of our wood tiles.
Let me warn you – this project isn’t for the faint of heart…it took forever! But, I think the end result is totally worth it, so I won’t complain.
To make the tiles we took a few 1×4 boards that we had already laying around and cut them down to 1/4″ thick tiles. It was the quickest way we could think of to do it, and it also meant that the end-grain of the wood would be showing, which added some fun texture. It was a pretty quick job to cut the tiles – we just used a chop saw (here’s how to use one if you don’t know how!) with a piece of wood clamped to it to make sure all of the tiles were the same size.
Our stack quickly grew, and soon enough we had a giant pile of wood tiles.
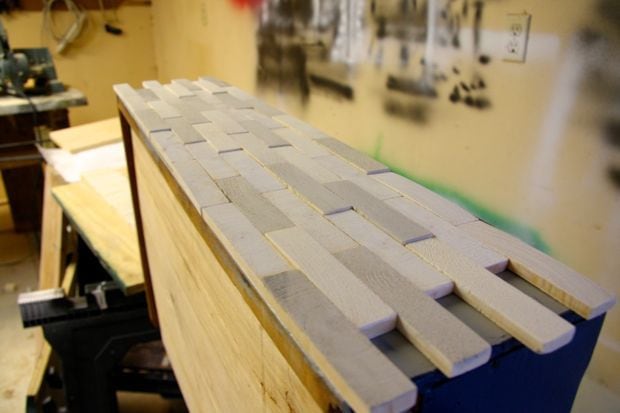
Step 3: Whitewash Your Wood Tiles
When they were all cut, we gave them a quick whitewash. This is accomplished by simply mixing water and paint, then brushing it onto your wood. The ratio will vary depending on how saturated of a color you want to achieve, but I usually start with 2 parts water to 1 part paint.
I wanted a bit of variety within the tiles. So, we did a whitewash on some of them and a gray wash on others. It was a subtle difference, but it makes the end product look a bit more random and varied, which I like.
Step 4: Attach Tiles to Drawers
Once our tiles were all dried and ready to go, it was time to attach them to the drawers. We didn’t want to nail them in because then we’d have a billion different nail holes to fill. So, we just used some wood glue. We glued ’em on in a subway pattern and then clamped a board to the drawer while it dried to ensure they all stuck. As the tiles got wet with the glue, some of them started to bow, so clamping it down also kept that to a minimum. We let it all dry together for about 12 hours (just to be sure!). Then, we removed the clamps, sanded down the edges, and that was all there was to it!
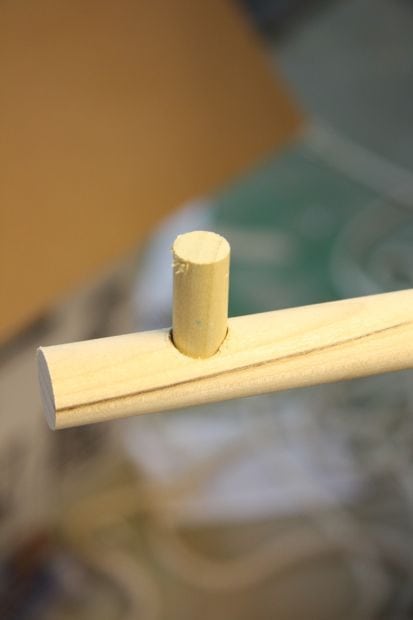
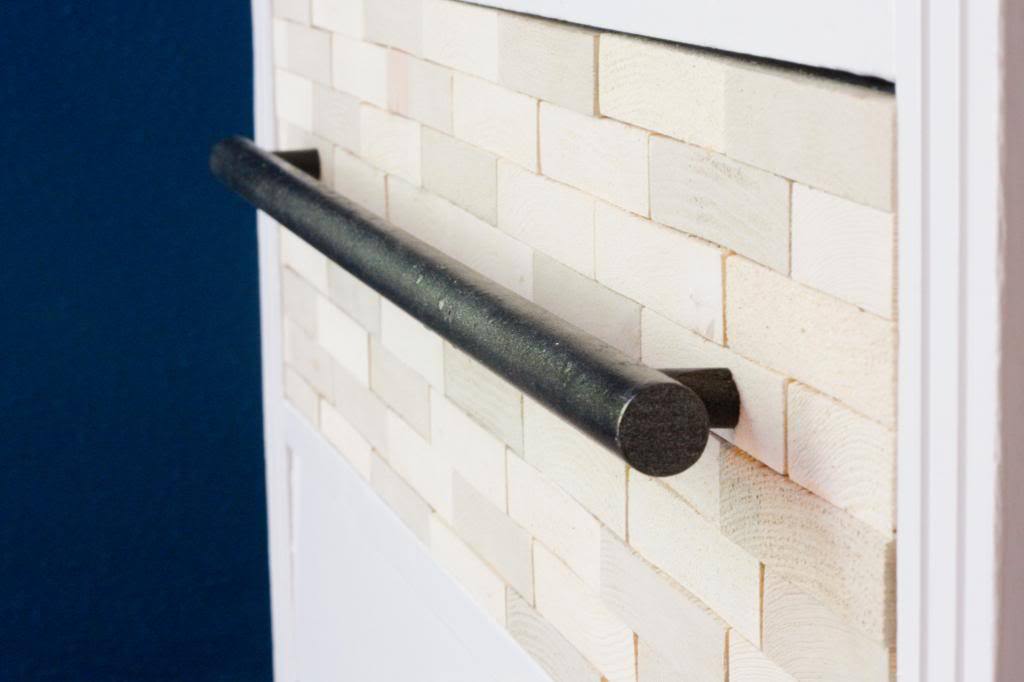
Step 5: Add Drawer Pulls
The last step was creating the drawer pulls! We knew we wanted ones similar to the inspiration piece, but we also knew that actually finding and buying those pulls would be challenging. Not to mention, expensive! So, we decided to make our own! Corey bought a 3/4″ dowel, drilled two holes in the back, and inserted a small, 1/2″ dowel piece. We then spray painted the whole thing with some oil-rubbed bronze spray paint, and screwed ’em in!
Once we put it all together, it looked a little something like this:
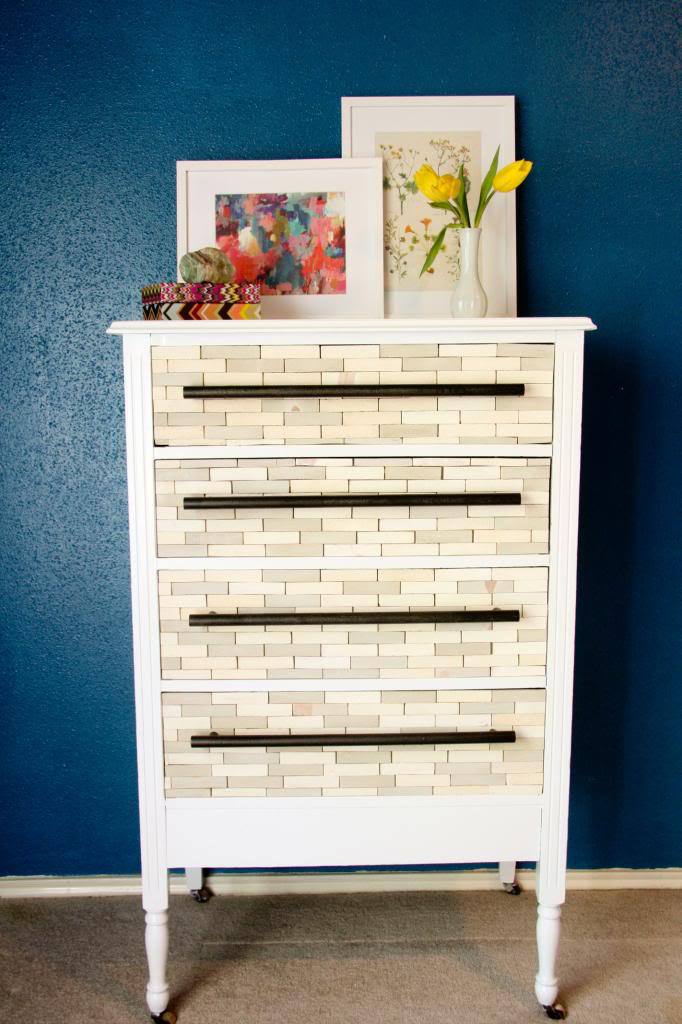
This whole project cost us under $200 (including the dresser itself!). That’s just a fraction of the cost of the original dresser! AND, we were able to put our own spin on it to make it even better for us.
So, my friends, next time you’re in your favorite store and you see something that you need in your home but you gawk at the price, remember that it can be incredibly simple (and way cheaper!) to make your own version!

Neat project! I’m a little OCD, so I wouldhave to:
cut a thin piece of veneer or plywood, the same size as the drawer front;
lay out the wood blocks, with spacers between the pieces to make them evenly spaced;
glue each one in its precise location;
dry, under heavy weight, face up, on a *perfectly* flat surface;
glue whole boards with attached pieces, to drawer front;…
after each drawer was assembled, quickly make the drawer pulls.
Then… it’d be another few hours aligning the drawer pulls, because they MUST BE PERFECTLY ALIGNED AND LEVEL or it will drive me crazy every time I look at it. 🤪😖🙄 I’m soooo NOT a Rustic-look kinda person. But I can certainly appreciate all the hard work that went into this project! Congratulations on completing it! 🙂
great idea, but i would suggest investing in at least a cheap drill press. save you some pain and skin at some point down the road..been there, done that…
Thanks for the tip, Darrell! 🙂
Great job! I actually like yours better than the original, especially because of the legs. (that link to the original didn’t work, but I went directly to West Elm.)
Thanks so much! And thanks for letting me know about the link – it works on my computer, I’ll have to test it out on my husband’s computer and see if I can figure it out!
I really love this dresser, and you guys made it look so professional. The wood pieces remind me of Jenga 🙂