
The Most Gorgeous DIY Chandelier
Last updated on January 14th, 2024 at 04:10 pm
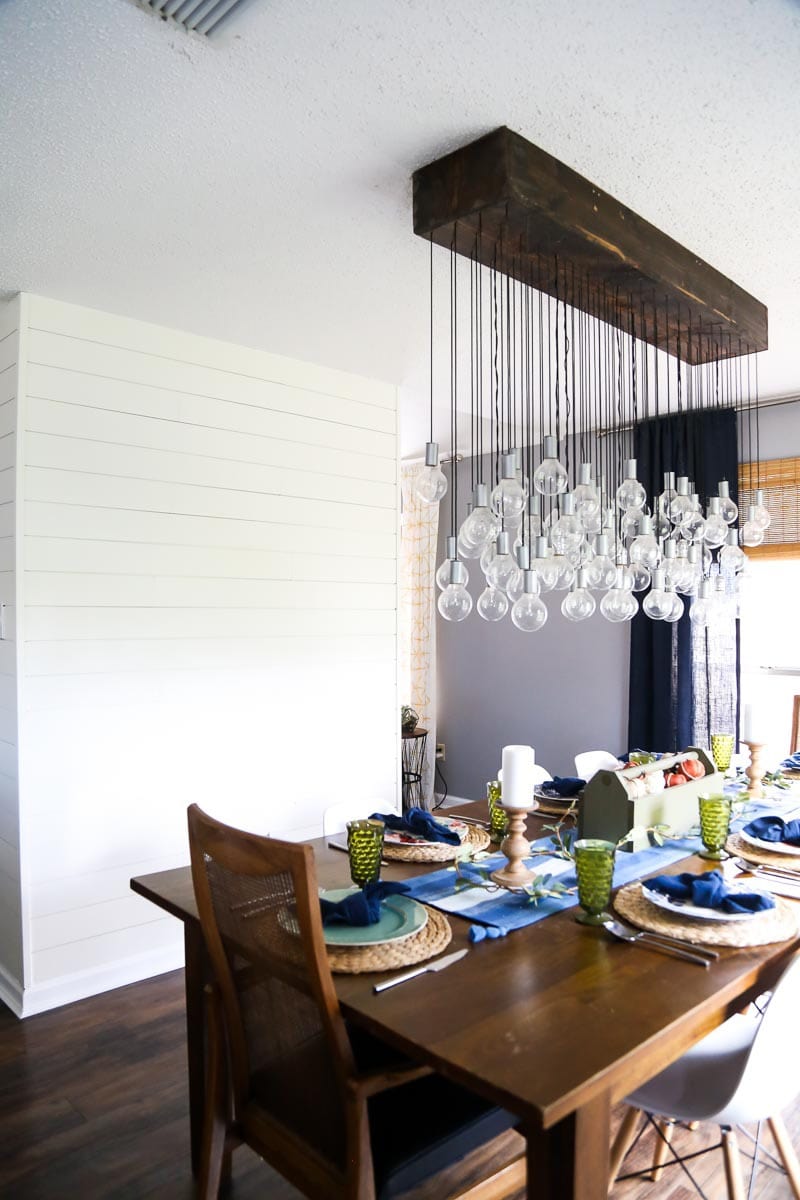
Looking to build a really beautiful DIY chandelier for your home? This multi-bulb dining room chandelier makes a huge impact, and I’ve got the full tutorial for how to make it yourself!
I’ve always had a thing for lighting – there’s just something about a big, impactful chandelier that makes my soul happy. In our first home, we struggled to find something that would make the impact we were looking for that wasn’t way out of budget. So, we decided to tackle the problem head-on and make something ourselves.
We’re nothing if not adventurous.
There are dozens of different was you can tackle your own DIY chandelier. The internet is full of easy DIY chandelier ideas! You could make a mason jar chandelier, chandeliers with craft supplies like twine and wooden beads, and I’ve even seen chandeliers made from embroidery hoops! There’s so much creativity out there and I love seeing it all. But, our goal with our DIY chandelier was to achieve something that looked and felt like we bought it from a store. We didn’t want it to feel homemade at all, and I really think we achieved our goal.
Oh, and the best part? We only spent about $250 on materials. And we ended up with this:
Trust me. You’re gonna want to see this.
Let’s get to the explanation.
An obligatory disclaimer: I’m no electrician, and I am not claiming to be. Taking on any electrical work in your home comes with inherent risks. If you want to avoid any risk, I’d recommend having an electrician help you out.
How to Build a DIY Chandelier
Materials Needed
The instructions that follow are for a 5′ long chandelier. You can adjust the sizing to whatever works best for you!
Planning + Mapping Out Bulbs:
Start by cutting your 1×12 board down to the size you want (we did 5′). If you do a shorter chandelier, you’ll need fewer light bulbs. We did four light bulbs per row, and the rows are 3″ apart. So, just adjust the number of bulbs you purchase accordingly!
Now, you’ll mark your 1×12 board with a pencil to indicate where you need to drill holes for all of your bulbs. Starting 1″ from the long edge and 3″ in from the short edge, mark every 3″ (so, at 1″, 4″, 7″, and 10″).
Do that on each of the short sides of the board, then draw lines to connect them so you end up with four lines running lengthwise down your board.
Then, go down each line and mark every 3″. These marks are where all of the cord lengths will hang, and you’ll have a bulb at the end of the each piece. But, not all of the bulbs will actually function. That’s overkill. Only 8 (or 1/10) of the lights will actually be attached to sockets!
So, your next step is to decide which ones will be functioning.
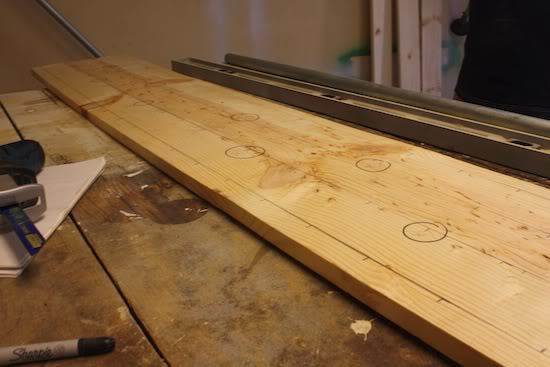
I’d love to give you some really simple method for figuring out which lights should be working, but it was a lot of trial and error for us. We played around with a bunch of different configurations (marking them with a pencil) until we found one in which they were all nicely spaced and looked pretty random. Then, we marked where the lights would go by circling their dot with a sharpie.
Before constructing the box, go ahead and drill all of the holes you’ve marked. You’ll want to drill them large enough to fit the rope, so about 3/8″ is ideal.
Construct the Box
Now you’re ready to actually start building! We decided to make our base come down about 6″ from the ceiling, but you can adjust to what looks best in your specific space. Just remember you’ll need some space for wiring.
For those of you following along, the final dimensions of our base ended up being 60″ long, 11″ wide, and 6″ tall.
We used wood glue and pocket holes (created by our Kreg Jig ) to assemble the box. You can also just drill screws in from the outside if you’re okay with visible screws!
Here’s how the completed base of the light looked once it was assembled:
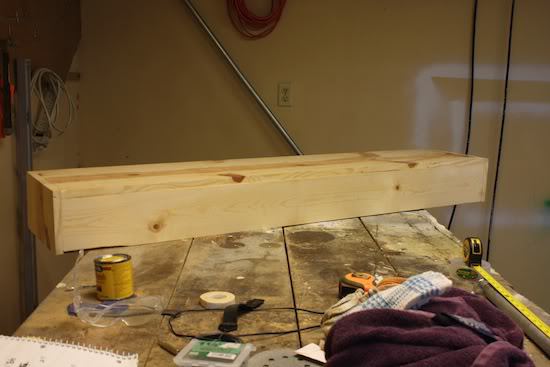
Next up, you’ll want to thoroughly sand the base, and then stain (or paint) it in your desired color.
Hang the Base Supports
To hang our chandelier, we cut a couple of pieces of scrap wood to act as braces, then mounted them to studs in the ceiling. We hung them so that they would sit towards either end of the base, and the entire thing would be centered over our dining table.
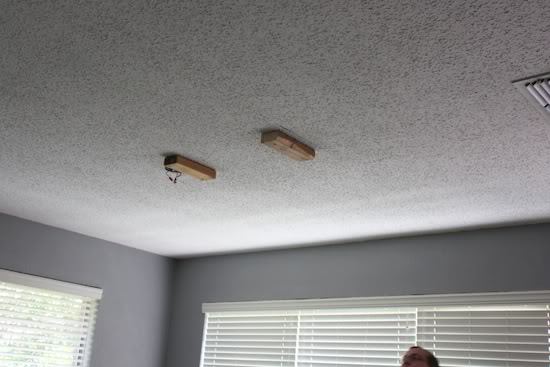
You don’t actually want to hang the base yet, this is just a good time to test things out before you move on. We even temporarily attached our base to the support pieces by drilling them in place so we could make sure we were happy with it before we kept going.
Once you’re confident in how it looks, pull it back down and continue working.
Make Faux Light Sockets
Now comes the fun (or, um, tedious) part. If you’ll remember, there are 80 light bulbs on this chandelier but only 8 of them function. In order for it to look a little more realistic, we decided to make some faux light sockets.
You’ll grab your 1″ electrical conduit and cut 72 two-inch pieces. We use our reciprocating saw, but if you have anything else on hand that can cut through the metal conduit, that’s fine too.
Hey, I never said this was a quick process.
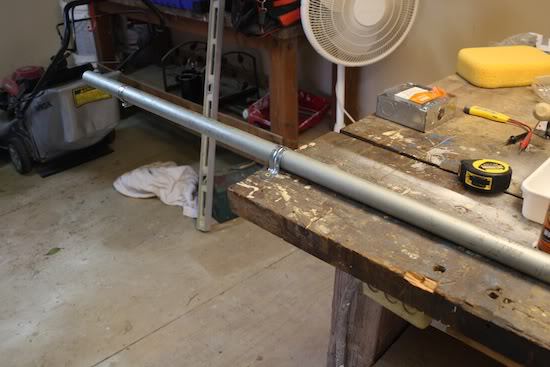
As you can see in the image above, we used an electrical conduit strap to attach the conduit to our work table while cutting. This helped prevent the conduit from bouncing all over the place while we cut.
So now, you should have something that look a little like this:
But it’s obviously not quite done yet. Now, you’ll grab your 3/4″ knock out seals and super glue them to one side of each conduit piece. It’s a tight fit so you might want to grab a hammer and/or some pliers to help you get it in there.
Here’s what it looked like:
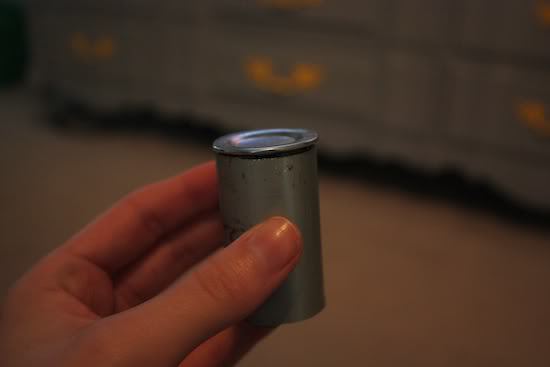
To finish them off, you’ll drill a hole in the top of each that’s long enough for your rope to fit through, and then spray paint them! You’ll want to paint them to match the light sockets you grab. We obviously stuck to silver but I think brass would have been really beautiful, too.
Once we were done with this step, it was time to piece it all together.
Cut Rope to Length + Plan Layout
Now, it’s time to grab some scissors and cut aaaaall of your rope pieces that will be holding the light bulbs. We wanted ours to be varying lengths, so we landed on a total of 5 different lengths.
Here’s exactly what we ended up cutting:
– 20 pieces at 3 feet long
– 15 pieces at 2.75 feet
– 20 pieces at 2.5 feet
– 15 pieces at 2.25 feet
– 10 pieces at 2 feet
It took a long of planning to get the lengths laid out in a way that felt random, so I actually drew out a little color-coded map to help me. Here’s a photo of it, if you want to just copy the work I already did!
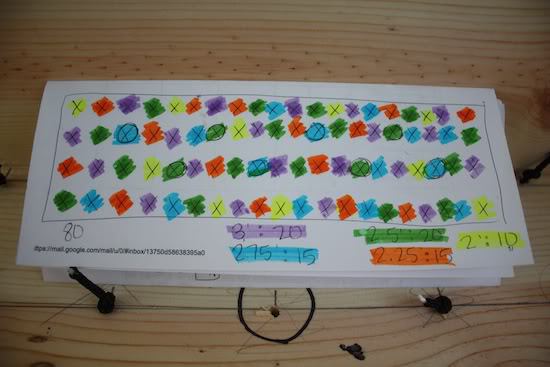
Remember, the circled X’s are the ones that will light up. We decided that we wanted the lit ones to all to be towards the middle of the light rather than on the outside edges. We also didn’t want any of them to be the longest or shortest length. Beyond that, it was random.
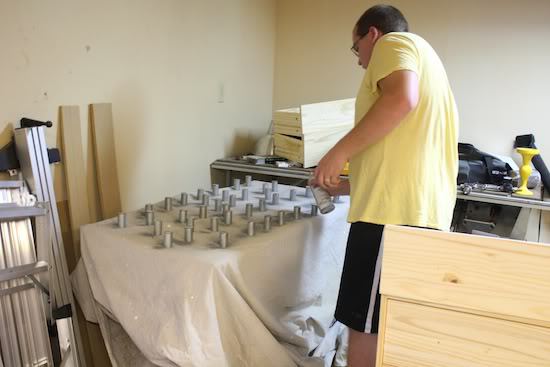
Attach Rope
Once all of your rope pieces have been cut, it’s time to attach them to the base of the chandelier. Simply thread one end into the holes in your chandelier base and tie a knot to hold it in place. Be sure to reference the map to keep you on track!
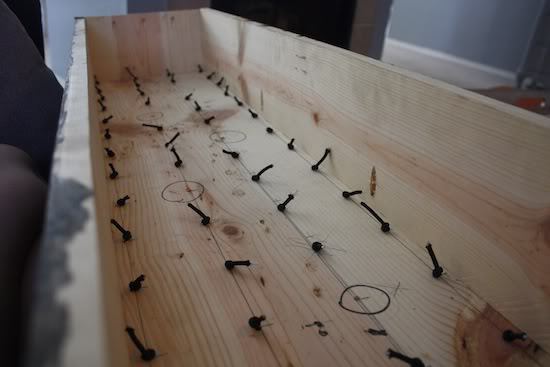
As you can see, we left the circled ones alone for now because those are where the working lights would go, which means those holes need wire.
Add the Wiring
Next up, it’s time to get those real light sockets ready. Remember – we’re pretty comfortable working with electrical projects in our house, but we are not pros. If you try this at home, please know we aren’t responsible for any issues you have and I fully recommend hiring and electrician if you aren’t comfortable handling it yourself!
Here’s a little diagram I made of how the light wiring worked for us. Again, there are different ways you could do it, and this is just the route we chose to take.
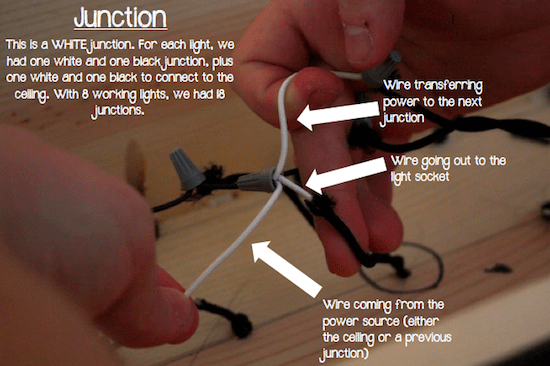
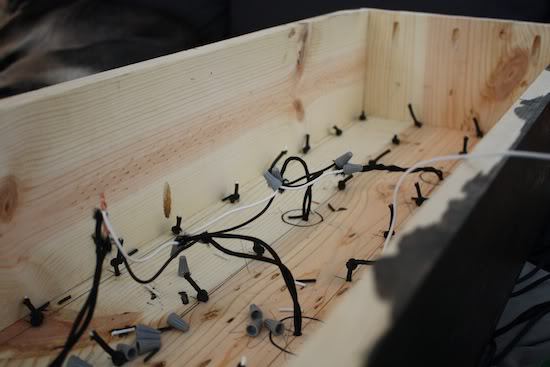
And for a little perspective, here’s a zoomed out photo so you can see how they all connected a little better. Even though it’s not pictured here, you should use a junction box for each connection to prevent any electrical issues.
Clear as mud, right? It’s a bit confusing, but once you get doing it you can start to make sense of it!
Hang the Chandelier
Now it’s time to actually hang it! We pre-drilled pilot holes in our box in the exact spots where the mounting pieces would be, so all that was left to do was drill the box in and hope it didn’t come crashing down (spoiler alert: it didn’t, although we totally spent a good three days with our couch cushions on the dining room table just in case!)
Here’s a peek at how things were looking at this point in the process:

Add the Rest of the Lights
You’re reaching the home stretch! The rest of the process is tedious, but very simple.
Just grab one of your faux sockets, string a rope through it, and tie a knot. Then, grab a light bulb and add a few dots of super glue, then push into the other side of the socket and hole it in place for a few seconds.
I know it sounds overly simple, but just a bit of super glue worked. We lived in this house for 5 years after installing this chandelier and never once had a bulb come out! But, you could also easily use a hot glue gun if the super glue makes you uncomfortable.
Once I was done and stepped back to look, I realized there were a few areas were lights hung at the same height in a group. No matter how careful you are, it’s impossible to keep all of your knots at the exact same place. But, we found it was really easy to pop the light bulb back out, adjust the knot a bit, and put it back. We just kept messing with it until things looked natural, and then we were DONE!
And the final results? Well, they really speak for themselves.
The Completed DIY Chandelier
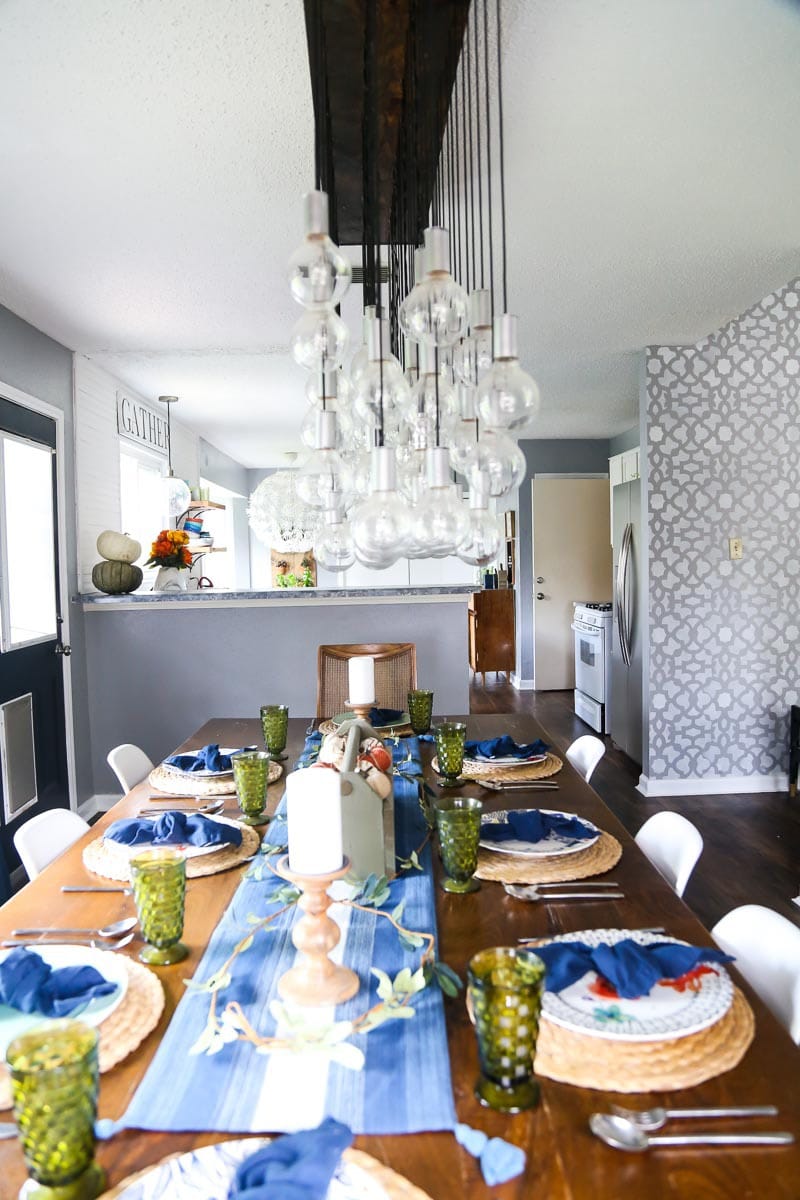

To date, this project is still one of the ones I’m the most proud of out of everything I’ve done! It was certainly a labor of love, but the finished result was so (so!) worth it.
One of our favorite features is how it looks when it’s turned on. The light from the 8 bulbs that actually work bounces off of all of the other lights beautifully. There’s an illusion that the whole thing is just glowing. It’s impossible to capture in photos, but just know it’s beautiful! I’ll have to have you all over for dinner someday so you can see how it looks in person!
This project was time-consuming, a bit overwhelming at times, and not for the faint of heart, but I promise that if you stick it out you’ll end up with an epic light fixture that everyone who comes to your home will ask you about. And I can tell you it feels so good to be able to saw you made it yourself!
Oh, and if you need a little extra help planning how this light might fit in with the rest of your lighting (or making the rest fit in with this), I’ve got you covered! This post is all about how to choose lighting for your home, and can guide you to figuring out how to help your lights play well together. It can be hard to know what kind of pendants to use over your kitchen island with a big ol’ chandelier like this right next door!


OMG wow, wow, wow! This is an outstanding post! The level of information is excellent and the light is beyond gorgeous. This is something that must be in my newly renovated basement!
You’re light fixture looks incredible! You did a great job with the design. I’ll have this as my inspiration. Thanks for sharing!
Hi Amanda, I love post about handmade dining room light. Actually, I was making preparation to build a DIY dining room light. And I was exploring information from the around and stumbled upon this post.
Very helpful post with images, instructions and directions are looks good, and I hope I will be able to build up my home dining room light following your steps.
Have a great day!
I have to tell you that this is absolutely the most gorgeous light I’ve yet to see….you name the website and Ive been there and literally (over the last 6-7 months) have looked at every light in styles like yours, I’m so happy your website found it’s way to my search results….I’m just completely amazed and completely bummed “because” now I have no choice except to build it LOL…,Im so grateful for the tutorial, thank you so much…I hope it ends up even closely resembling yours and that alone will make my year!!!…your a Wonder and a Gem!!! Truly can’t thank you enough!!!
You’re so sweet! Thanks so much, Alex. Good luck!!
I love this!! great thing you created! Thank you for the publication
What are the electrical code requirements for the wire connections inside the box?
As wood is a combustible material seems that special protection is required in case of shorts?
We’re not electricians, and you’d need to check the codes and requirements for your area. We did our research and took precautions to make sure our light was safe (and had no issues in the years that we lived in this house after making it!), but I can’t give any specific advice on the wiring!
I love this so much! My only confusion is how it is attached to the ceiling? I don’t quite get that part!
Hi Aidan – We built a box for all of the lights (where the rope/wire is attached), and it simply fits over two ledger boards on the ceiling and is screwed into place! You drill the ledger boards into studs in the ceiling, then fit the box over them and attach the box directly to those boards. 🙂
I have the same dilemma and out of many ideas popped to my head, this seems to be the nicest, especially after seeing your hard work. I am not going to do that many lights, do they look amazing. Only two ledge boards were used and what size wood? . 2X4 ? and what size screws used to screw them into ceiling joists and what size screws to attach the light to the board? 4 or 8 screws? Wooden light box must be very heavy. Definitely two requires two people. One of then has to be very strong.
This is incredible. I need this in my life. I’m just scared to do the wiring. I think I could do everything else.
You could always hire out that part! 🙂
when I saw that big piece of timber I thought that someone was to go on the cross
Hey, would you still have the pictures of the whole process.. they don’t seem to open on any of my devices, so I would believe that they have been removed from your blog. Would you mind uploading them again ? This is a gorgeous piece and I would love to make one
Thanks a lot
Hi DeeGee – thank you SO much for alerting me to this issue! We’re having some glitches with images on our older posts, but I didn’t realize this post was affected! All of the images should be working now! But, if you do any browsing on older posts, you may notice similar issues, please know I’m actively working on it right now!
Hi Amanda. I’m almost finished making ours. I was wondering if you would like photos once it’s complete.
Regards,
Charlie
This light looks awesome and I’m seriously debating trying this in my own dining room. I’m a handy guy and think I’m up for the task. My and my wife’s only reservation is that there are no photos with the final chanalier lit and I really want to get an idea of how much the whole thing glows versus just the 8 lights. If you could post or email a photo of it lit up it would be very helpful.
Hi Charlie! Unfortunately, I’m not sure if I ever took a good photo of the chandelier all lit up (or, if I did, I can’t seem to find it!). We’ve since moved out of that house and so I can’t snap one for you. So sorry – I can’t believe I never got around to photographing it all lit up. I’ll definitely come back and let you know if I find a photo, though. One thing to note is that we had ours on a dimmer switch and found that was the best way to get just the right amount of light – we rarely turned ours up to full blast, because it was in a room with a ton of natural light already. Hope that helps!
It made me gasp out loud! I love this. I don’t have anywhere to put it at this time, but I won’t forget it. Ever.
Thanks so much Anna!
Congrats to both of you, it turns out pretty gourgeous
what does it look like turned on?
It’s almost impossible to catch a good photo because of all the light we get in that room, but the light from the functional bulbs bounces off the others and makes a really cool effect! It kind of illuminates them and makes it seem like the whole thing is glowing. It’s pretty beautiful! 🙂
fantastic! if all the bulbs lit up, you could light up a whole city block!! great job…
AMAZING!! Love how it turned out–so clever!!! Thank you for sharing.
Thanks so much!
Love the project, what kind of wood did you use how much ?
Thanks! We just used white wood, we made the box from a 6-foot 1″ X 12″.
Excellent tutorial. I’m going to add this to my honey-do list 🙂 Thx for sharing…
Thanks! Be sure to come back and share if you do make it – I always love seeing photos!
Hi There!
This looks absolutely amazing!! You guys did an great job!!
I am planning to replicate this…wish me luck!
Before i do get started, my only concern is…how do you change a bulb if it goes out? Do you have to remove the whole unit?
Thanks in advance for your help!
Nope, you can just switch it at the socket. It’s actually kind of nice because you have an almost never-ending supply of extra bulbs – you can just switch one that isn’t connected for the one that is, since it won’t matter if a non-lit one is burned out.
I would love to see a photo of this lit up at night!
I would too!
So beautiful!!
So excited that I’m starting this project next week! My rustic dining table is 9.5 feet long, so your idea was PERFECT! Going to make some slight modifications, with using all real sockets for all (since I don’t have access a garage full of tools), and using a paracord style wiring vs twisted style, so that the non working sockets wiring match the working ones. And also shorten the box so I have more clearance over my dining table.
Before I ordered 90 light bulbs, I wanted to ask you… How do you feel about the 40 watt bulbs? Are they bright enough? Or would you prefer to go with 60 watt??
How exciting! The 40 watt bulbs are perfect – any more would definitely be too much. Our light is on a dimmer switch and we normally don’t even turn it all the way up.
Just seen this. Brilliant!
Hi! I am in the middle of making this right now. I am wondering what was the width of the rope that you used? I have to order most of the parts online and am anxious to order the rope as I just ordered the bulbs and wire and have just about finished to box. I am so excited to be making this myself 🙂
I don’t know the exact width, but it was the skinniest rope they sold at Lowe’s. I would guess either 1/8″ or 3/16″.
This is awesome! i was searching to make my own dining as well and i think this will be a great tutorial. Thanks for the step by step instruction!!!
You used crazy glue to hang light bulbs to strings. how does it hold the weight of the faux metal socket? would it be ok to use PVC pipes as faux socket? would it melt due to heat created by light next to it?
thanks!
The glue doesn’t actually hold the faux sockets, those are held up by knots in the string. It holds the light bulbs in perfectly – we haven’t lost any! I don’t see why pvc pipe wouldn’t work…unless your light got extremely hot or was on all the time, but our bulbs never get very hot. Hope that helps!
How much wire did u need/buy?
It really depends on how low you want them to hang. We just figured out how low we wanted each of the bulbs, then calculated based off of that.
My husband is convinced this is exactly what he wants in our dining room. I’m not thrilled on a DIY light, but it is beautiful…. thanks for so many details!
This is great! Where did you buy the wiring for your lights at? My husband and I are making our dinner table light out of a whisky barrel and blue mason jars. we have been trying to figure out how to make our own pendant lights like you guys did with a total of 5 lights but it seems like we are constantly finding different methods from everyone and we are getting frustrated. We know we need the sockets, and the ceiling mount for power, we just dont know where to get the electical wire and how to hook it all up without burning our house down. that would be a bumber.
The wire is from 1000Bulbs.com – you can find it here: http://www.1000bulbs.com/product/65786/ELEC-D8302-10FT.html … I can’t help you on the hooking it up part because that was all Corey’s doing and I don’t feel confident enough to give out electrical advice, haha. Good luck!!
I’m in a similar situation, where I’m building the chandelier out of a cast iron pot rack. I’m worried about the wiring and not burning my house down! Amanda, I just sent you an email with more details, if you can please help me, I’m super excited to try this project!
You guys are awesome!! Amazing job concise and humorous tutorial. I’m looking to make something similar but with branches in lieu of bulbs and you have just given me a rainbow of confidents.
Peace and Joy my crafty mate
This light is about the most amazing thing I’ve ever seen. I am going to try it in a much smaller scale for my kitchen. Thank you for a wonderful time reading your blog. Time well spent. By the way, when and what’s for dinner? LOL. Thanks again. Penny Buckler
THIS IS AMAZING!!! Exactly what I was thinking of for our dining room in our new house (if it ever gets build)! I so want to steal this. Just not sure I can do it. Great job.
this looks fabulous! I am thinking about doing something like this to my room (minus the amount of light bulbs..) haha, can you email me.. i just had a few questions about the wiring and stuff 🙂
Thanks so much for this tutorial!! Looks amazing. I will definitely be doing this in the future b/c of all the great step-by-step info. You guys are so great 🙂
I just saw this on Pinterest and was thinking that looks just like our light fixture! The inspiration is my loft. LOL, small world. 😉
What is the wall color? I love it!
Flagstone by Olympic! 🙂
Thank you for posting your plans on here! My husband said to me the other day, I would love a light that has multi strands and uncovered bulbs for over the kitchen table, what do you think those cost? So we went out and the only ones we liked were around 3,000 dollars. I recalled seeing your blog and said wait a minute I think we can tweak the plans I have seen on this wicked girls blog and we can do it ourselves. We took your light as inspiration and made some adjustments and voila the coolest modern light ever! we made the box 3 feet and recessed the bottom piece with the holes so that it was less noticeable, then we sprayed it with prosche silver car paint and a hight gloss clear coat (thank goodness my father manages an autobody shop). My hubby ordered colored fabric covered wire from the UK and we bought all real ceramic sockets for all 48 bulbs. We sprayed them along with the hartdware to attach it to the cord and the effect is so goood it looks like we purchased the light at a high end modern store. I wish I could post a picture in case anyone wanted info on the items we used and to show you what you inspired. But wanted to thank you for helping us accomplish our dream light project. Our cost however was $650 since all the sockets were real, but compared to 3K we were pleased!!
Wow – sounds amazing!! I’d love to see photos – my email is [email protected] if you wanna send some my way! 🙂
how tall were your ceilings? very nice
In the dining room, they’re just standard 8-foot ceilings. 🙂
Very beautiful. great job on the wooden box, cool finish. Impressive indeed.
I love your light and I am attempting it with help from my husband. Where did you get the fake wire rope? I can’t seem to find any at the hardware stores around me and I am wondering where else to look. Thanks so much!
This light fixture is incredible. I think it’s beyond my DIY skills. But it’s inspirational and truly beautiful.
O. M. G. ! This is INCREDIBLE! I don’t have a great space for a chandelier like this in my house, but I wish I did! Congrats on an amazing DIY job! I love love LOVE it!
-Sarah
Congrats on getting into the contest!! This project is simply amazing!!! Well deserved! Can’t wait to see what other amazingness you come up with!
My boyfriend and I spent the last month recreating our own version of this dining room light. First of all this has been one of the most fun projects we have ever done! And your plans have been invaluable!! We are soooo pleased with the results. We made a few changes: we downsized to half the size (as my dining room & table are very small) and made it with 40 bulbs, shortened the length, found an easier way to make faux sockets (using 3/4 inch PVC female adapters) which cut the work time by lots, and we were able to screw in the bulbs so we can reuse later if needed. We’ve had so much fun, we are now inspired to upgrade and redesign my tiny kitchen! Just want to say a huge THANK YOU for your plans which are well developed, inspiring, and even funny!
That’s so exciting! I’m glad to hear our plans were useful! 🙂 I’d love to see photos if you have ’em!
Amazing job! I love that he is standing on the table while the table is set with dishes! I pinned this and hope you will stop by my website and submit it for me to feature!
Susan @ Oh My! Creative
This looks so great!! DIY fixtures like that can look very tacky, very quickly. You completely avoided a tacky look! I’m in love! Hopefully this project gets you into Creating With The Stars!!
Aw, thanks! Fingers crossed! 🙂
Wow, this is incredible! I soooo admire how much effort you put into this and it totally paid off! Super impressed. 🙂
Thanks for entering the contest! 🙂
Jess
Thanks so much! 🙂
An amazing amount of work, but with amazing results! Very cool.
Wonderful job! I hope Corey wasn’t scolded too much for standing on the dining table!
I noted that the holes in the knockout caps were rough edged. No doubt that a standard twist drill bit was used. One my metal projects, I use “stepped” drill bits, as they leave a smooth edged hole. These bits make very clean holes without the sudden pull through at the end as with a twist bit. I also use a bit of cutting oil to ease things along, too.
Thanks so much – and, no, it’s a super sturdy table, so we stand on it surprisingly frequently as needed. Thanks for the tip! 🙂 This was our first time playing around with this sort of stuff, so we were definitely making it up as we went along!
THANK YOU SO MUCH!!!!!!
I also spotted that light and I was and still am in love with it absolutely.
I will try to make it also when I hope so…
Beutiful, tnx again!
Thanks – glad we could help!
Great Job!!! I would only suggest that you put some kind of rubber edging on the holes your drilled for the “real” lights. The sheathing on the wires could be cut and then you would have a rather ‘hot’ light! I would have also suggested that you tape each connection with electrical tape or put them in boxes. These suggestions are for safety only coming from an electricians daughter!! Yet your light is gorgeous! I think I will make one similar to it but smaller. Since I am renting I will somehow make it so I can take it out and put the original one back in when I leave. great job!
Wow. I have been looking for a light similar to this but my budget is $300. Probably not possible, right! You should sell these!!! o my
It’s totally possible if you DIY it! 🙂 We did ours for under $300.
Hi this absolutely gorgeous -and by far the best diy I’ve ever seen!!!!
Can’t imagine cleaning those light bulbs though lol
So happy I saw this
Hugs,
Suzan
Hi Amanda! I’m in love with this fixture… it’s so unique and really well crafted. Awesome job! Each Friday I highlight DIY projects in a series I do, and tomorrow I’d like to feature this project if that’s ok with you. Just wanted to let you know, in case you want to check it out! Again, beautiful job and beautiful blog!!
Hi Jenna! Thanks so much – I’d be honored to be included!
This is amazing! I love light fixtures like this– so beautiful. I bet you’re enjoying the heck out of it after all the work you put into it! Congrats on the feature on CG. 🙂
Erin
Congrats on being featured on Centsational Girl! You must be so excited!
Wow! This is very nice. It’s very educational information and very inspiring post. I will make it also for my dining. You impressed me from your unique chandelier and from your patient of your effort. Great work!
Very cool project! I agree with another commenter that this looks store bought. Especially love the feel of the wood box – I really thought it was a huge wood beam until I saw the steps to put it together. Interesting making most of the lights dummy lights – can you imagine how bright it would be if they were all live? LOL
AMAZING! Great tutorial and fantastic results! I am loving the fake sockets! Great job!
Arg, this so so mindblowing that I need to try convincing my dad to help me to do this! WOW!
looks fabulous!!! love it! great work you guys!!
Wow! That is super impressive. I’m also amazed at your patience and skill. It really does feel like organzied random lights. I missed it…but Ithink that you should call it a chandelier. Stunning!!!
P.S. Popped by from Addicted 2 Decorating.
Thanks so much for stopping by!
I don’ usually post comments, but I had to make an exception in this case. Your light fixture project absolutely blew me away. The time and patience and team work that obviously went into this is priceless. I am in awe of your accomplishment and am adding your blog to my favorites. Congratulations on a beautiful project.
Thanks so much! I’m honored! 🙂
I am in awe of how great this project came out. It looks beautiful!
Unbelievable! How amazing are you? Pretty amazing! I love this. I need to find a place in my house to do something like this. Pinning right now.
This light is incredible. You both did an amazing job!!
That is AWESOME! I am in awe. Wow.
I LOVE how it turned out! Looks great!
I tried making a light once. This gives me hope to try again it is just THAT awesome!
Bernadette from http://www.b3hd.blogspot.com
Unbelievably amazing!! Just…WOW!
This is pretty much amazing! I can’t believe how much work you guys put into making this happen!
HOLY CRAP!!! You weren’t kidding when you said you DIY’d a large light fixture! I don’t think calling this LARGE does it justice! WOW!!!
It looks amazing! And I love that all the wires hang straight!!!! (I’ve seen ones where the wires are kinked and it looks weird) yours looks great!!!
It’s like an Edison light on crack! TRULY AMAZING! wow !
Great Job!!! You guys are awesome!
Lots of Love
Ashli
Ahh, thanks so much Ashli! 🙂 We’re pretty happy with how it turned out, haha.
This was so awesome, I shared this today on my blog as a Favorite Project from the Summer Pinterest Challenge!
Check it out. 😀
http://twolivecolorfully.wordpress.com/2012/07/12/blog-lovin-some-of-my-favorite-projects-from-the-summer-pinterest-challenge/
Can’t wait to see more!
Awesome – thanks for sharing! 🙂
I can’t believe how great this came out. It looks amazing!!!
I. Love. Your. Light. Oh my goodness! You two nailed it! It looks so pretty!
xo,
Shannon
The coolest DIY project I have seen in a very long time! Very unique and spectacular! Its mesmerizing!
Oh my goodness, this is crazy good!! I have been wanting to a smaller version in my walk in pantry for ages, but had no idea where to start. Thank you so much for the detailed tutorial. Pinned!
This looks amazing! Seriously, it looks like a high end fixture! You guys did amazing. I also tackled a light fixture related project like taping colorful strips of paper to fishing wire and hanging them in our dining. Mine’s cool, yours is way cooler! Great post! (I came over from the pinterest challenge!)
Hi Amanda: Wow–this is just gorgeous! Such a dramatic look–I love it! Thank you for the step-by-step details–it was very informative. Take care, and have a wonderful week!
I never would have guessed that this was homemade. It looks super professional and just all-around gorgeous. You guys totally rocked this project!
This is amazing! I absolutely love it!
Nikki Kelly @ the ambitious procrastinator
That is so beautiful!! You guys are really talented. I was excited to see it on the list of YHL reader-submitted projects too!
Wow…….all I can say is WOW!!
I am SO impressed! You guys did an amazing job. Definitely time for a dinner party.
I just… I can’t… even process. Seriously. I cannot get over the awesomeness. Amazing job!!!!
Oh my GOD!! This is absolutely incredible!! You guys should be so effing proud of yourselves. You are truly so, so good at this stuff! I can’t believe it!!
I love this!! How awesome that you guys made this yourselves!
This is my favorite project of yours yet, and all your others have been amazing. This is stunning. Nice job.
WOW. WOW. I am so, so impressed that a) you thought this up and b) you had the patience to pull this off!! It looks amazing. I hope you guys finished it before your cruise so you could take a break and celebrate your huge accomplishment!
Holy crap!! That is amazing! It turned out SO good! I can’t believe you guys DIYed it!
Holy cow! This is so amazing and so well done. I can’t believe you did this for $250. You guys are awesome!
So adorable! I definitely want to come over to check it out in person, but not share this with my husband. I’m sure he want to make it, but with all of the bulbs working!
Wow. This looks like it is straight out of a magazine and if I were lucky enough to dine at your house I would be completely mesmerized the entire time. I’ve scrolled back up to look at it 3 times already while writing this comment!
E.T.A.: The only thing I would encourage you to do is put the wire splices inside of a secured junction box w/ a cover plate as a fire safety/ fire preventative measure. You can probably fit two or more splices in a junction box depending, its the size 🙂 Seriously love this project!!
please know that as I write this my jaw has dropped to my desk.
You guys are so dedicated. I’ve done a couple home DIY projects and almost gave up after 3-4 hours worth of work. I’m so impressed with how meticulous you are and how perseverant! Awesome job, truly. It turned out beautifully.
Um, AMAZING! It looks great Amanda! I’m so glad you shared this project and your budget 😀
WOW! this is amazing!
How I wish we werent’ renting and could do this….
hmmm.. I may have to think of a temporary way of doing this… maybe smaller, with a circular drum type base.. .that could be awesome 🙂
Question: are you worried at all that with a fan or open windows that the lightbulbs might bump against eachother and break?
Thanks! No worries at all about them breaking – they’re very sturdy! We’ve bumped up against them several times when we’re putting stuff on the table, etc. and they just move around for a few minutes and then settle. They’d have to get moving much more than a fan or breeze could possibly do in order to break them!
wow, that is quite the challenge to undertake! you guys rocked it!
Amazing!!!
Oh wow!! You guys did such an amazing job, I love it!
Wow, this is SERIOUSLY impressive. It’s so beautiful, and it looks just like your inspiration! I’m really envious of your DIY skills!
YOU WIN (even though it’s not really a competition). Seriously, I’m pretty sure no one participating in the Pinterest challenge can top this. WELL DONE!
Um…that is the most beautiful light fixture I’ve ever seen!! You did such an amazing job!! I hope you’re submitting it somewhere because everyone needs to see that!
dude. this is really effing awesome. i seriously wish i had skills like you and your hubs. this ROCKS.
that looks amazing! you guys are geniuses!
WOW! All I can say. You guy’s did a great job!!
Wow, that looks so awesome, wouldn’t be surprised if they asked you to co-host for the next challenge!