
DIY Pea Gravel Patio With Pavers
If you’re looking for pea gravel patio ideas, this post is for you! I’ll show you how I made my own DIY pea gravel patio (with pavers) in just a few days.
Y’all, I built a pea gravel patio.
I DID THIS! By myself! Can you believe it?!
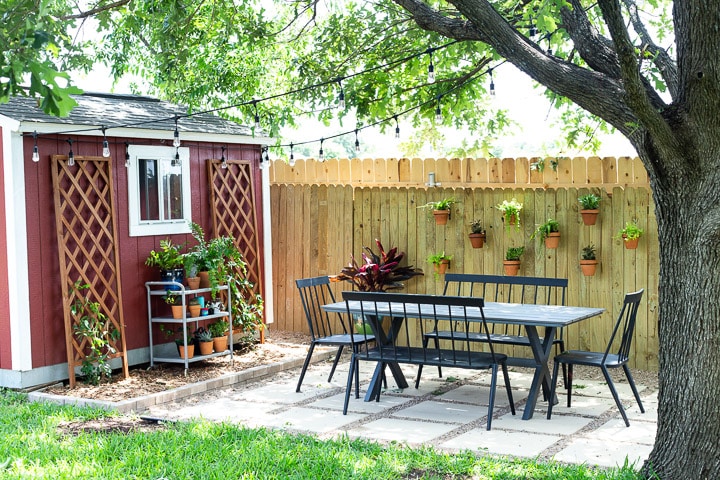
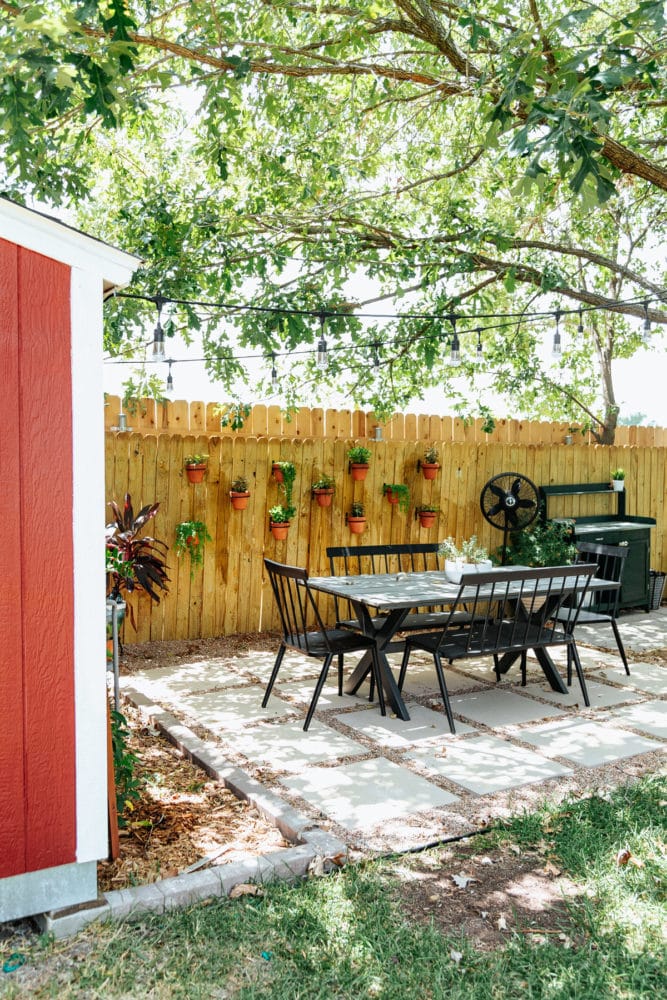
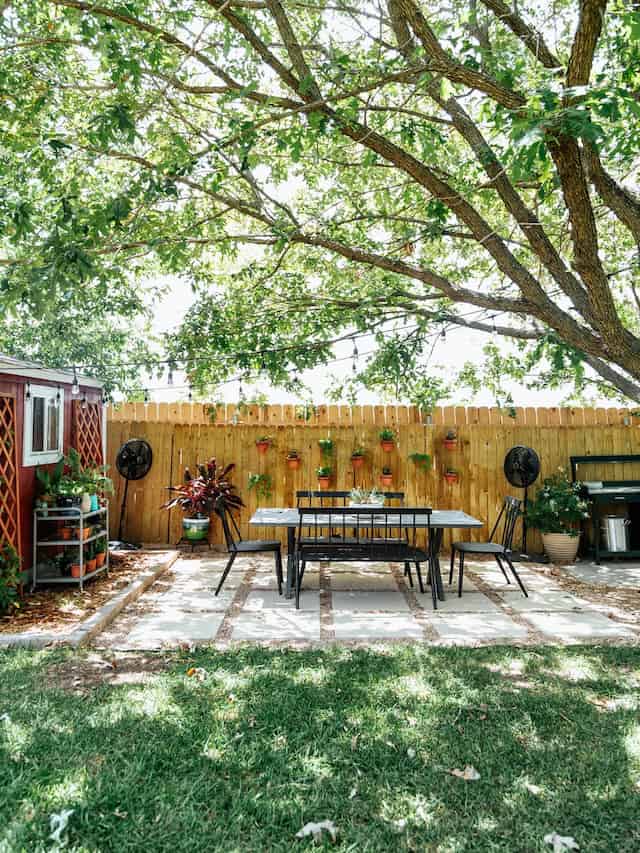
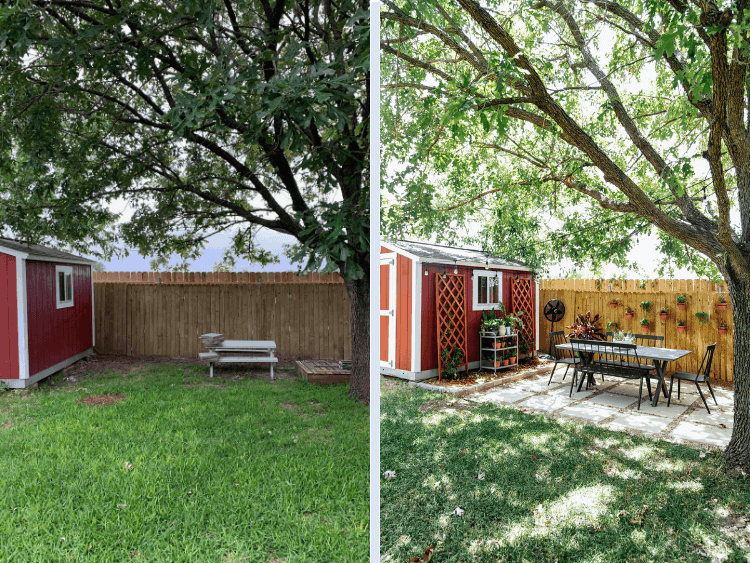
This little corner of my yard used to be completely empty and boring, and now it’s functional and beautiful. I keep pinching myself over the whole thing because I still can’t believe I did it.
This post will detail every single step I took to build this DIY paver and pea gravel patio. And, be sure to read all the way to the bottom for all of the other posts in this backyard makeover series – it’s a doozy!
Let’s do this thing.
Benefits to Using Pea Gravel
Let’s start with the most obvious question: why did I choose a pea gravel patio? Lots of reasons.
- Pea gravel is a substrate of small rocks that have been formed by natural weathering. They have a really pretty natural range of colors and sizes, and look great in any environment.
- Pea gravel is easy to install, and doesn’t require a professional. I love DIY projects, so anything I can tackle on my own is a win. Having no labor costs makes me happy, you know?
- Pea gravel is low-maintenance. It’s a particularly great choice if you have a lot of freeze and thaw cycles in your area, because it won’t crack over time!
- Pea gravel gives a really classic look that won’t ever go out of style.
- It’s incredibly affordable. Other hardscaping materials like flagstone or brick can be really expensive. This is a much more reasonably-priced alternative!
Are you convinced? Good. Let’s get to the details.
Video Recap
Wanna watch the whole thing come together? I put together a compilation of all of the videos from this project that I shared on my Instagram stories.
How to Install a Pea Gravel Patio
Tools + Materials
- Straight edged shovel
- Gloves
- Nylon string + grading stakes
- Line level
- Landscape fabric and staples
- Paver base (see my note below)
- Landscape Border
- Leveling sand
- Tamper
- 24X24 pavers
- Pea gravel
- Landscape border
Step One: Determine The Size, Shape, and Location of Your Patio
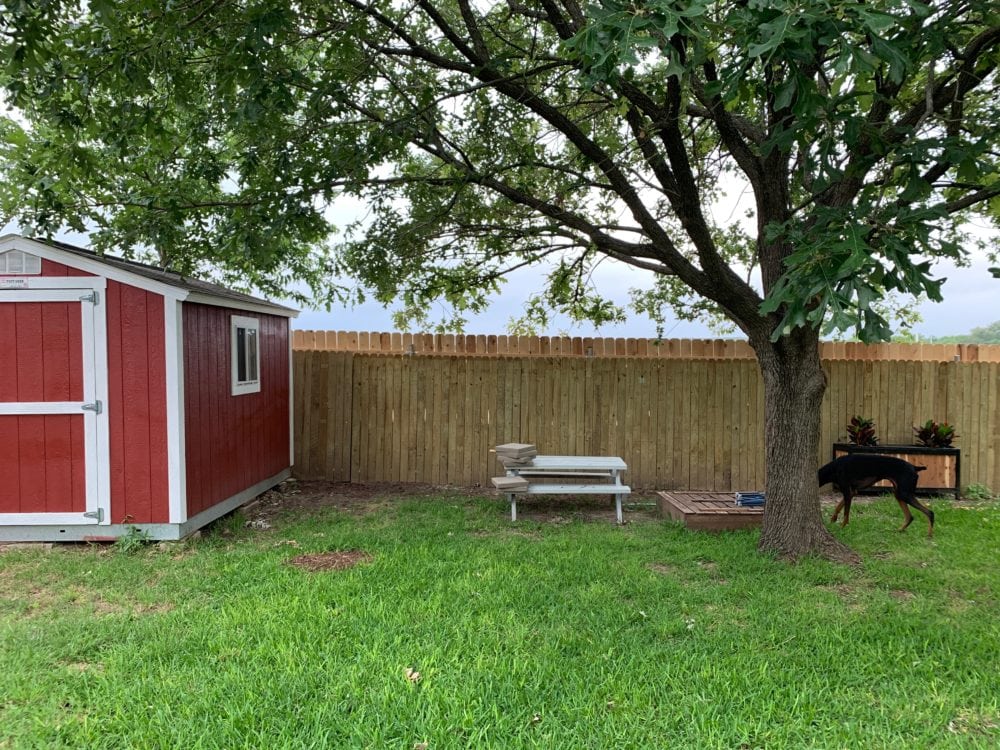
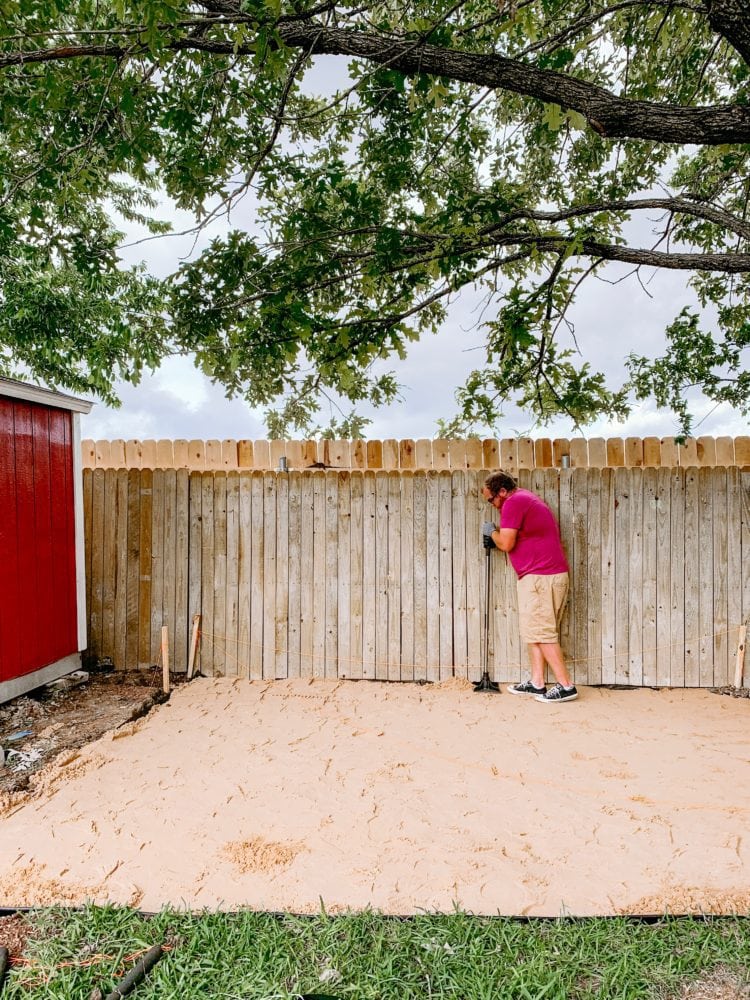
Your first step is to figure out where you want to place your patio and exactly how large you want it to be. We had this perfect area next to our shed where grass never grew, and we knew if we put a patio there it would make this corner of our yard usable again.
Once you’ve determined the sizing, use your stakes and string to frame out the area where you want the patio to be. Place a stake at each corner, then tie the string to the stakes to create an outline. Use the line level to make sure the strings are placed evenly.
Once you’ve framed out all four sides, add a line of string going diagonally across both sets of corners. This will help you level out the middle of the patio (I’ll detail that in a second).
Once you have the patio space marked off, you’re ready for the hard part: digging.
Step Two: Dig Up the Grass
Now, you’ll need to remove all of the grass from the area. You’ll need to get all the way down to the dirt. This helps ensure no weeds or grass will poke through your patio!
To determine the depth, take the height of your pavers (ours are 2″), and add 1-2 inches for sand PLUS about 3 inches of paver base (a mixture of crushed rock that is used to improve drainage). Then, get to digging!
Here’s a quick note: You’ll note I skipped adding paver base. Depending on the area you live in and how much use your patio will get, you may be able to skip it as well. I absolutely do not recommend this if you’re doing a full paver patio (so, no pavers), if you live in an area that gets hard freezes regularly, or if this will be the main patio in your yard and therefore see a ton of traffic. BUT, since our area almost never freezes, our soil drains really well, and this patio will only see light use, we felt good about doing the sand only.
The digging is definitely the most back-breaking part of the entire process, and you’ll want to quit at least a hundred times. Just put on a good podcast, tune out the world, and keep on digging.
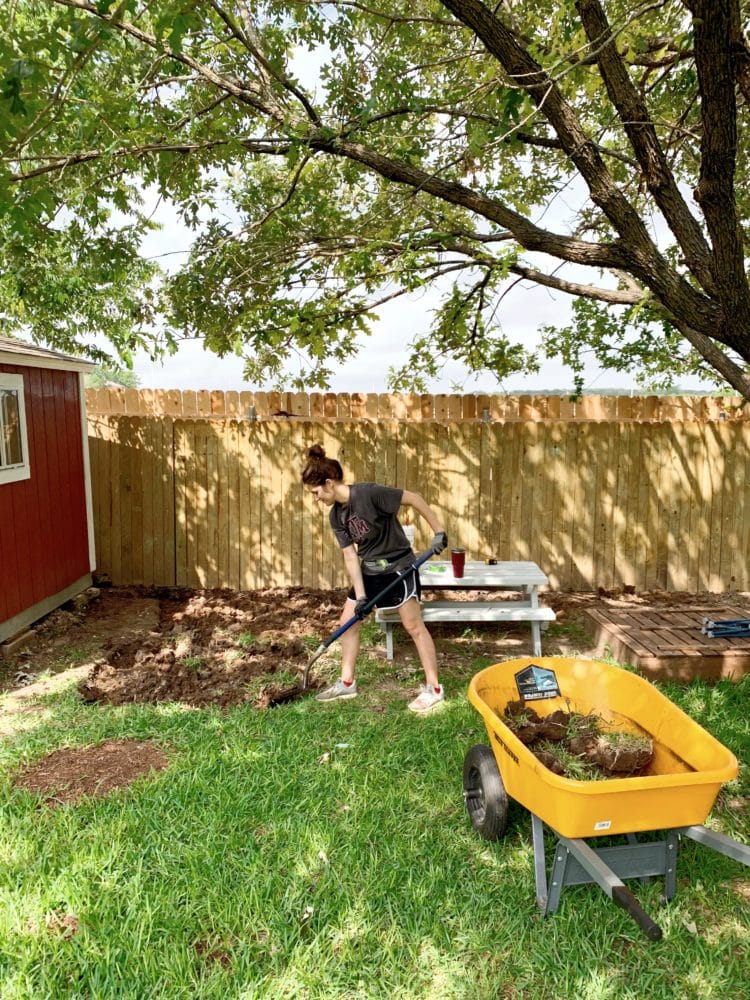
You may notice that we hadn’t placed the string yet in the above photo. We didn’t want to work around it (I’m clumsy and kept kicking it), so we dug out the main area, then added the string to get the edges and determine the spots where we needed to dig deeper. This is a perfectly fine order to work in too, if you find that easier!
Here’s a quick rundown of how you’ll use the string border you’ve put up:
- Use the string as a guideline for where you should dig the edges of the patio. If you follow along the straight line of the string, you’ll be sure to end up with perfect lines and square corners. You can also use spray paint to mark the ground!
- You’ll also want to use the string to make sure the area you’re digging for the patio out is level. Grab your measuring tape and measure from the string down to the ground where you’ve dug. You’ll want that measurement to be consistent across the entire patio.
- Remember, since you’re doing a pea gravel patio you have a lot of room for error here. Don’t stress too much!

Step Three: Lay Landscape Fabric
Next up, I took some landscape fabric and laid it out across the entire patio area. This step helps make absolutely sure no weeds poke through! This is going to really reduce the amount of maintenance you have over time.
It only takes a few minutes to roll out the fabric and push in the fabric staples. Honestly, this is the easiest step in the entire process and you probably want to do it just so that you can cross something off the list quickly and easily.
Step Four: Lay Paver Base + Sand
Once the full patio area is dug out, install your landscape border. We went with a flexible plastic one, but they also sell nicer metal ones that are a bit more sturdy! You can also line the border with brick, stone, or lumber
If you’re doing paver base, you’ll want to put down about 2-3 inches of that here, and it will need to be tamped down.
Our next step was to lay the sand. You should use concrete sand (I’ve also seen it called leveling sand) for this step. I highly recommend you find a local landscaping supply company where you can buy it in bulk. For us, it was about 1/3 of the cost of just buying bags of sand at the hardware store! We had them deliver it directly to our house – they just dumped it in the driveway for us and I used a wheelbarrow to bring it back to the yard.
Before laying the pea gravel, you should screed the sand layer. This is a step we skipped that I wish we had done!
Here’s a quick rundown of how to screed your patio:
- Lay lengths of PVC pipe (I’ve seen it done with 2X4s too) about every five feet across the patio. This should be done on top of your paver base, before laying sand. Be sure they’re level! Whatever material you choose, make sure it’s about the same height as you want your sand to be (so, if you want 1″ of sand, choose a material about 1″ thick!).
- Fill the patio area with your sand and spread it all out.
- Grab a 2X4 and run it along the top of the pipes to pull off any excess sand. Be sure to look as you work to be sure there aren’t any areas so low that the 2X4 isn’t touching.
- You should be able to pull out the pipes once you’re done, and use a small trowel to fill in the spots where they were.
With this step, you don’t need to also tamp down the sand, as the screeding does a good job of compacting it. You will, however, want to make sure you’ve compacted your base layer if you’re using that!
Step Five: Lay Pavers (Optional)
If you plan on adding concrete pavers, now’s the time! This is an optional step, but I really love the look.
If you’ve done everything else in the installation process properly and your ground is totally level, this will be pretty quick! Just be sure to measure the distance between each paver (we did 4″), and make sure that you’re laying in a straight line. Another string can help if you want to use that to guide your lines!
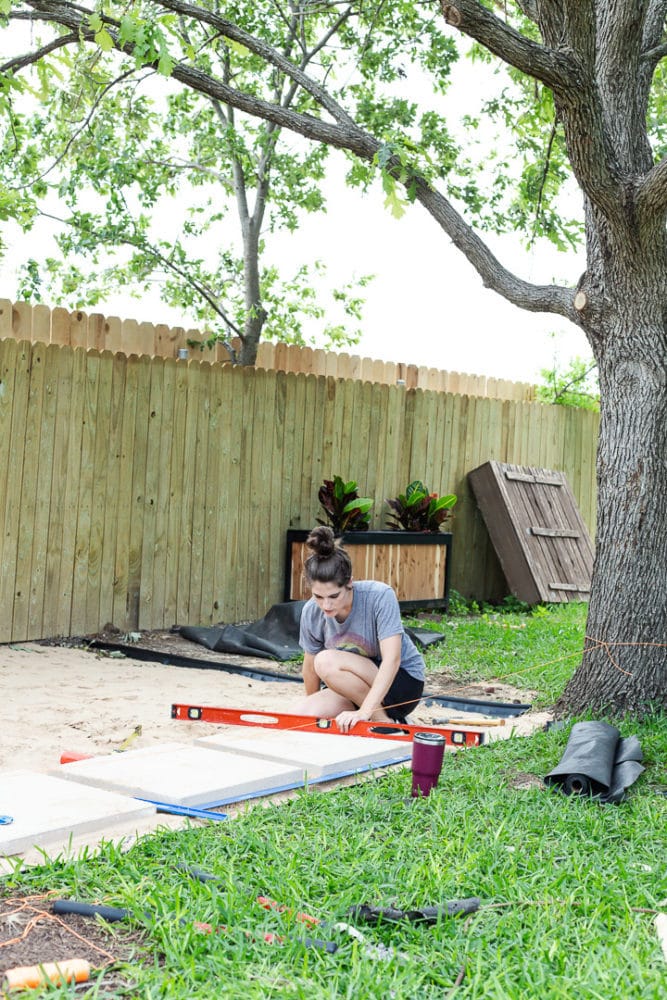
Check that each paver is level, and that it’s level with all of the pavers next to it.
Step Six: Add Pea Gravel
This part of the project was satisfying, surprisingly fast, and incredibly back-breaking and exhausting. I did it all by myself in about 2.5 hours. I just loaded the wheelbarrow up, brought it to the backyard, dumped it onto the patio, and used a combination of a large broom and my rake to spread it around until it was level.
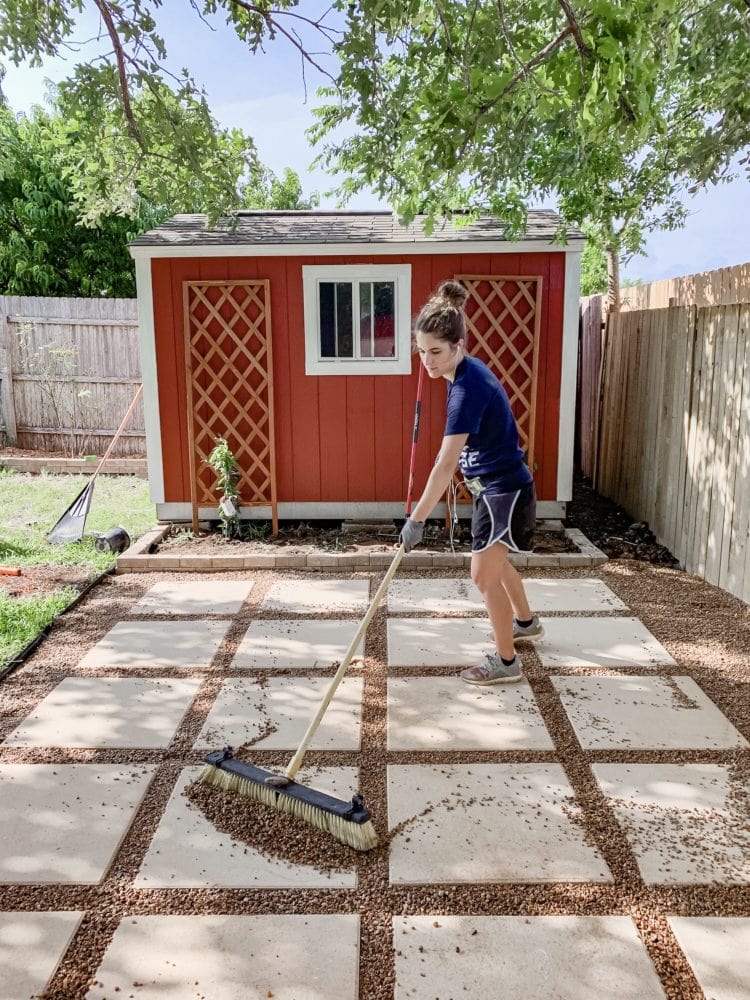
You’ll find that the pea gravel doesn’t always stay where it’s supposed to (you’re shocked, aren’t you?!), so just accept the fact that you’ll have to sweep the patio regularly if you want it to stay looking nice and neat. It only takes a few minutes, so it doesn’t bother us at all but if you think that constantly having rocks creep up onto your pavers will make you twitchy, you can add a binder to help hold things in place!
After your pea gravel is in place, you’re DONE!
FAQ
How Much Does Pea Gravel Cost?
We got our pea gravel from the local landscape supply store. When you’re looking, you may also find it labeled pea stone or pea pebbles. They’re all the same thing, just small stones! River rocks are also similar, but slightly bigger in size.
It was about $50 for one cubic yard of pea gravel. This was enough to do all of the 180 square foot patio and we had plenty left over.
For contrast, purchasing that much in just bags from the hardware store would have cost about $215. We picked it up in our truck, but even if we had chosen to have the rock delivered (which is about a $50 fee), we would have saved a ton of money!
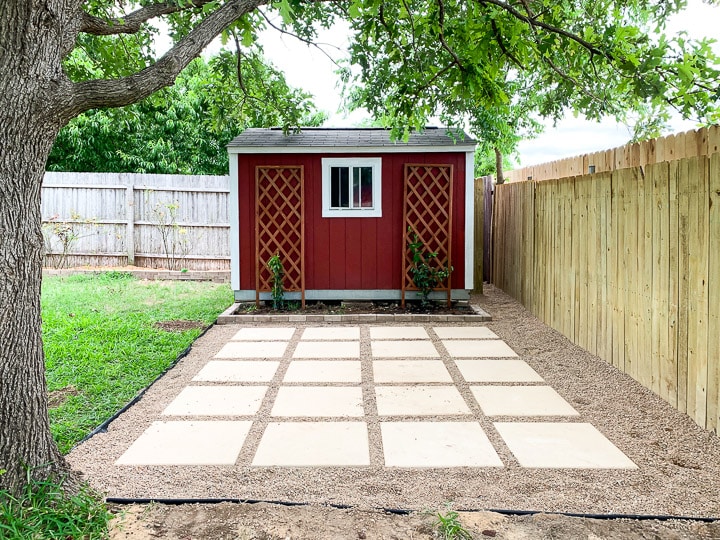
How Big Is Your Patio?
Our pea gravel patio is 12′ x 15′, or about 180 square feet.
How Much Pea Gravel Did You Use?
One cubic foot was more than enough!
Is Pea Gravel Messy?
It can be! Pea gravel does have a tendency to get moved around a bit, as it’s very small. We have found it isn’t too bad, but you can add a resin binder to prevent movement if you’d like.
Is Pea Gravel Hard to Maintain?
Not at all. Pea gravel is a really great way to create a gorgeous and usable outdoor living space with minimal maintenance. The very nature of a pea gravel patio promotes drainage and minimizes erosion.
Can I Do This On My Own?
Yes, yes, yes! If you’re intimidated, you can contact some contractors to give you a quote, but I promise you that any homeowner with some determination and a very basic set of DIY skills can tackle this project. You’ll also save a buck…or a few hundred.
Pea Gravel Patio Ideas
Looking for some more inspiration and ideas for how and where else to use pea gravel? Here are some thoughts!
- A pea gravel patio is perfect for a fire pit area! Add some Adirondack chairs, and it’s so cozy.
- Pea gravel patios are great for the space next to flower beds!
- You can add pea gravel in an area next to concrete patios to extend it visually and functionally!
- Pea gravel is great for the side yard, as well!
More Backyard Makeover Details
This DIY pea gravel patio was part of a much larger effort to give the entire exterior of our home a major upgrade. Here are all of the posts in that series!
- The styled pea gravel patio
- How I added a mini grill patio off of this one
- All the details on how I painted our metal awning on the covered patio
- DIY exterior plant wall (on the side of the house!)
- All the details on painting our cute red shed
- How I painted the entire exterior of our house
- And finally, this post has the big reveal of the entire backyard!

Your patio looks great! You can use mulch glue to keep the pea gravel in place.
Thank you so much for sharing your experience. I have a nice wooden deck in my yard that is that was built on the ground under a big old black walnut tree; however, there is a space there is about three feet deep and about 20 feet long behind it that is a constant problem for me. I’ve been searching for a way to fix it up. I was thinking of pea gravel but I wanted some pavers as well which lead me to your blog. Your shared experience has really helped me. I definitely will not forget to add the paver base in my area. I’m so excited now…I finally feel that I can tackle what has been a eyesore in my life. I really want to enjoy my beautiful deck and adding this is so going to help accomplish that. Thank you!
Those pavers weigh a ton. I sure hope you had a lot of help. I couldn’t even lift a 20 x 20 paver. I want to put a row of the 24 x 24s (spaced 4 in apart) right alongside my built in pool decking which is only 3’ wide. You’ve given me inspiration.
This looks amazing and think I’d like to do a smaller version in my yard. However we do a a slight slope at one end and at the end of that slope it does tend to get a bit wet there in the spring when the snow melts or if we get a heavy rain. Do you think this would be a problem?
It shouldn’t be a huge issue, I wouldn’t think!
Is your 12×15 patio counting only where the pavers are or the entire area?
The pavers!
How long it took you to finish the project? And how much did you spend at the end of the project? This looks so nice!
Hi! It took about two weeks of working in fits and starts (in the evenings, during kid nap times, etc.) and I don’t have the exact cost but if I remember right, it was under $400!
Hi! Working on this project now with your patio as a guide. Thank you for your detailed tutorial! How has your patio held up? I’m also in austin and wondering how many inches of paver base and sand to add. Thank you!
It held up great! I didn’t work with paver base for mine, so I’d recommend doing a bit of quick research to see the best setup – I believe it’s around 2-3″.
Our canopy of trees is a blessing and a curse for us in our north Austin home. We love the shade in the summer, but we cannot grow grass in the backyard. Therefore, we are looking for an alternative to our “mud pit”. Thank you for your idea of paver stones and pea gravel.
This is such a cool idea! I love it! 🙂
Gravel Binder is a product that ‘glues’ the top layer of pea gravel together so it doesn’t stray. Vuba (on Amazon) seems to have good reviews at a lower price than what Home Depot stocks. You have to tape or otherwise protect the pavers so the mix doesn’t get on them while applying.
You have already worked so hard for a quality result – so maybe just file the Gravel Binder option away as a future project for if you get sick of sweeping peas.
We did consider that! We never had an issue with the gravel spreading at all, though, so it was a non-issue for us, thankfully!
This looks great! Do you have a link for the pavers? We have looked at Lowe’s and can only find gray ones which don’t really match our brick.
Hi! These are gray – they’re from Lowe’s, just their standard gray large pavers.
Hi there, looks great! Just curious — did you put an edging band around the perimeter of the patio? Or is that sort of black line along the edge next to the grass just weed barrier poking up?
Yes, there’s an edging band there!
That looks awesome !! How many bags of sand did it take for your patio area?
We had a local landscaping company deliver sand for us! We got about 2 cubic yards, if I remember correctly.
Hey! Looks great. How far apart did you lay your pavers?? Thanks!
4″!
Where did you get the 24″ pavers? We’re looking to do something similar in our yard and I haven’t had much luck finding ones that aren’t $$$, so we thought about pouring in place.
Hey Meagan! They’re from Lowe’s- about $9/each!
Thanks Amanda! I’ll check it out!
After doing several landscaping projects myself, I know how much work that is. Go you for getting it done!!! Take some time to enjoy it 🙂