
How to Paint Laminate Cabinets
I just finished giving our bathroom vanity a major makeover, and I’m here today with the big reveal and all of the details on the process of painting laminate cabinets!
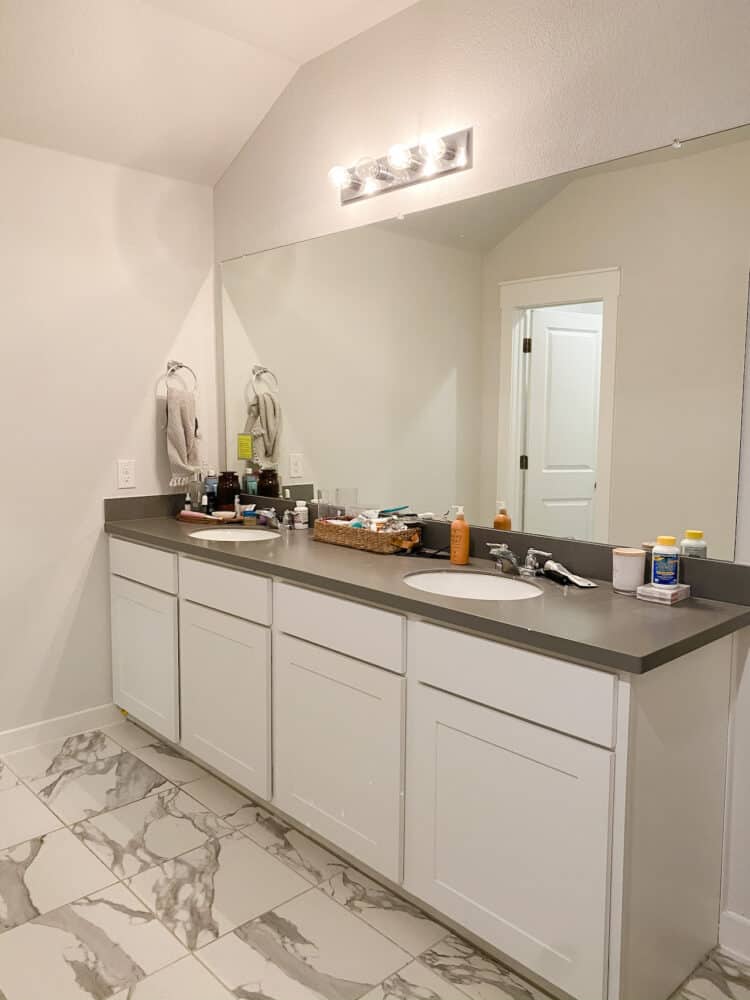
This is a project that I was honestly pretty intimidated by. I’ve painted wood cabinets quite a few times before (click here for a tutorial on that!), and it generally turns out great. But, in this home, we have painted cabinets that are not real wood – they’re just a factory-finish laminate cabinet, which doesn’t generally lend itself well to just painting right over.
This post is sponsored by Wagner.
The key to painting laminate cabinets or factory finish wood cabinets is to prime with the right primer. The surface of these cabinets is extremely shiny and smooth and, without proper prep work, the finish will scratch right off.
Another important factor is going to be choosing a high-quality paint that’s meant for cabinetry. In the past, I’ve painted cabinets with plain ol’ latex paint. This time, I went with Cabinet and Trim enamel and it’s worlds different from what I’m used to using! Latex paint never holds up as well or gives nearly as good of a finish as this does. Cabinet and trim paint is specially formulated to be self-leveling and extremely durable, and it doesn’t require any sort of a top coat, which is a huge time-saver.
Are you ready for all of the details on how I painted our laminate bathroom cabinets? Let’s do this!
Hw to Paint Laminate Cabinets
Recommended Materials
This is a great place to list items used in your recipe and use an affiliate link to amazon for the items. This little box is a great space to disclose that the below links are affiliate links.
Video Tutorial
Want to watch it all go down in video form? Here’s a compilation of my Instagram stories from when I was painting our laminate cabinets.
What is Laminate?
Let’s start here – how do you know if you have laminate cabinets? Laminate is a product that’s made by attaching a thin layer of plastic veneer to plywood or particle board. You’ll know you have laminate cabinets if they’re fully smooth without any wood grain! Laminate kitchen cabinets and bathroom cabinets are pretty common, and if you have cabinets that are factory-finish painted, there’s a good chance they’re laminate!
Laminate cabinets are great in a lot of ways (they’re easy to clean and stain-resistant), but they’re hard to paint! Because the surface is plastic, paint doesn’t absorb at all. It just sits on the surface. So, you have to take some extra steps to make painting laminate cabinets work.
Thankfully, it’s pretty simple!
Step One: Prep and Prime
Cleaning + Sanding
Your first step is to thoroughly clean the cabinets to remove any grease and grime. This is a really important step, because any dirt or dust left on the cabinets can affect the adhesion of your paint job as a whole! Clean the cabinets with TSP (trisodium phosphate, which is a degreaser) or just soap and warm water. This is a good time to go ahead and pull off the cabinet doors and hinges – it’s easier to clean that way. Be sure to wear gloves if you’re working with a chemical cleaner!
Once you’ve cleaned your cabinets, give them a light sand. You aren’t looking to remove the finish at all, you just want to scuff it up a little bit so the primer can grip better. I wouldn’t pull out the orbital sander for this particular job, you can just use some fine-grit sandpaper.
Once you’ve done a quick sanding, wipe off any dust with a tack cloth. You can also vacuum any crevices in the cabinets to fully remove dust! If you’ve noticed any areas where the laminate is peeling up or there is damage, take a second to put it back in place with some wood glue. Let it dry before moving on to priming.
Priming
Then, you’re ready to prime! This specific primer is the only primer that I’d recommend using over any sort of laminate surfaces. It’s shellac-based so it’s incredibly durable, and it’s meant to grip to a wide variety of surfaces. A good bonding primer is the most important factor in a job like this!
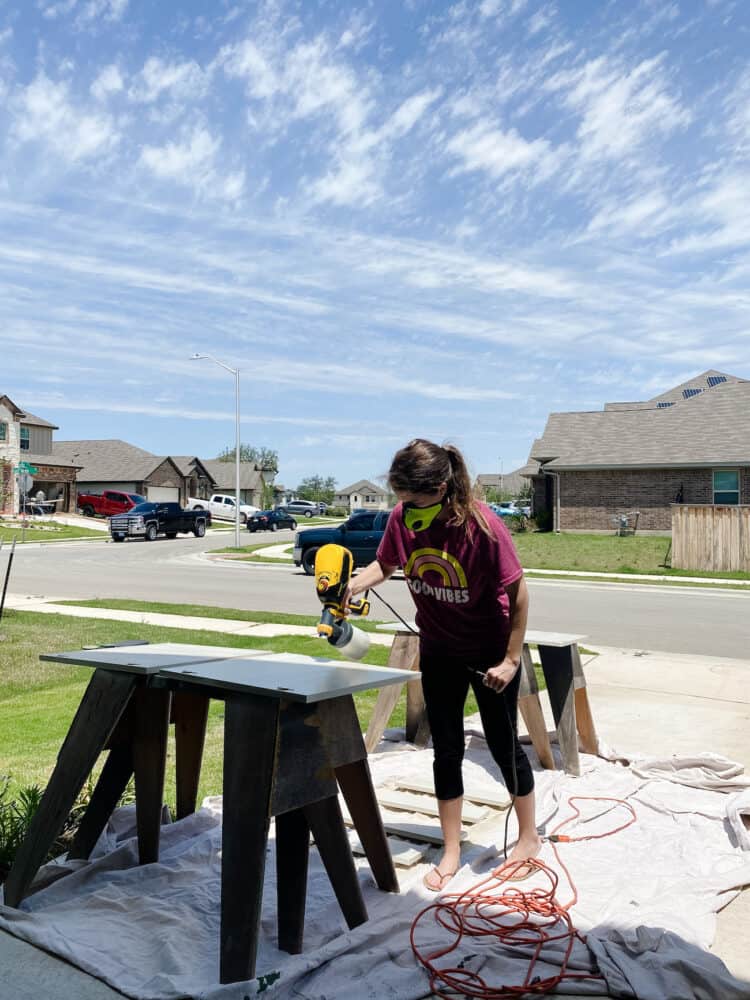
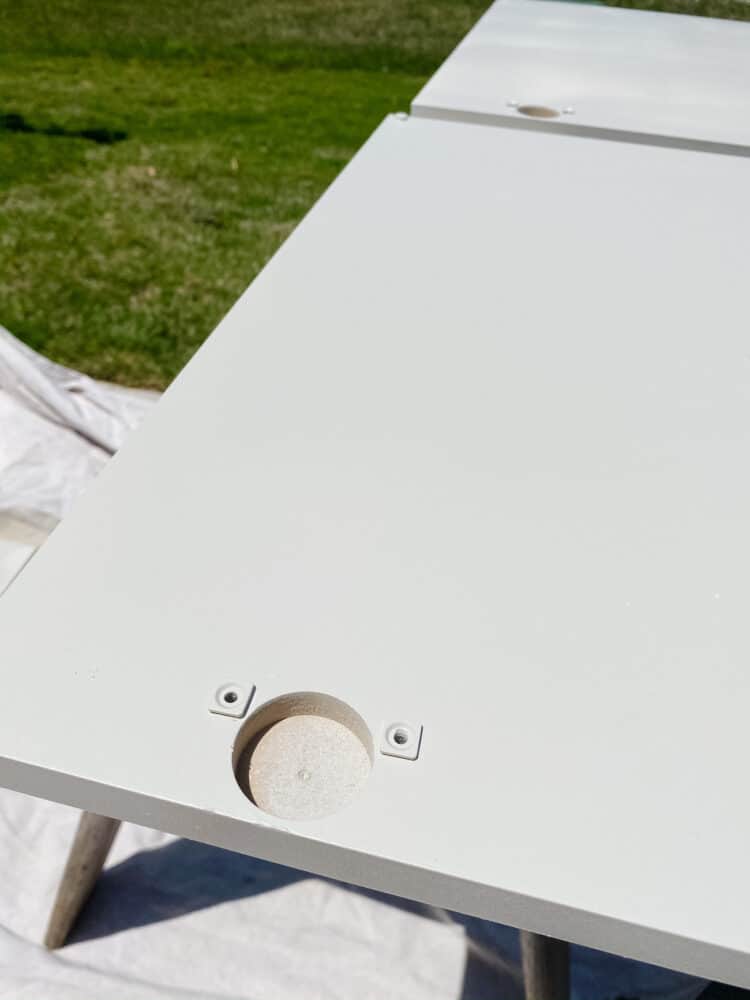
Because it’s a shellac-based primer, clean-up can be messy and difficult. For this reason, I don’t recommend spray painting this part. I just brushed it on with a foam roller and my paint brush – it was the exact same color as my cabinetry, so the visual difference is minimal.
I recommend you add a second coat of primer to the cabinets prior to painting for the best results. Once it has dried for at least an hour, it’s ready for a top coat!
Step Two: Spray Two Coats of Your Chosen Color
Once the primer is dry, it’s time to paint!
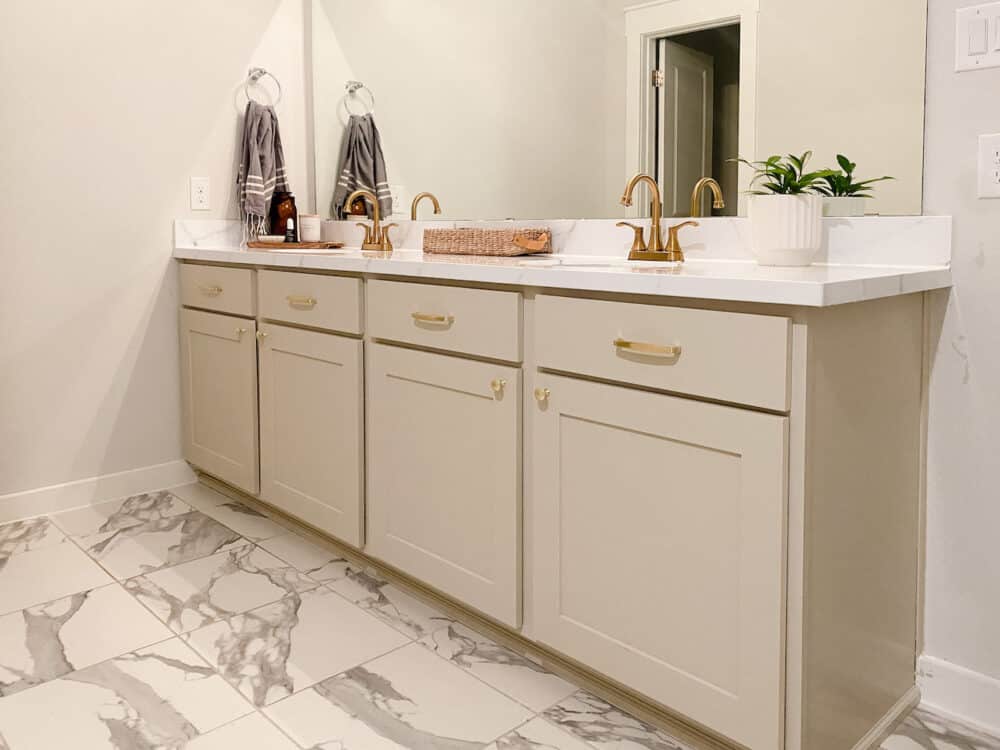
I used Behr’s Sculptor’s Clay for this project!
For this part of the project, I busted out my secret weapon for a perfect paint finish every time – my Wagner FLEXiO 3000. I’ve been using it for years and years and it’s so, so trustworthy and easy to use.
I’ve written so many posts over the years about how to use a paint sprayer, so if you’re new to it and want to learn more, this post is a good starting point! For this particular project, I brought the doors and drawer fronts outside to spray, and I ended up painting the base of the cabinets by hand. The only reason I didn’t also spray the base is because it’s so small – I knew the prep work needed to use the sprayer would take longer than it would to just paint it! If you want to see more about spraying cabinet bases, this post is for you!
Be sure to allow the first coat to dry fully before adding a second coat of paint.
I was really impressed with the quality of the Behr Cabinet + Trim Enamel. It does a really fantastic job of self-leveling and, especially with the paint sprayer, the finish is just about perfect. Enamel is an oil-based paint that is more durable than regular latex, so it’ll hold up well over time!
Need help choosing a sheen for your paint? This guide to paint sheens is a good place to start. I’d recommend either a satin finish or semi-gloss.
The color I chose for the vanity is Sculptor’s Clay by Behr – it’s a really beautiful, light-toned neutral, and it warms things up in this bathroom so much.
Step Three: Allow to Cure, Then Assemble!
Once everything is all dry, you’re ready to put it all back together! I recommend waiting as long as possible (2-3 days is ideal) before putting the cabinet doors and drawer fronts back on. When you give it more time to cure there is less chance it will scratch or scuff when you re-install it.
However, if you’re in a hurry, you can re-attach and close the cupboard doors in as little as two hours and you won’t have any sticking, which is a really great feature of this paint.
My cabinets didn’t have any hardware on them at all, and I’ve been dying to add it for quite some time now. So, I grabbed some pretty gold hardware from Amazon and installed it before putting everything back together (it’s linked below!).
It’s really easy to add hardware to bathroom or kitchen cabinets – if you haven’t tried it yet, click here for my full tutorial on how it’s done! You just need to be brave enough to drill a few holes in the cabinets!
Adding the hardware really took things up a notch and made it feel more complete. It always blows my mind how much of a difference such a small little change can make!


Drawer Pulls | Cabinet Knobs | Faucets
You may notice that the countertop also have a totally new look. Would you believe me if I told you they’re the exact same counters as before, just with a fresh coat of epoxy?! You can see that project here!
Painting laminate cabinets is a really simple and fun DIY project that can totally transform a space. It’s budget-friendly and beginner-friendly. And, if you ask me, it’s always worth it to take the time to upgrade your space a little!
Please tell us the color of the cabinets.
Hi! I used Sculptor’s Clay by Behr
I believe my master vanity is factory laminate. Do you think it’s possible to remove the finish/paint to get down to the bare “wood”. I would love to have more of a wood look instead of painting over the color.
On your how to paint laminate cabinets post my wife fell in love with the color and we bought our first house and are having a baby in april and we are remodeling a bit and she wants our bathroom vanity that color coukd you tell me the name of the color?
Hi! It’s Sculptor’s Clay by Behr.
We had a house built about two years ago. All of the indoor trim pieces were painted white and remain tacky to this day. I believe the paint was not allowed to dry properly between coats. One problem area we have is with our drop-zone cubby. My wife put some knick-knaks on it and when we removed them, it also removed some paint. Given this is probably veneered MDF, how do I repair the created divot? Can I lightly sand or should I use wood filler?
You can start by lightly sanding and painting, and if that doesn’t work you can try wood filler!
I can’t wait to try this paint on my hideous bathroom vanities. Do you think it will cover the “oak” veneer strips or should they be removed.
It did well on them when I used this same method in my garage, so it should be fine!
The hardware made such a big difference! I couldn’t visualize the paint color you used looking good when you showed the swatches but I love this and may have to consider it in my kitchen!