
DIY Toddler Outdoor Playhouse
Last updated on January 31st, 2024 at 12:59 pm
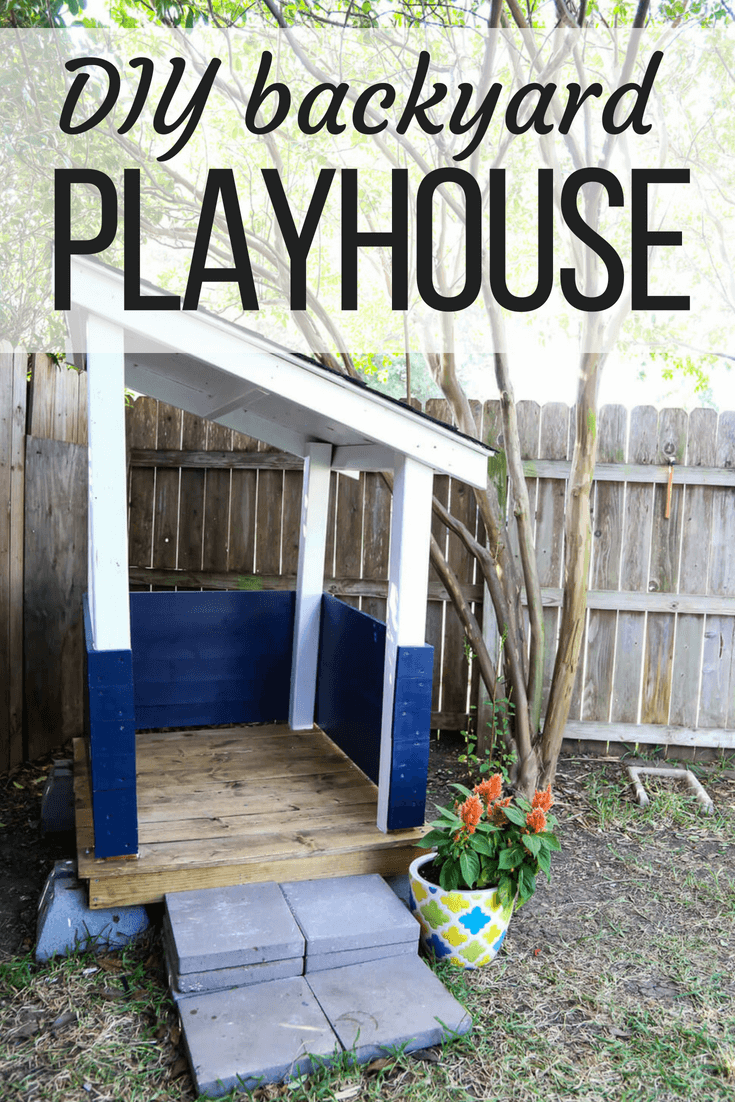
We’ve been talking about building a DIY toddler outdoor playhouse for our son practically all summer, and earlier this week I finally showed you a few photos of the finished playhouse (along with a tutorial on how we did the roofing). I promised I’d be back with the full tutorial on how to build a super simple DIY playhouse, and today’s that day.
Are you so excited? I’m so excited.
This toddler-friendly playhouse is so cute, so simple to build, and so much fun for Jackson to play in. He’s completely infatuated with it, and so am I. I’m also totally proud of the fact that Corey and I built this whole thing on our own…and, let’s be real, that I helped at all!
I used to just sit back and watch while Corey worked on building projects, but it’s so empowering to actually jump in and help. Our power tools for beginners series has been a huge help in getting me more involved. I actually even learned a new tool while we were working on the playhouse – click here to learn how to use a circular saw with me!
Anyways, I know why you’re really here. You wanna learn how to make an outdoor playhouse for your toddler too, yes?
Let’s do this.
This post contains affiliate links. Click here to read my full disclosure policy.
How to Build an Outdoor Toddler Playhouse
Materials needed:
- (3) 4X4 8-foot posts
- (10) 1X4 6-foot boards (we used pine and sealed it, but for more durable wood, go with cedar!)
- (8) 1X6 5-foot boards (we used pine and sealed it, but for more durable wood, go with cedar!)
- (5) 2X4 8-foot pressure treated boards
- (3) 2X4 8-foot boards
- (1) 2X8 1/4 inch sheet of plywood
- (5) concrete footings
- Paint
- Deck sealer (used for floor)
- Circular saw (see my tutorial for how to use a circular saw right here)
- Power drill/driver
- Level
- Tape measure
- Speed square
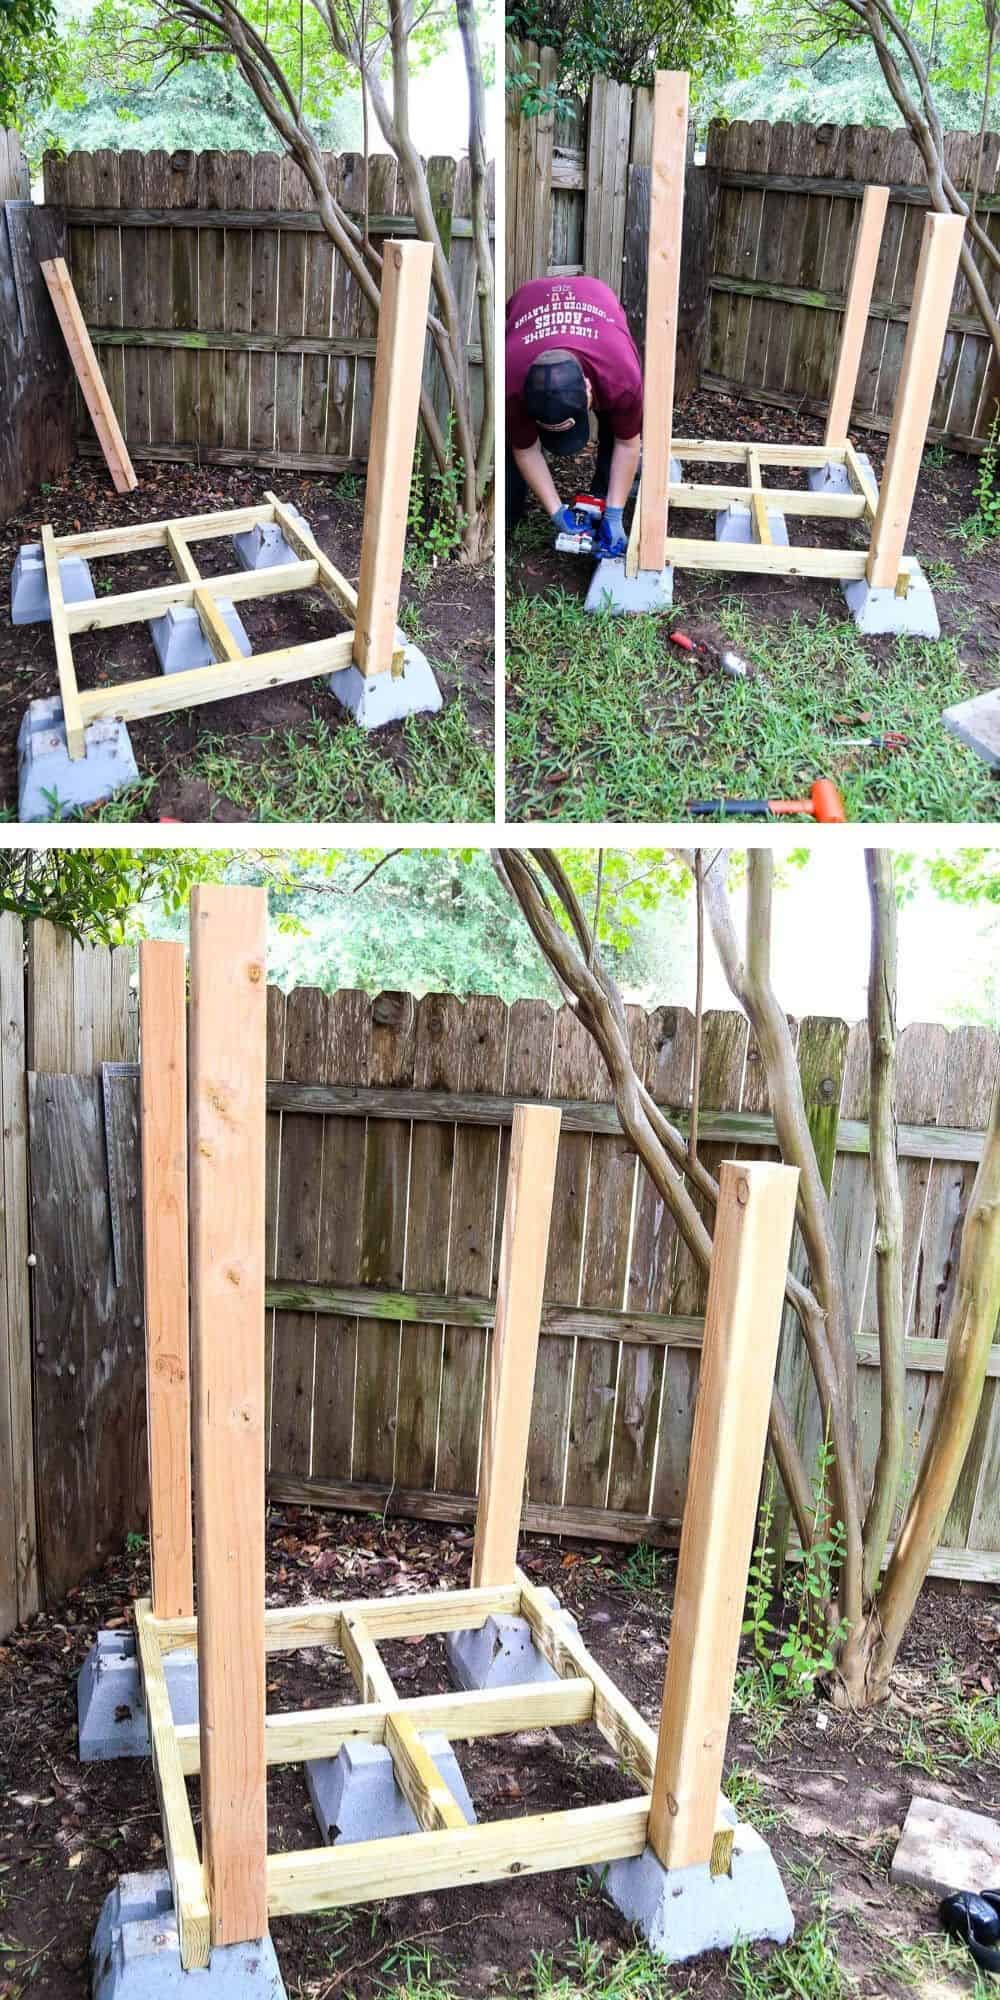
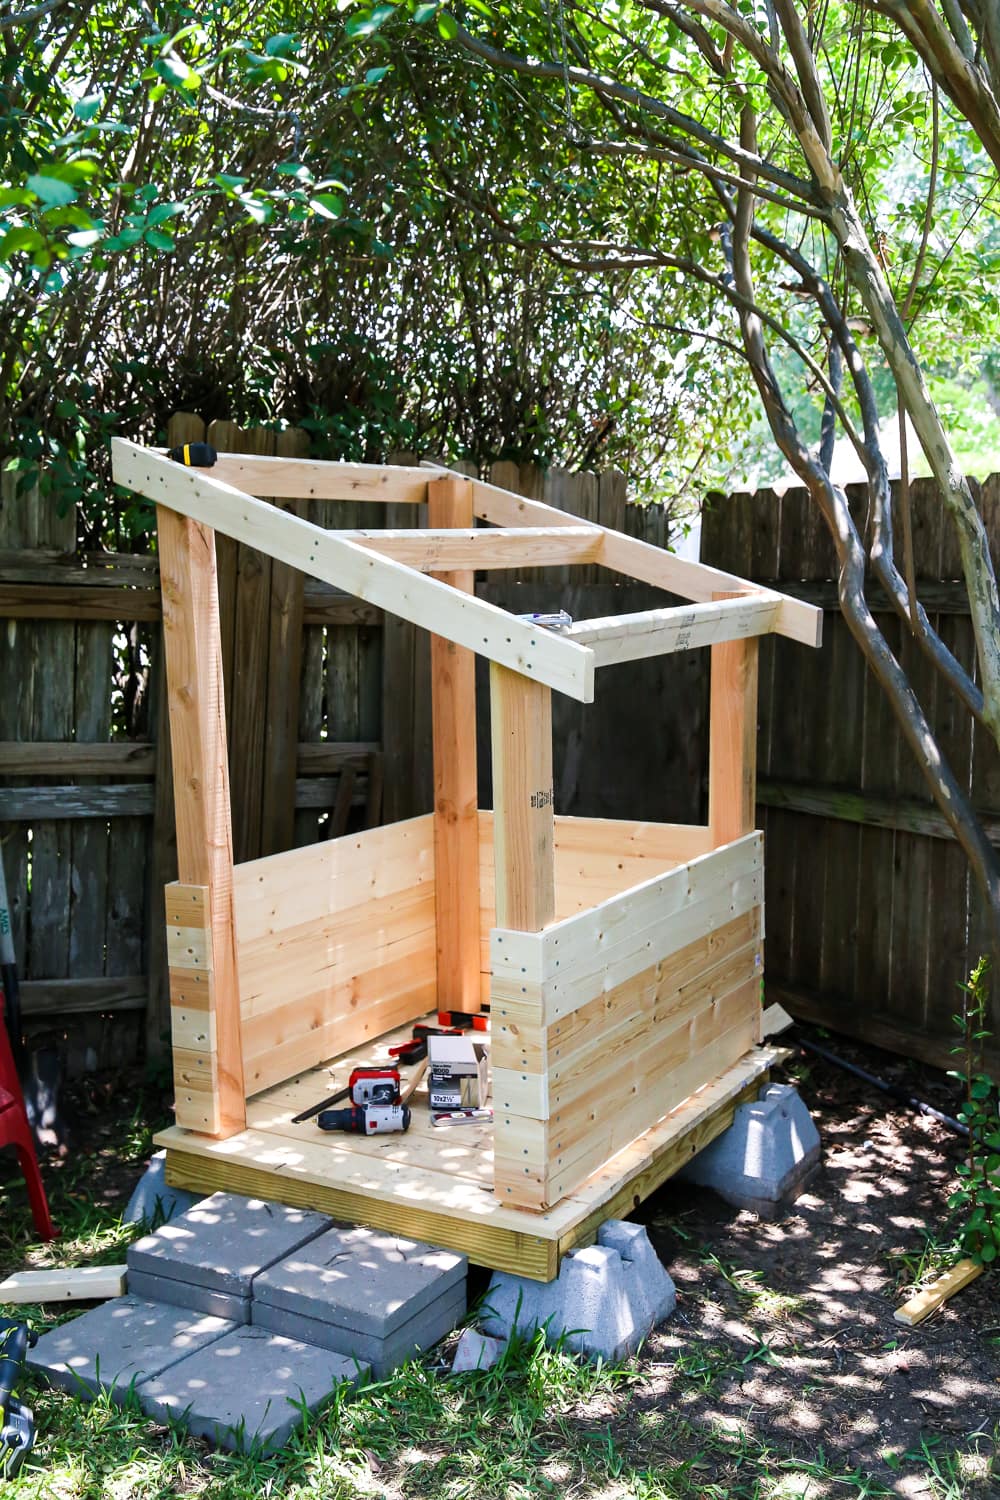
STEP ONE: Planning + Foundation
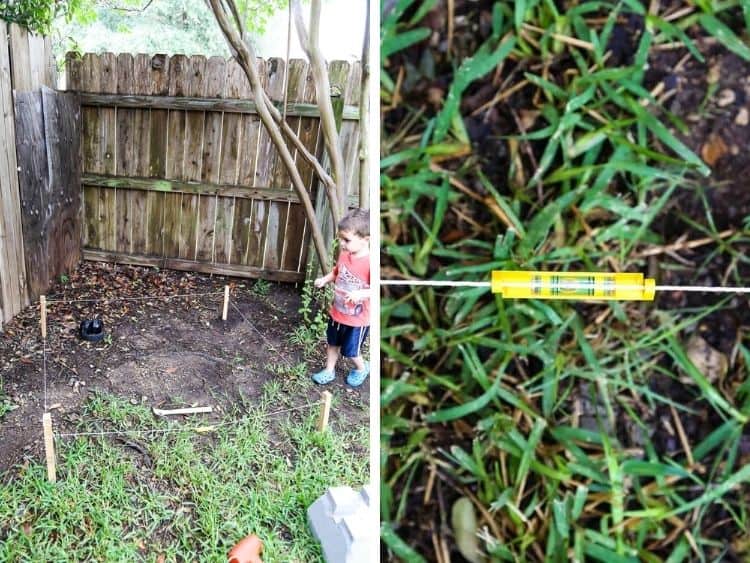
Start by figuring out where you want your backyard fort to be, and how large you want it. Ours is about 4 feet by 4 feet (though I later realized we probably could have gone a bit larger).
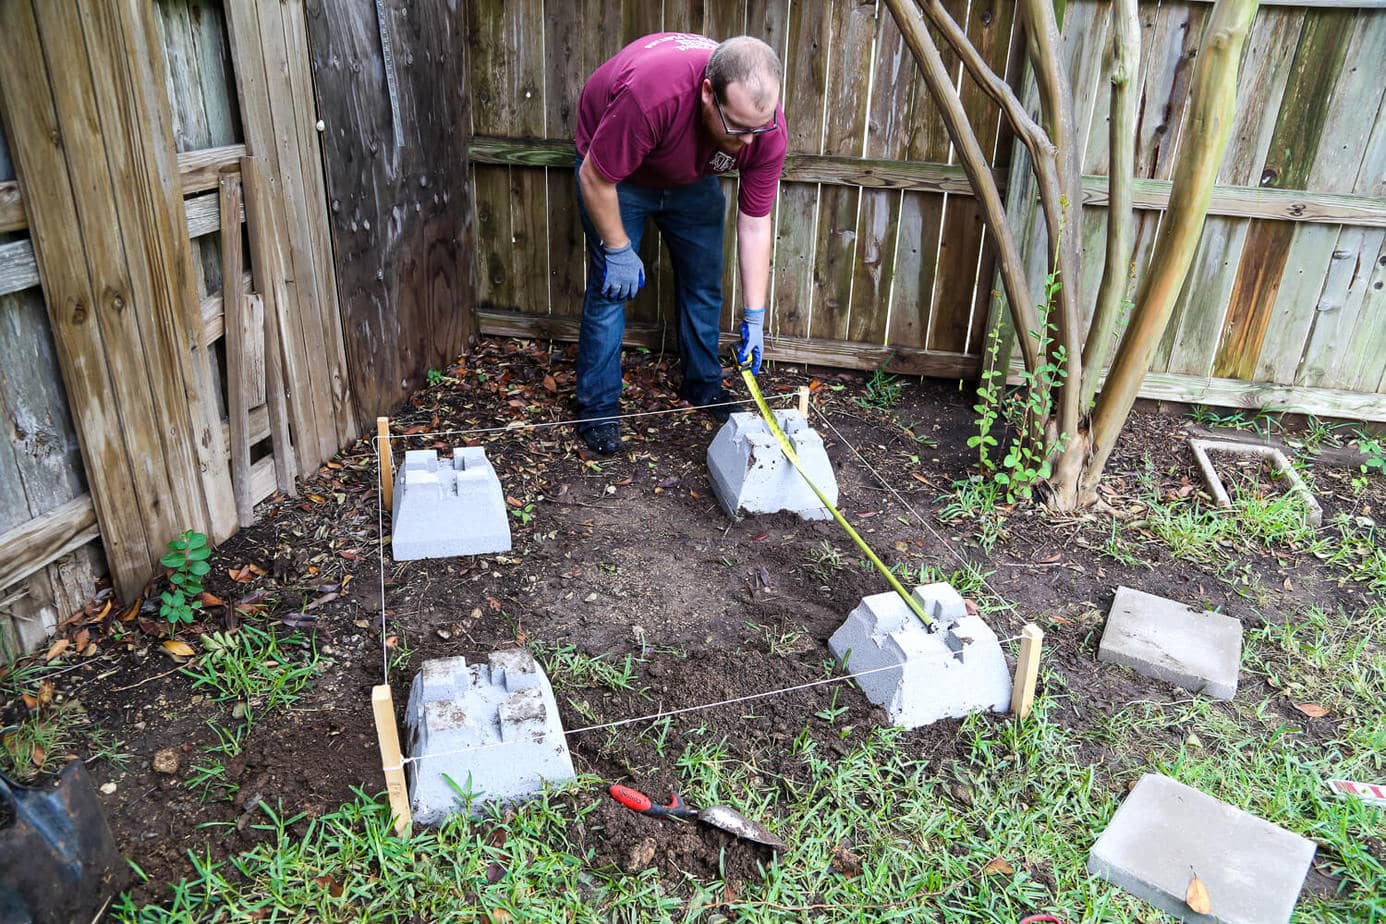
We used some concrete footings as the base of our playhouse. There are about a zillion different ways you could probably do it, but this was simple, cheap, and manageable for us. You’ll need to start by creating a perimeter to guide the placement of your concrete footings using some stakes and string. Make sure it’s level!
Then, place your footings in each of the corners. You may have to dig a bit and lay some pavers underneath to make sure it’s all level. You’ll have to check it, dig, check again, dig some more, blah, blah blah. This is (by far) the most frustrating part of the process. It’s annoying and exhausting, but I promise it’s all downhill from here.
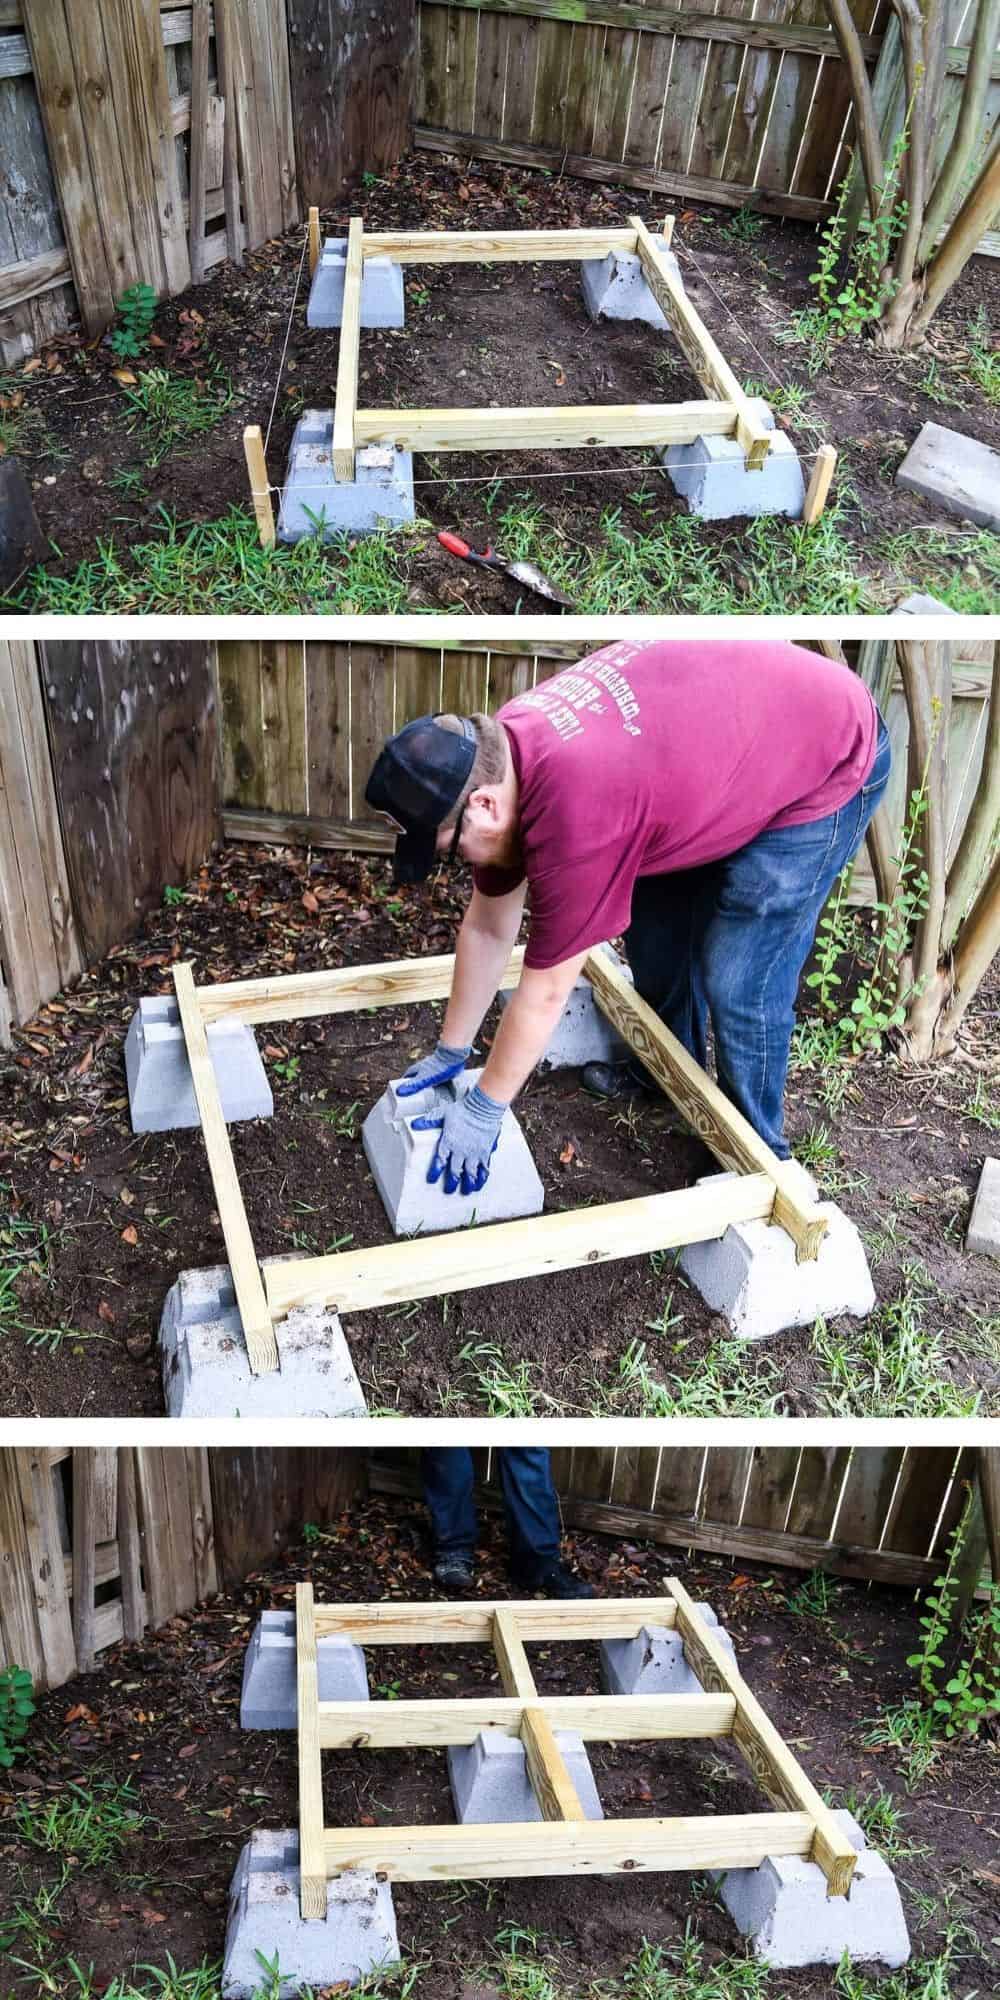
Once you’ve got everything set up, you can take your pressure treated 2X4s and lay them in the footings to create the base of your playhouse. You’ll also want to add a center footing for some support in the middle, and screw in some 2X4s to create a cross in the center.
Here’s a peek at what that process looks like:
STEP TWO: Add Posts for Framing
You keeping up so far?
Okay. Once you’ve got this done, the hardest part is behind you. Seriously. That was it. The rest is a lot easier, and a lot more rewarding.
Grab your 4X4 posts and decide how tall you want your playhouse to be. Ours is 4 feet on the short side and 5 feet on the tall side. You’ll just screw them in down at the base of the playhouse for now. They’ll be wobbly, don’t worry about it. We’ll fix that later.
Step Three: Install Playhouse Flooring
Now, it’s time for the floor.
We started by adding another 2X4 across the front and the back so that the floor could come all the way out (and to add some extra support for the beams). It looked like this:
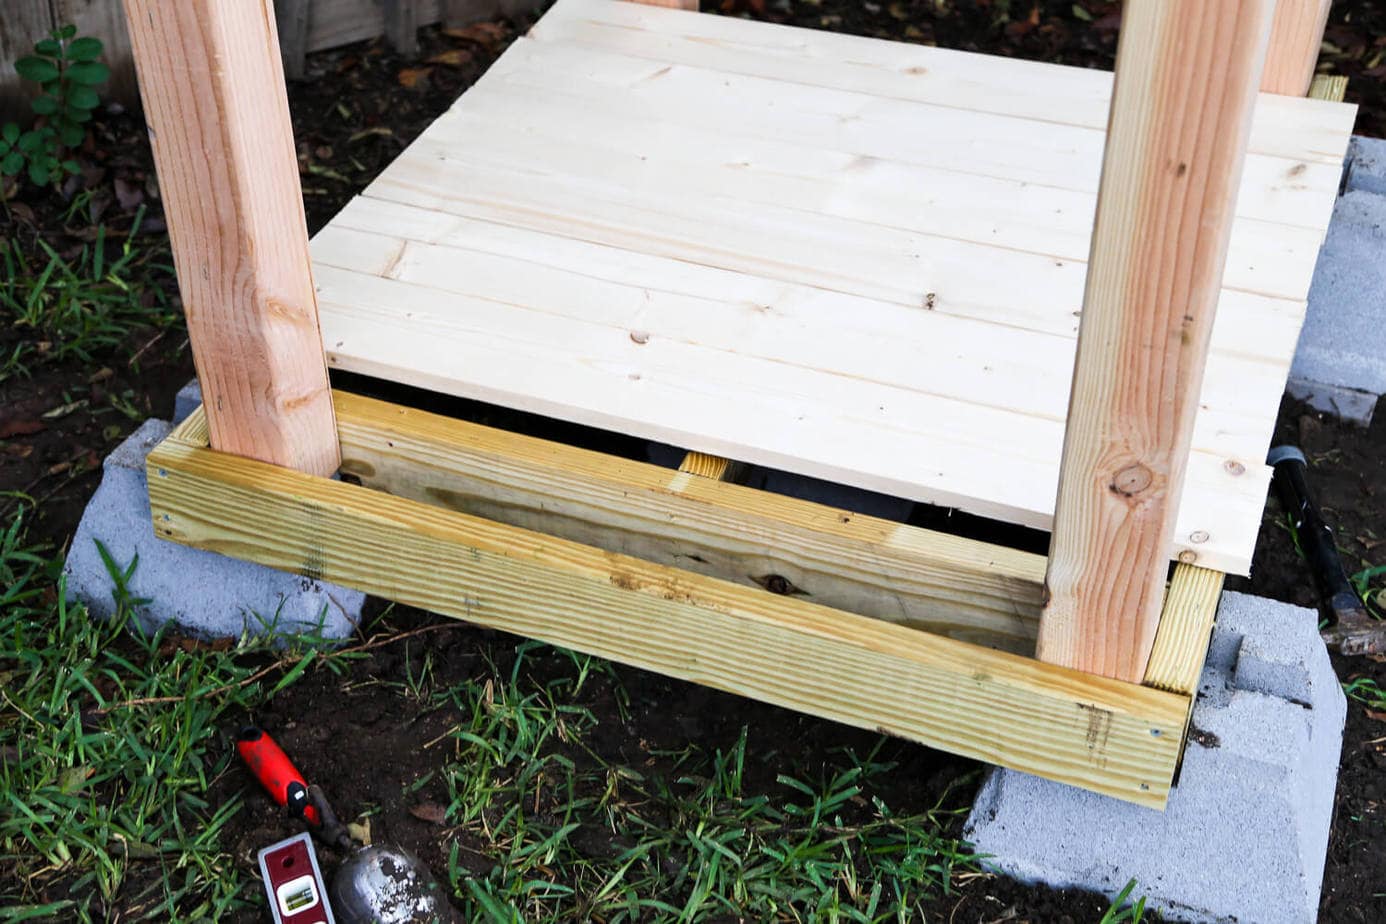
We just used 1X6 pine boards for the flooring – it’s not weather-proof like pressure-treated or cedar, but once you seal it, it should stand up just fine to the elements (especially with a roof overhead and, in our case, tons of trees all around to provide some extra protection). I’d definitely recommend going with cedar if you’re worried at all about the durability, but ours held up just fine.
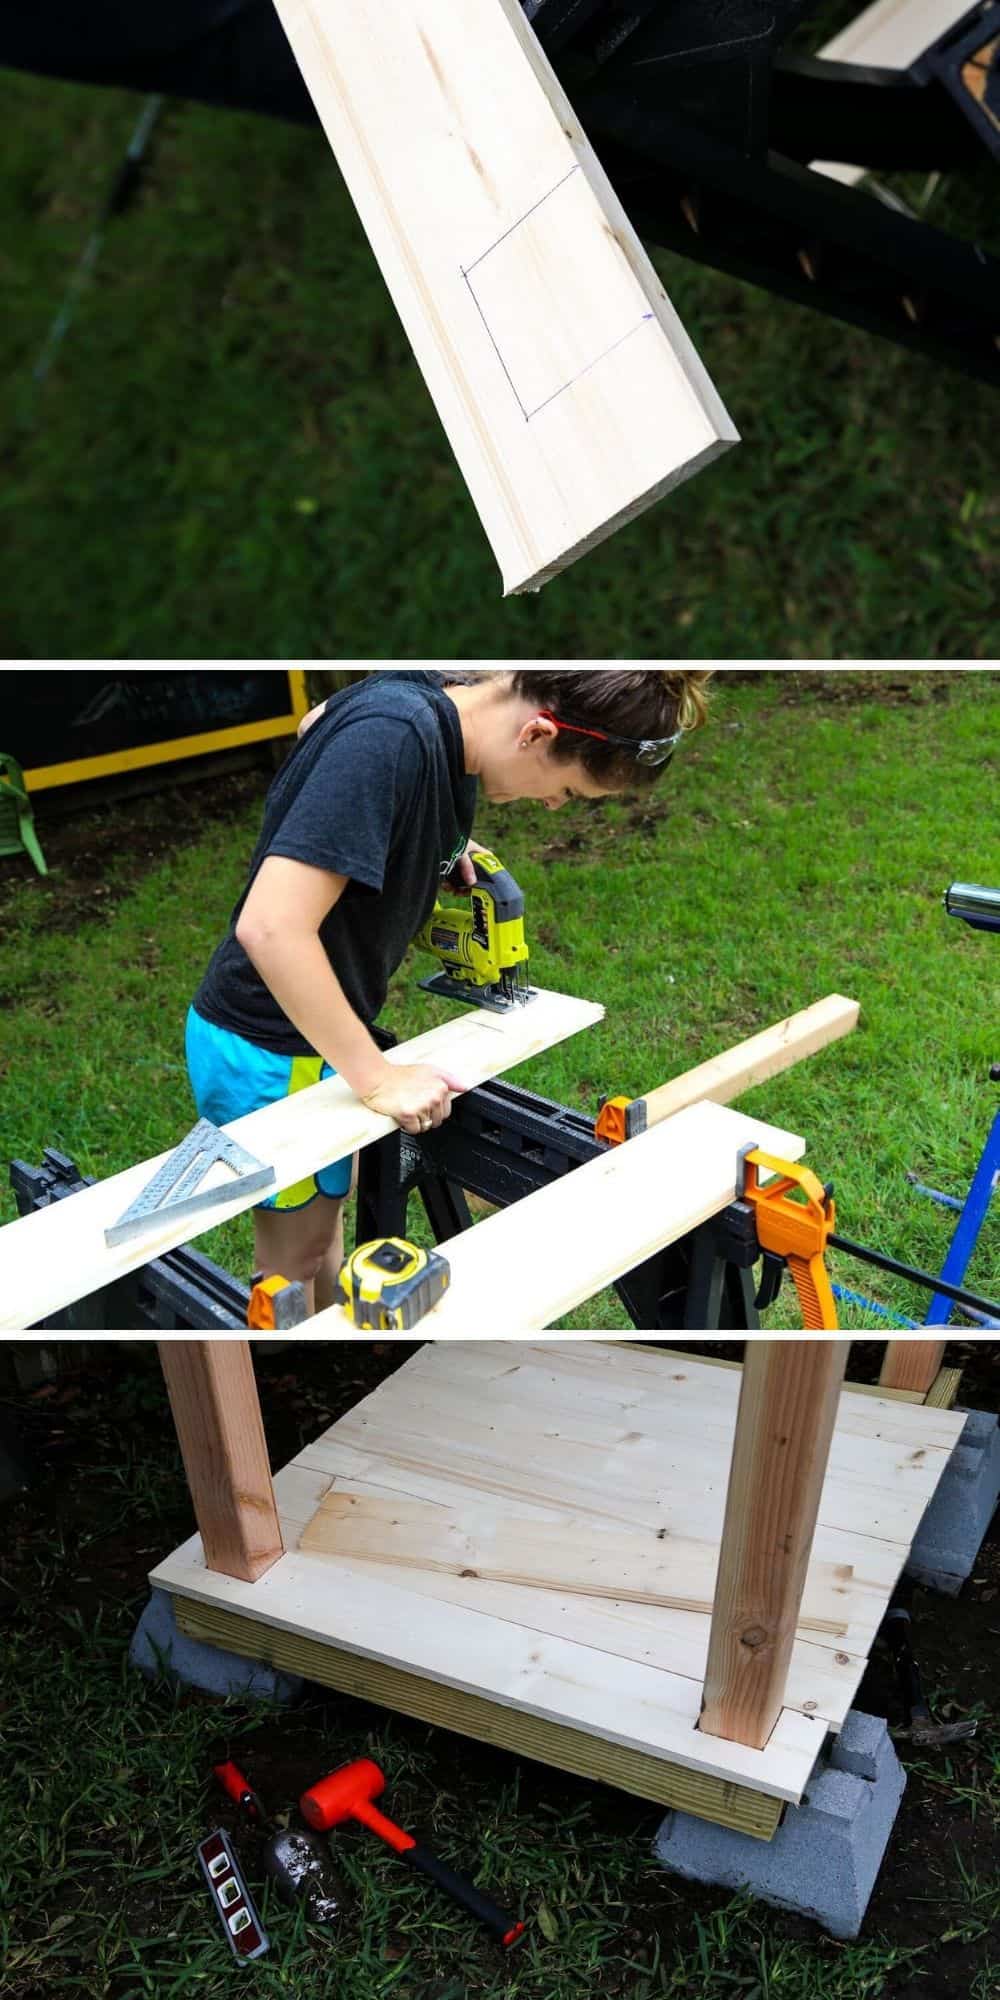
To install the flooring, I just cut it down to size (we have about a 1″ overhang on both sides) and screwed it in on either side and in the middle.
For the pieces around the posts, I used my jigsaw (don’t know how to use it? Let me teach you) to cut out a space for the beam to fit and slid it right into place. Like so:
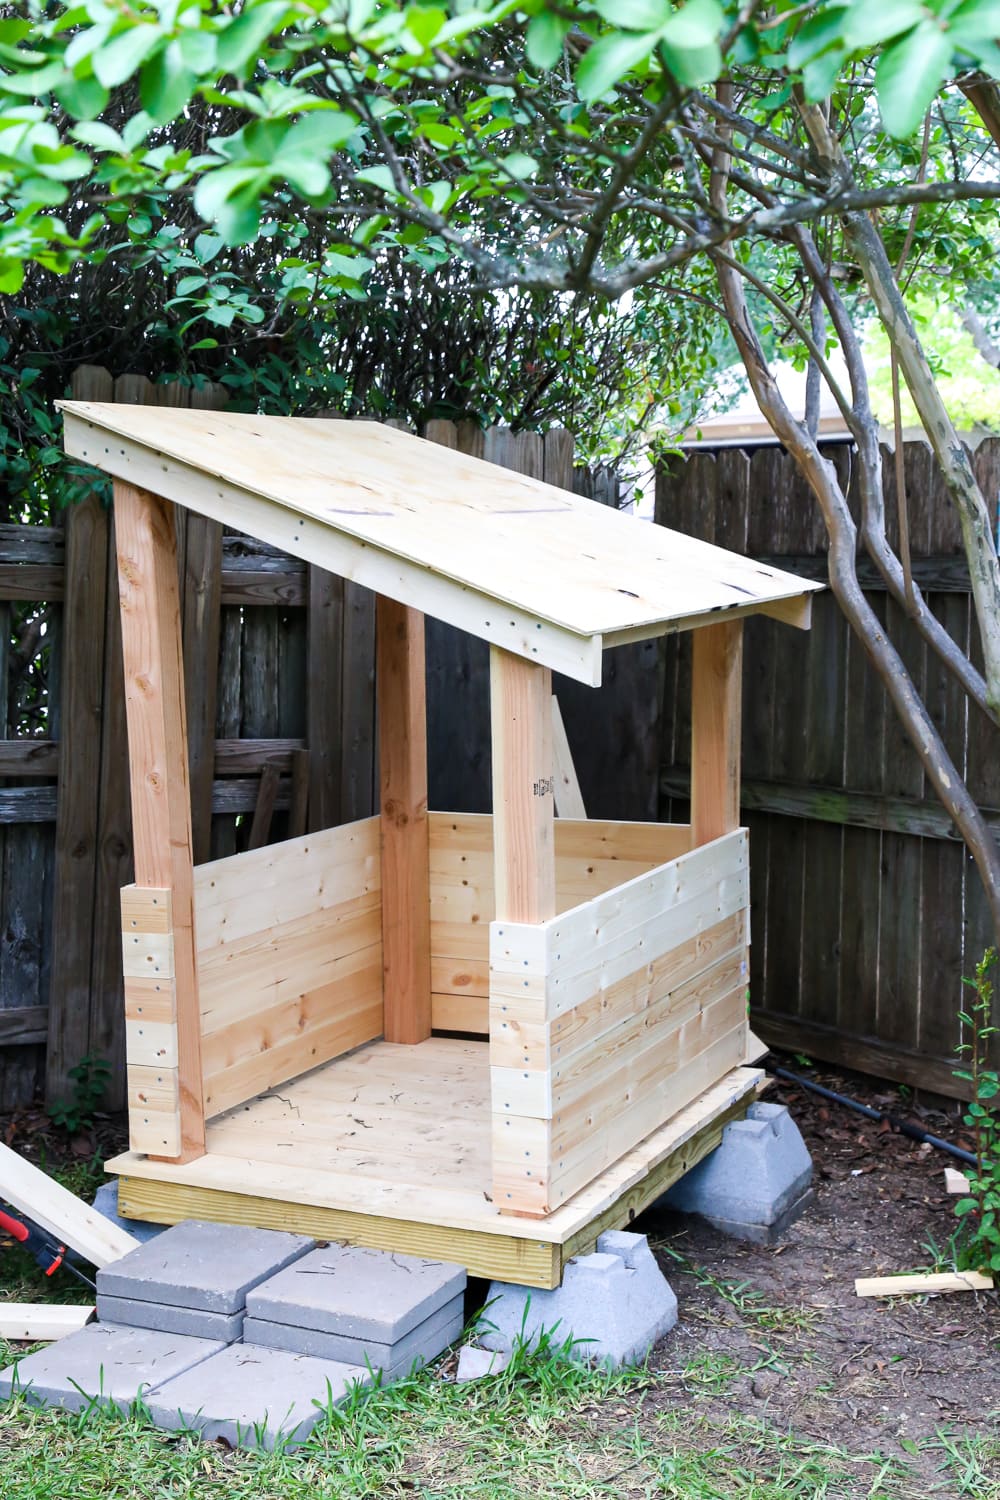
STEP FOUR: Build the Walls.
Flooring? Check.
Now let’s build some walls. We, again, used white wood for the walls, 1X4s this time. We knew we would be priming and painting it, and since our backyard chalkboard has held up really well with a similar treatment, we felt confident that it would work just fine. You could, of course, use cedar or pressure-treated wood – it’s just significantly more expensive, and we’re cheap.
(At least we can admit it, right?)
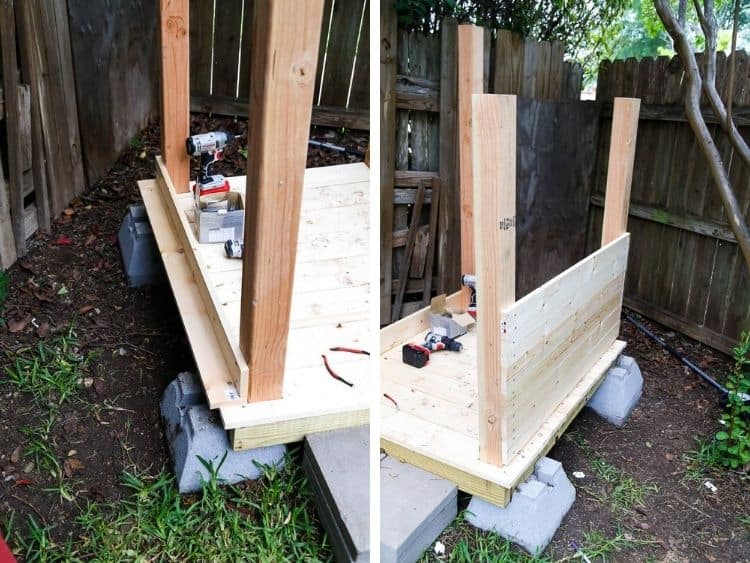
I just used one of my 1X4 boards laid flat on the floor to add a small space at the bottom (so that water can drain out if any does manage to get in, and to give the wood a little room to breathe), and then just laid the boards on top of each other from there.
We did each wall 6 boards tall – we wanted this to be an open-air backyard fort, and we had Jackson stand in it to help us “measure” how tall we wanted it to be.
STEP Five: Add the Roof.
Once the walls are done, it’s time for the roof! You’ll need to start by framing out the supports – you’ll screw a board to the front and back (angled downward, obviously) and then on either side and one in the middle. It’ll look something like this:
This is another one of those annoying parts where you have to make sure the angles of your front and back boards line up and that everything is even and straight. It’s not fun, but it’s worth it to not have a super wonky playhouse.
That being said – throughout this whole process, our motto was “it’s just a playhouse.” Meaning, some slight wonkiness is okay. If you’ve been messing with levels for half an hour and you’re still ever-so-slightly off balance, let it go. Your kid doesn’t care if the floor is slightly off-level or if the playhouse isn’t perfectly squared off.
It’ll be okay. No one is living in here.
(At least, I hope not.)
Now is the part where it all starts to come together! You’ll need a sheet of plywood for the top, and then you’re ready to lay your roofing!
You can check out this post here to see all of the details on how we did the roofing on Jackson’s playhouse. It was shockingly simple, and I’m so glad that we decided to go with actual shingles for the roof.
We decided to paint the playhouse in the same color scheme as we painted the workshop. I love that the blue is dark and hides dirt, but still adds a really fun pop of color to this little corner of the yard.
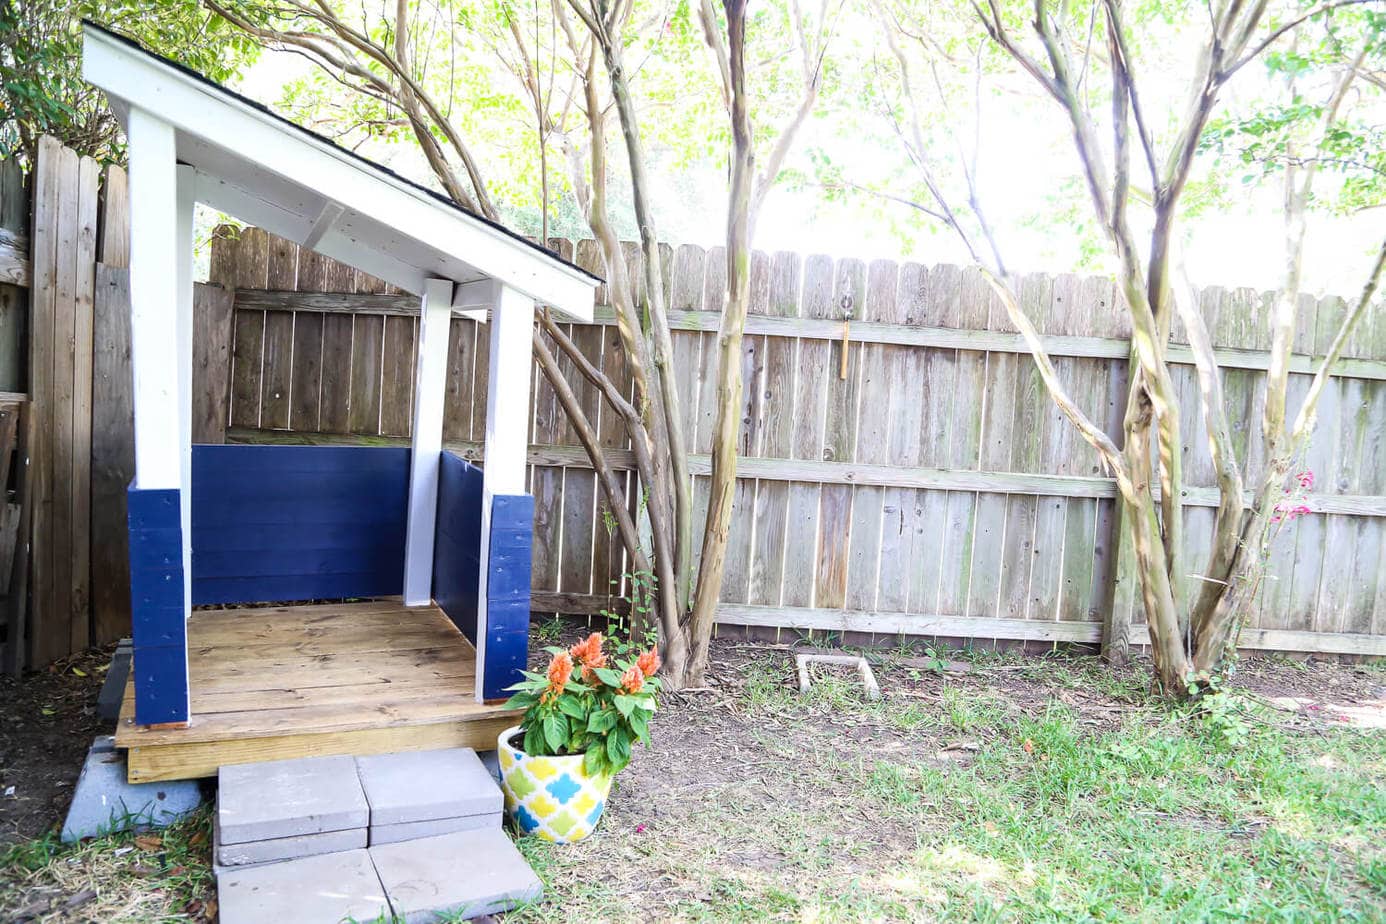
Of course, we’re not completely done here. We still need to fix the fence back here (holy cow, how awful does it look?!) and I’d like to add some fun details to the playhouse. I’m thinking house numbers, maybe a flower box, some furniture? I haven’t decided for sure, but we’ll definitely add something. I’m also thinking it could be cool to add a little picnic table or something next to the playhouse to fill up the rest of the space.
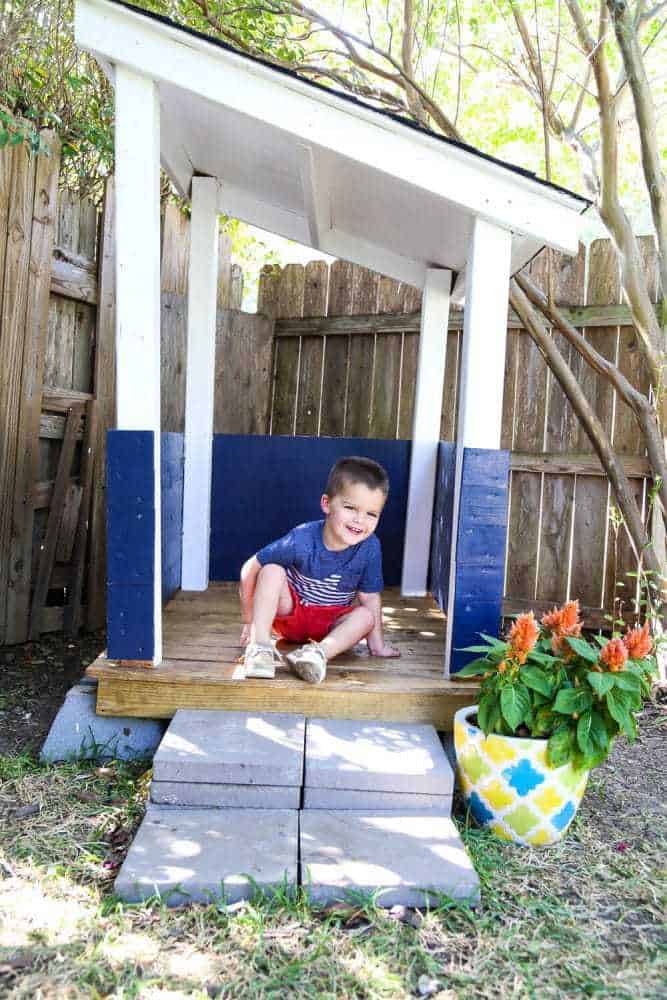
I’m in love with how this turned out, and Jackson’s really happy with it too. He’s so excited to have his own little house, and I love that the simplicity of it really seems to be encouraging him to get creative with his play – it’s totally open-ended, so some days it’s a house, some day it’s a superhero secret hideout, and some days it’s a pirate ship. You never know what you’re gonna get.
I’d love to hear your ideas for what we can add to the playhouse and the area over there. I’m leaning towards a picnic table, a flower box, and maybe some faux house numbers, but I’m totally open to different options!
Firstly, I wanted to thank you for this post- your directions are concise and easy to follow. Question- are the floor beams attached to the concrete footings at all? We rent our place, so I’d like to know it could be moved in the future. Thanks so much!
Hi! No, it’s not attached to the concrete footings, it would be easily moved.
I know this is an old post, but just wondering why you didn’t put the 4×4 posts in the middle of the deck blocks?
Is it more structurally sound the way you did it? Or easier to attach to the 2×4 frame? I’m going to attempt this for my son this spring! So excited!
I believe it could be done either way!
Why? Just why? Those poor trees dont deserve this.
Not even sure how to respond to this one other than to say, hope you have a great day! 🙂
lol.. poor trees over making a child happy…?
We built this and it was Great! Very happy with the way it turned out and both our girls love it! Not sure how to post a picture but thank you for the plans! You have some very cool outdoor DIY things we’re definitely going to be making 😊
So glad to hear it worked for you!
About how much did you spend?
Hey Lety! Unfortunately, we didn’t keep track of the budget for this project and it was a few years back so I’m not sure. My best guesstimate is that it would cost about $250-300(ish) in lumber, though!
Is there a cut list?
Hello,
How do I get a copy of the plans or a cut list?
Hey Simeon! Unfortunately, I wrote this post a couple of years back and didn’t officially put together plans or a cut list.
I’ve always had this dream of a small, homemade, wooden playground that my husband could add a bright colored shade said over (what he does for a living), for the kids to play on, and I’m finally getting started, eee! But I just adore yours and the attached shade from the roof, we’re in AZ so they’d need the shade, couldn’t go without it! Might just have to leave my man’s expertise out on this one and do a bright painted wooden roof as well 😉
Curtains (paint drop cloths or old sheets), an old rotary phone, a spyglass, a steering wheel… you know, found items that can be anything they imagine….
Great ideas! 🙂
This is adorable! And I love that you and Corey built it together 🙂
Thank you! 🙂