
I Tested 7 Different Stain Colors So You Don’t Have To
Last updated on January 6th, 2023 at 11:19 am
Looking for how a specific stain color will look on a certain type of wood? I’ve got you covered!
This was originally a part of my How to Stain Wood Guide, but I wanted to pull out this information into a separate post for those of you who know how to stain wood but want to see how wood stain colors look on various different types of wood.
One thing I think that people (including myself!) often struggle to really understand is that stain is going to show up very differently on different types of wood.
So, I decided to do an actual experiment to show you how different types of wood react to different stain colors.
The Wood
For this particular experiment, I stuck to just wood that can easily be found at your local big box hardware store – no specialty wood here.
First up, here are the players:
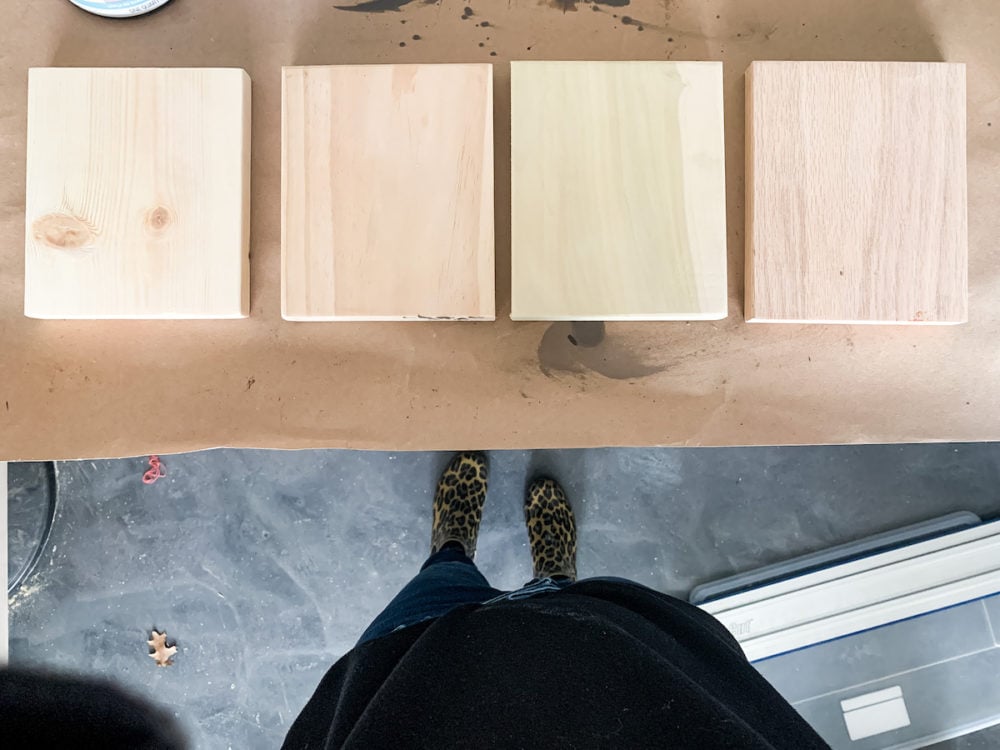
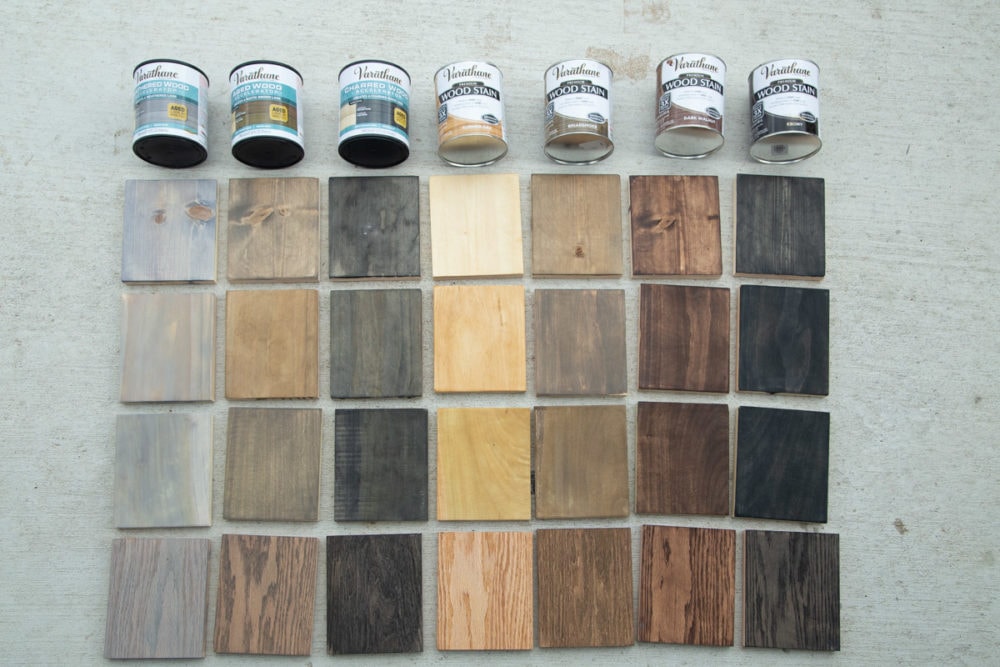
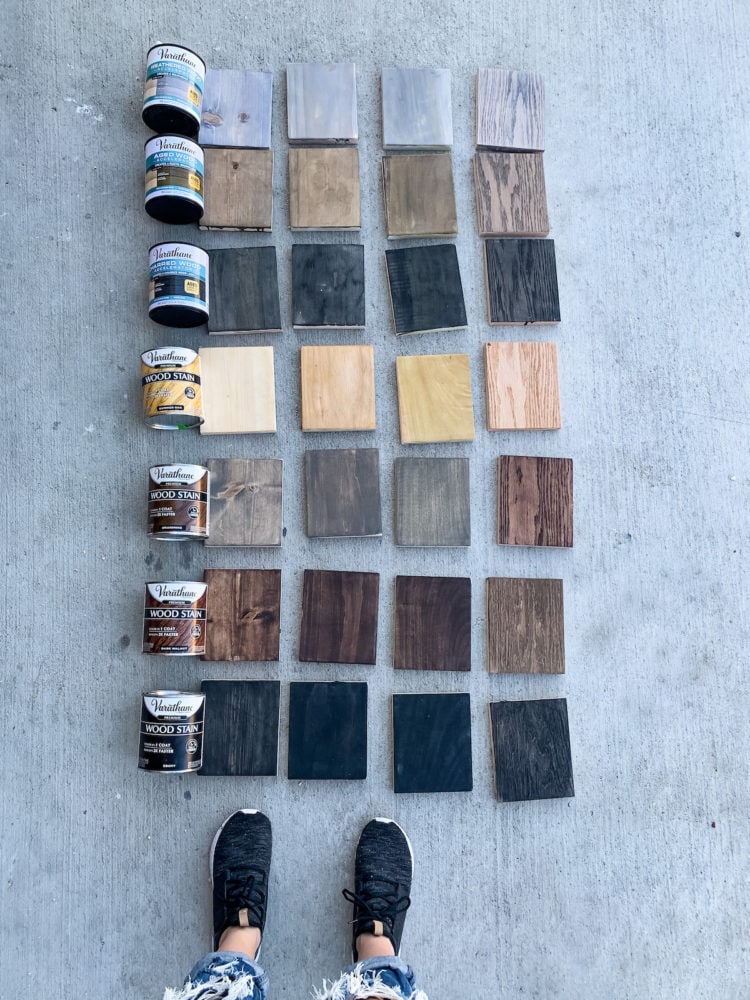
What you see above are the different types of wood I used for my experiment, from left to right (also, cheapest to most expensive) you have:
- Whitewood (also known as “common pine”)
- Pine (also referred to as “select pine”)
- Poplar
- Red Oak
The Stain Colors
And now, here are the stain colors I am testing:
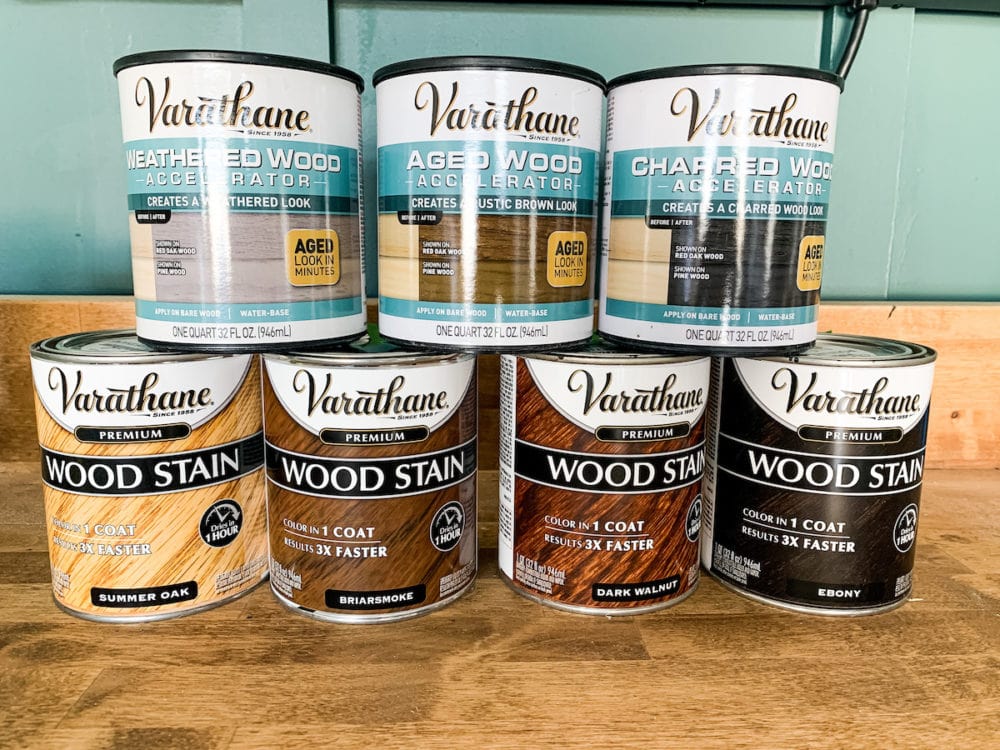
Obviously I can’t test every color out there (even though I so wanted to!), so I just stuck to four colors:
I also wanted to show off the wood accelerators, and those are:
Let’d dive in, shall we?
Note: All of the photos below are straight out of my camera. I did not edit the lighting or colors in any way.
For each of these stains, the wood species are shown exactly as they are above. From left to right, you’ll see: common pine, select pine, poplar, and red oak.
Varathane Summer Oak
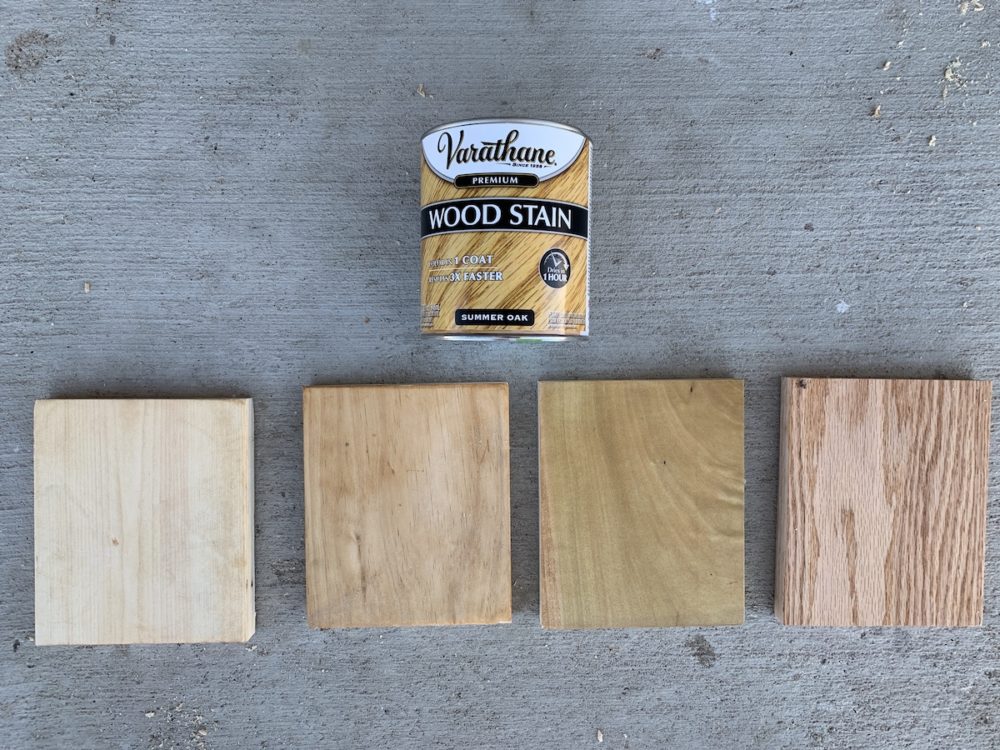
This darkened the boards up just a bit, and left plenty of the yellow tones in the two pine varieties. In the poplar, I felt like it really drew out some of the green undertones. In the red oak, it made the board look very pink!
Varathane Briarsmoke
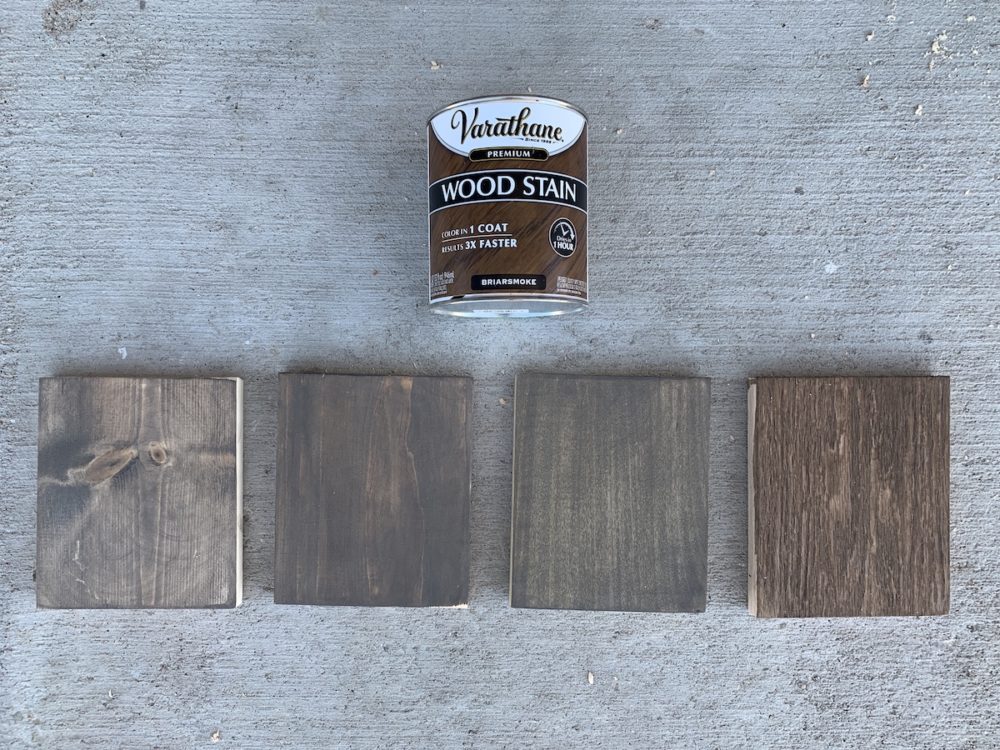
You might note that both pine varieties feel a little splotchy with this dark, gray-ish brown. Using wood conditioner prior to staining a cheaper wood like pine can make a really, really big difference!
This feels almost black on most of the wood, except for on the red oak where there are definitely more brown tones happening.
varathane Dark Walnut
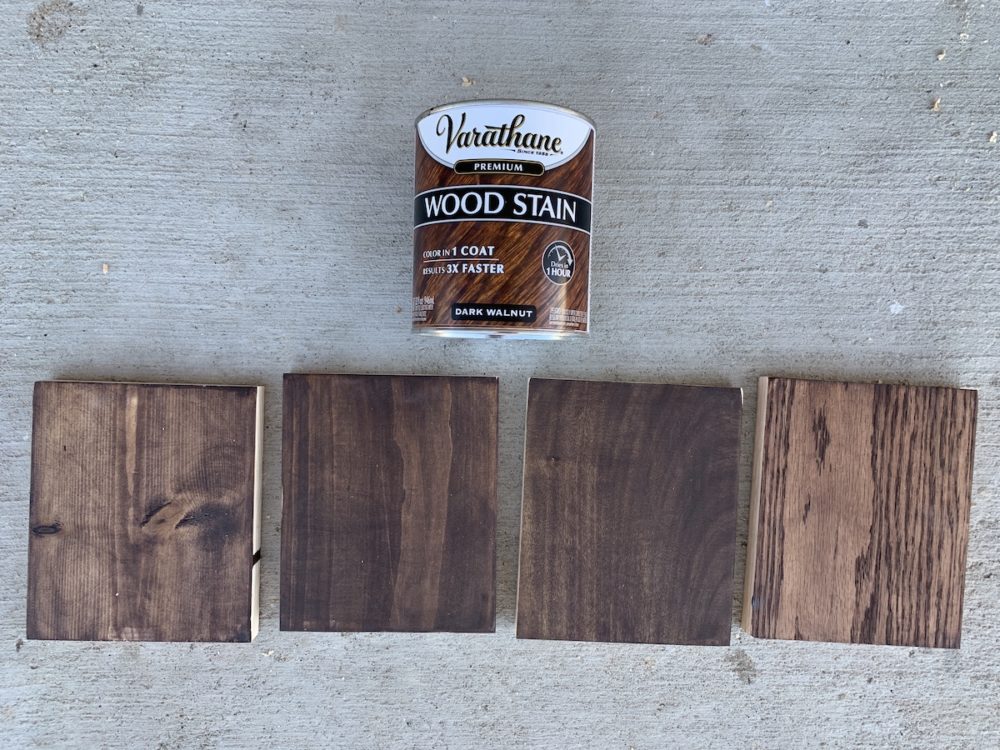
Dark walnut is a go-to for me when I want a good, pure brown color that feels pretty consistent no matter what wood species I’m using!
Again, you’ll note that the common pine just doesn’t accept stain in general all that well without a wood conditioner. You may also note that the grain on the red oak really becomes obvious once you add on stain.
Varathane Ebony

I think my blocks got mixed up on this picture – from left to right you have: select pine, poplar, red oak, and then the common pine.
This color worked really well on all of the wood species, and is really a great, pure black. It’s one I reach for all the time for really great coverage and a beautiful, rich tone.
Stain Takeaways
Looking at the photos above, some pretty clear patterns emerge for me. First of all, it’s so fascinating to me how every single stain color will look pretty drastically different on different species of wood. However, it does seem that the difference in color is more noticeable with lighter stain – once you get into the darker colors, they seem much more similar.
You’ll also notice that whitewood (the one on the left and the cheapest wood) occasionally gets a somewhat splotchy finish. Part of that could be due to sanding (I might not have sanding some spots well enough), but part of it is just the nature of cheap wood – it’s not going to take stain nearly as well as a more high-quality wood!
I really liked the way pine took pretty much every single stain, and of these four I actually think it was the most consistent and true to the color I expected. Poplar and red oak both have strong undertones that can affect the coloring of the stain, so it’s something to keep in mind if you’re working with either of those!
Varathane wood accelerators
Next up, let’s take a look at the wood accelerators. As a reminder, these are just brushed on with a foam brush and then left alone. You don’t need to wipe off the excess, you don’t need to apply a second coat. Just let them sit for 30-60 minutes and you’ll achieve exactly the effect shown below! Get more details on these and how they work on this post right here!
varathane Weathered Wood accelerator
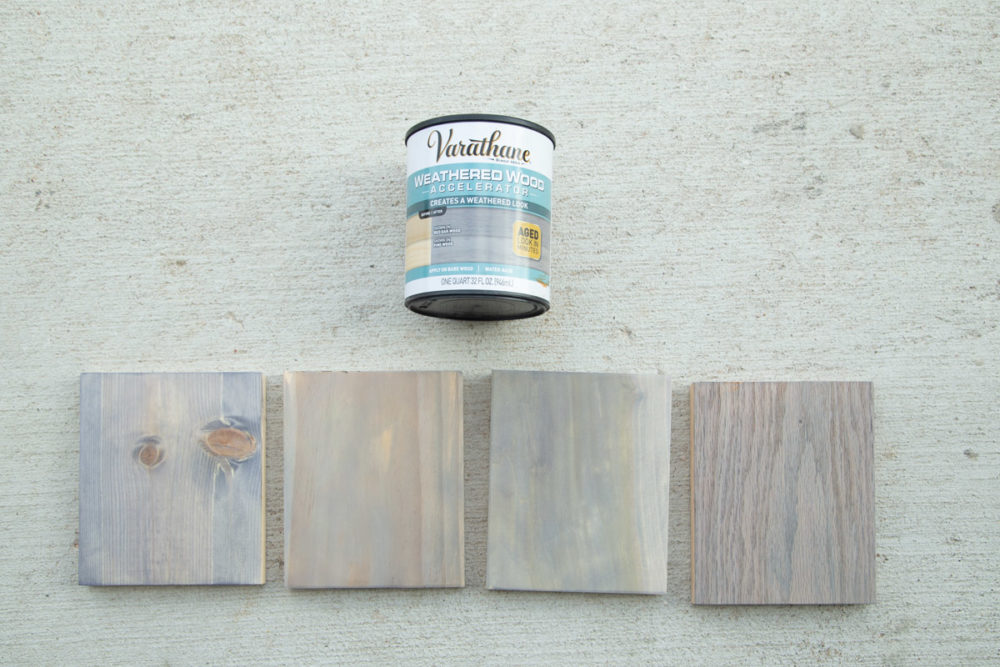
This turned out a little splotchy on the poplar and on the common pine. I think the red oak accepted this one so beautifully, and I really like the unique feel of the color that the select pine produced as well. it feels almost blue-ish purple with the common pine, and it leans pretty green with the poplar!
varathane Aged Wood accelerator
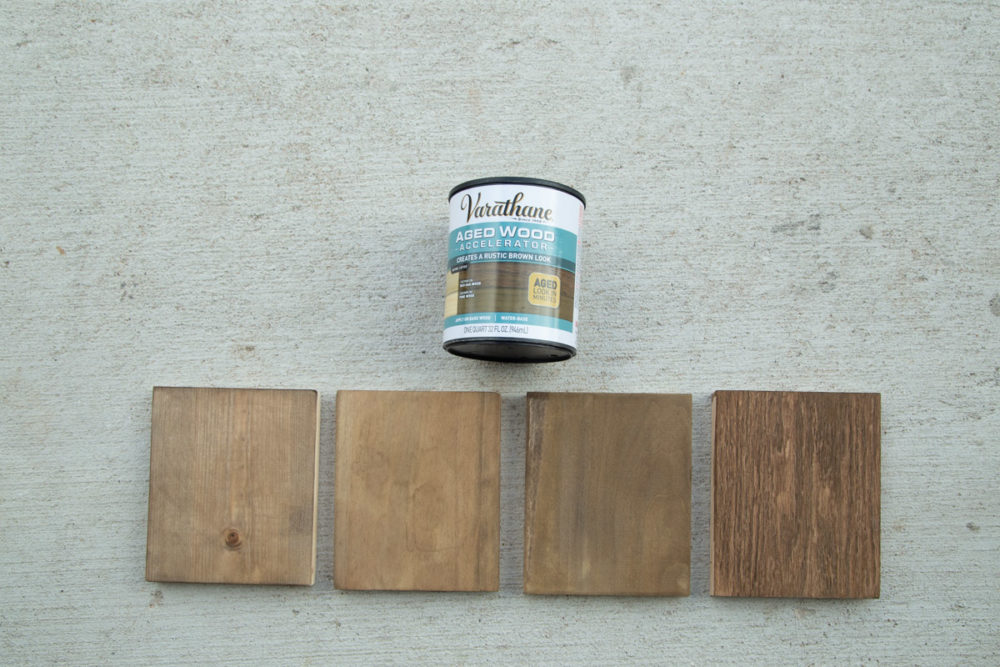
I really really love how this one looked on every single wood species! It brings out a really right brown color, and you can see the natural undertones of each of the wood species peeking through (yellow on the pines, green on the poplar, and red on the oak).
Accelerator Takeaways
I’m so so impressed with these wood accelerators. I’ve personally used the weathered wood one for this project, and I used the aged wood one on this DIY raised garden bed.
The can shows how the accelerator will look on both pine and red oak, and I found that those two were the ones I tended to like them on the most! Whitewood sometimes got blotchy (again, that’s likely to do with the quality of the wood), and poplar looked great but it’s just not my favorite wood to work with so I tend to favor the others more.
These are such a fantastic option for anyone who is nervous about trying out stain and wants to get their feet wet. It’s also great for those of us who are comfortable with staining but just want a really easy finish! The aged wood one is my favorite and I can see myself using it often!
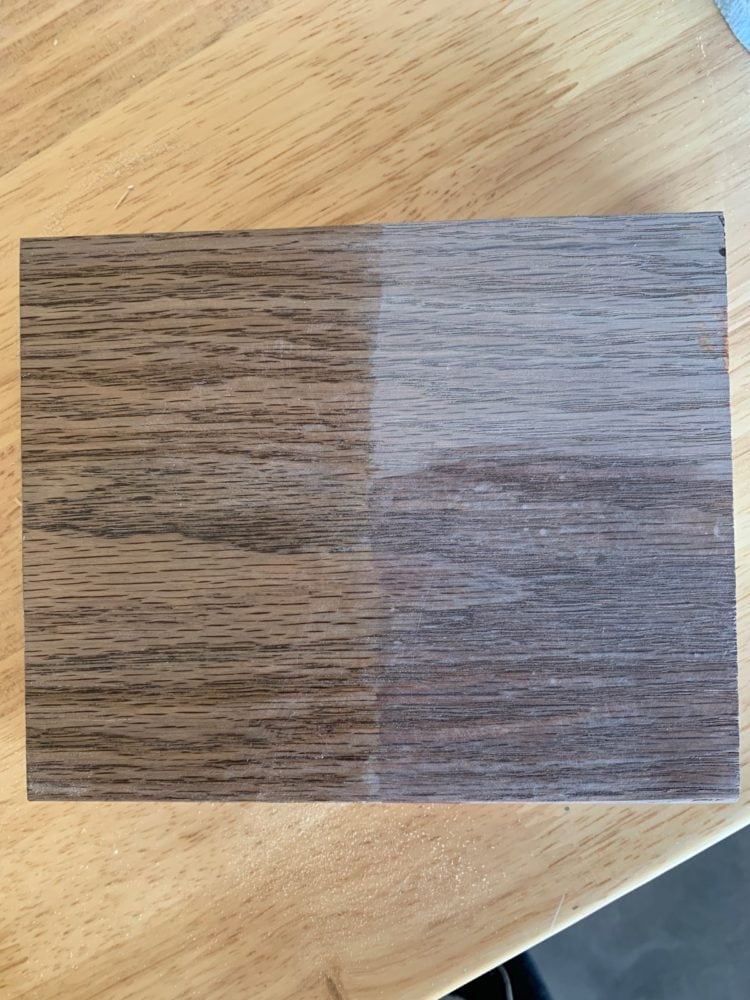
A note on sealing: Please be sure to remember that you should use a lacquer spray to seal the weathered wood (gray) accelerator to avoid messing with the color. The below image demonstrates what I mean. On the left half, I used Watco’s Lacquer in Matte, and on the top right is the unfinished wood. On the bottom right, I used a water-based poly and you can see how it changed the color more than the lacquer (which just made the color richer). The poly also added some splotchiness to the finish. Bottom line – if you’re using the weathered wood (gray) accelerator, make sure to choose a lacquer spray over a poly.
There are (obviously) about a zillion more stain colors out there, but the goal with this post is to help you see that different wood species will accept stain very differently, and it’s important to take that into consideration when you’re making decisions for your projects!
A few key tips you can walk away from this post with?
- Know your undertones! It’s important to know what undertones your wood has, because those will often become even more noticeable when you add stain.
- Don’t forget to thoroughly sand. Sanding makes a huge impact with how stain is accepted by your wood, and anytime you notice a splotchy finish (especially with more expensive wood), it’s likely due to not sanding quite enough.
- And finally, wood conditioner can be hugely helpful, particularly when you’re working with softer, cheaper woods. It won’t make a huge difference on something like oak, but when you’re working with pine it can mean the difference between an uneven finish and a really smooth one!
Any more questions about staining? Be sure to check out this blog post for lots of tips, and if you still need help drop your question in the comments below!
We have new hand hewn Doug Fir beams inside. On the outside, we also have new Doug Fir smooth side ceilings next to more hand hewn Doug Fir beams.
On the front of house we have new vertical rough cedar & garage doors.
I did samples with Eco Wood (Accelerator) on all the different woods & it all come out gray green. I’m going to try the laquare to maybe enhance the aged wood look & maybe try the wood treatment you used. Some of the hand hewn samples Doug Fir took on a charred look.
I’m trying to get a greige color using knotty Alder. Everything turns red!
Same!! I need to know a good Rich brown that doesn’t turn red on alder!
SAME!!
More of the same! Did you get an answer?
We are in the process of refinishing old pine floors. The floors were sanded and then stained with Minwax Provincial. They look blotchy and uneven in some spots, but what bothers me more is the really darker areas and even black. Is there anything that can lighten the darker/black areas before the polyurethane is put on top? Thanks
I don’t have any experience with this, but I’ve heard rubbing the darker areas with acetone can help even it out.
Where is the charred wood accelerator shown in the first picture
It’s the third from the left!
Did you use a wood conditioner prior to using the wood accelerator? Thank you!
You can! I generally don’t
Thanks for the information. Sent it to my boyfriend… I’m the researcher in this love. 🙂
This article is SO helpful! I wish i had seen it BEFORE I applied a stain to a old pine ktichen table. I am not crazy about the stain as it is leaving a green patina where the darker parts of the wood is. Can I use the accelorator Aged Wood (love that look) over one coat of a stain to deepen the dark wood tones?
It’s definitely worth trying! I don’t think it will work as well over stain, since it reacts with the wood itself), but it may help. You can also layer stain colors, so you can always play around with a darker color on top of what you have!
Can these stains be used for outdoor siding?
Most stains are great for interior and exterior, but you’d need to check the label on the specific color and brand you want to try.
Thank you so much for this article. I love the Ebony stain on pine. I have a rustic oak console with knots and grain-finished in a medium matte stain.
I’m not crazy about the idea of a huge sanding project. Would you recommend a black paint color in a matte finish instead? Could you advise on a black paint that would be similar to the Ebony stain?
You could definitely go with black paint instead! My favorite black paint is Limousine Leather by Behr!
All I can say is that you deserve a Nobel Prize for providing the in-depth analysis and commentary on the various woods and stain options. VERY instructive and helpful. Have found some beautiful carved corbels on Etsy … that I want to use as wall brackets. As a result, I was delighted to have discovered your website. Continued good luck ! Edward / Chicago
This is a really awesome post, thank you so much! I love DIY and furniture painting, but never did staining before. I learned a lot from this, and it helped me narrow down my options for a teak cabinet I’m redoing.
Hi! Sorry if I missed it, but are all of these showing just one coat of stain? And how long did you let the stain sit before wiping it off? Very helpful post!! Thank you!
Hi! Yes, this is one coat of stain. I let it sit for about 5-10 minutes.