We’ve been gathering lots of workshop ideas lately to help us get our garage workshop organized and functioning in the most efficient way possible. We’ve recently added a few new things that make a big difference. So, today, I’m sharing 10 quick ideas for how to make your workshop function more efficiently. This post is sponsored by Rockler.
One thing Corey and I have learned (over and over) throughout our years of homeownership is that if our garage isn’t organized, every project we want to do takes about 10 times as long. And is about 10 times as frustrating.
Workshop organization is key when it comes to being efficient with your projects (and actually enjoying them). We’ve been working hard on getting our garage workshop as organized as we can so that it functions smoothly for us. It’s been a slow process (I’d say at this point we’re a little over halfway done). But, we’re trying to take our time and ensure that each system we add works for us and meets our needs. We didn’t get to enjoy our super organized garage in the old house for very long before we moved. And, we never finished organizing our workshop in the old house. So, we’re putting a priority on getting this space up and running so that we can actually use and enjoy it as much as possible.
Today, we’re working with our friends at Rockler to bring you this post all about how you can get your workshop running a little more smoothly. Rockler has been a huge help to us when it comes to organizing our garage. They provided our dust collection system (which is a total game-changer!)! Plus, they introduced us to the lathe a few years back and I think Corey will forever be grateful for finding his new favorite tool of all time.
Read on for my tips for organizing and streamlining everything in your workshop (no matter what size it is!). Be sure to let me know if you have any additional ideas!
9 Workshop Ideas to Help Make Your Workshop More Efficient
You can’t have too many workspaces.
When you’re in the middle of a big project, you’ll quickly find that a single workbench probably just isn’t going to cut it. We have a good-sized workbench in the garage. But, we still end up bringing materials out to the driveway on makeshift workbenches when we’re working on a bigger-scale project! We’ve been working on maximizing our workspace out in the workshop, and every inch makes a big difference. I think when all is said and done we’ll be adding at least one more workbench (either portable or built-in) to our garage.
Make it Look Good!
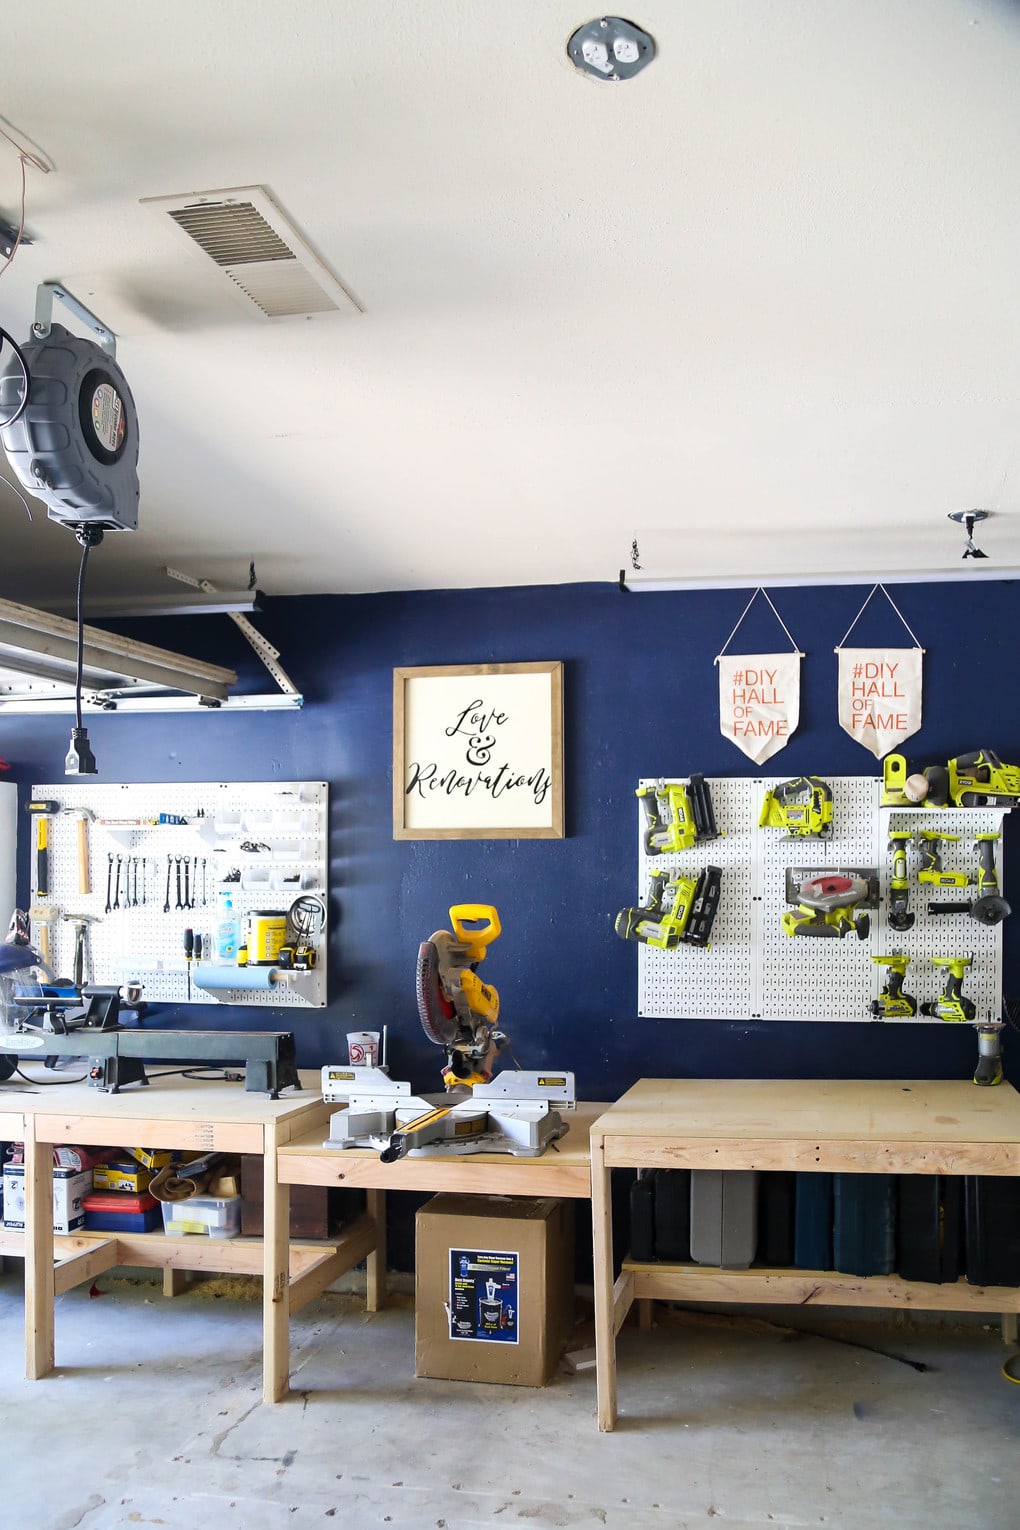
I’ve always been a big believer that you’ll be much happier in your spaces (even the purely functional ones like a workshop!) if you love how they look. I think laundry rooms and garages and workshops should all be beautiful spaces. And, who doesn’t want to enjoy working in a space that you have to spend a ton of time in anyways?! That’s why I put a big priority on making our workshop look as good as possible. Maybe it seems silly to spend an afternoon painting a wall blue or making a DIY wood sign to hang on the wall. But, if it makes me smile when I head out there to work, that’s all that matters. We still have a long way to go on this tip (this wall is the only one that really looks good!), but we’ll get there!
Have a System to Keep Things Clean.
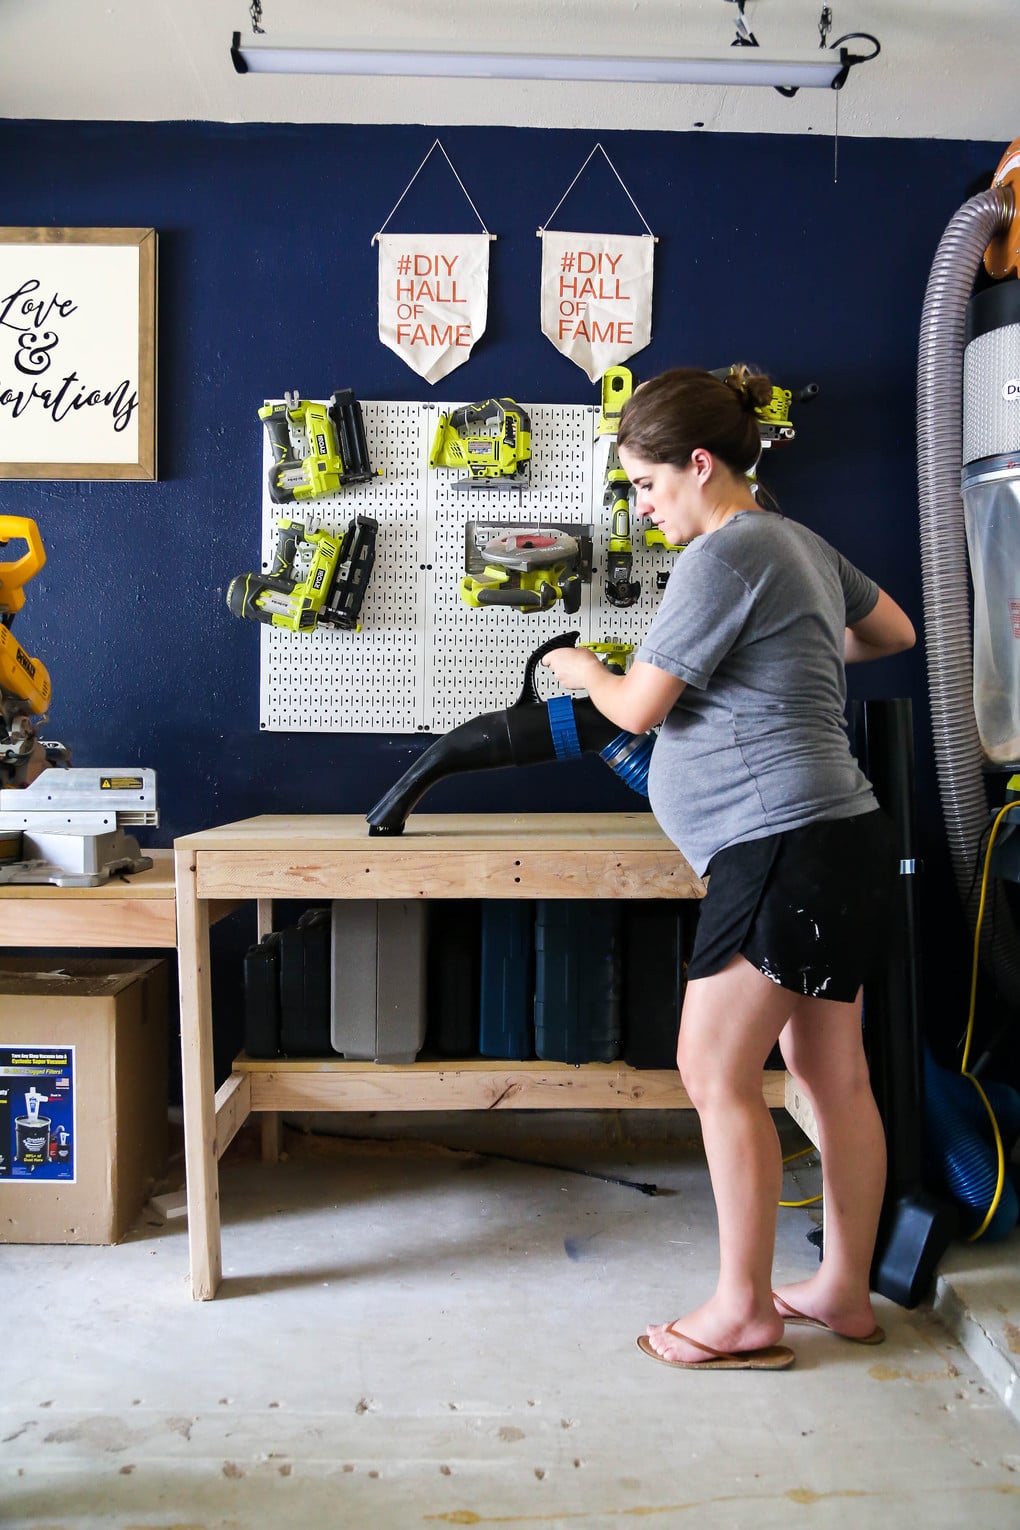
I can’t even tell you how much of a difference our dust collection system is making in helping our garage workshop function more efficiently. It’s just about impossible to actually get work done in a messy space (ask me how I know…). So, having a simple and easy-to-use system to keep things clean will go a long way. In the past, we’ve just had a shop vac that we tried to use on the regular but we never were really good about keeping up with it. Now that we have a dust collection system, it’s so easy for us to clean up after ourselves! We really do keep things looking way nicer in here. It’ll be even better once we get the miter saw and table saw dust collection installed. Those are some messy tools! Regardless of whether you have a dust collection system or not, you’ll want to have a plan in place to help you keep everything clean in your shop. Don’t let messes build up!
Keep Often-Used Tools Within Reach.
This one might seem really obvious, but it’s worth mentioning. If you have to search and search for your regularly-used tools every time you go out to work, you’re never going to want to work. That’s why we installed metal pegboards to hold all of the tools that we use the most. It’s easy to get them out (and, just as important, it’s easy to put them away!). And, we no longer have to search through boxes of tools to find what we need. Don’t underestimate the power of a good pegboard or a well-placed shelf!
Install Good Lighting.
We recently added some of these lights from Rockler to our workshop and, holy cow, it changes everything! Previously we only had a couple of single-bulb lights in there. That meant that once the sun went down, our workshop time was pretty much over. Now? We can burn the midnight oil as long as we want because our workshop is bright with all of those lights on! They’re linkable, which means we don’t have to use up all of our outlets to plug them in. Plus, they provide the perfect amount of light over our workspaces! We’ve got 6 of them installed in our garage, and we can turn on just a few if we only need some task lighting or all of them if we want the whole space to be illuminated. When it comes to working in the shop, lighting is pretty vital. These guys have made a huge difference for us.
Have Specialized Spots for Specialized Tools.
We haven’t really dug into this one yet, but it’s probably next on our list. If you have a tool that’s a little more specialized or awkwardly shaped (like a router, a lathe, or a drill press), you’re likely going to have to create a specialized place to store it! I touched on this a bit in my tool organization ideas post.
Bring in Multi-Purpose Workspaces.
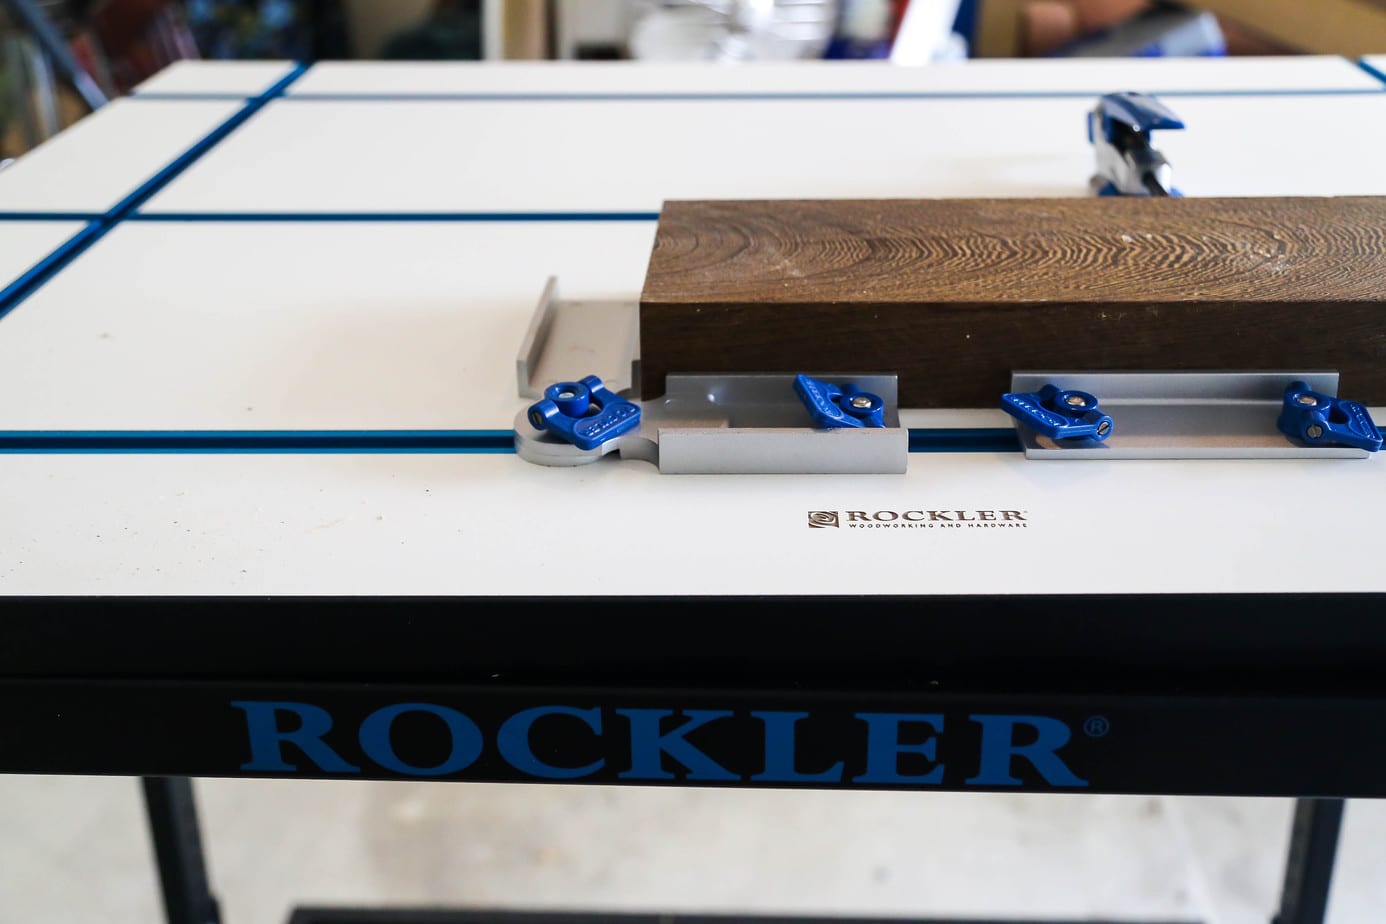
Another powerhouse that we recently added to our workshop is the Rockler Material Matewith the T-track table top. This little guy is now one of the most-utilized spots in the entire garage. It’s a great workspace (see #1). It helps you maneuver large pieces of plywood without having a second person around. And, it can be used next to the table saw to give you extra working space. The T-Track top, though, is probably my favorite part. As you can see above, you can get all sorts of accessories for it to help you clamp wood down more efficiently. This makes it easier to sand, saw, route, or assemble things. Basically, it makes your life way easier. It is hugely helpful when it comes to knocking out projects in the workshop.
A Place for Everything.
This basic little rule for keeping a clean and organized house also applies to the workshop. Everything (and I mean EVERYTHING) in your workshop should have a designated space. We’ve got a spot for the tape measures, a spot for paper towels, a spot to put our favorite magnetic level, and even a spot for Corey’s spare glasses. Anything that doesn’t have a designated space will end up just floating around the room and driving you nutty. So, be sure to take the time to make sure every tiny little tool has a home. And that you put it back when you’re done working!
Don’t Forget to Utilize Wall Space.
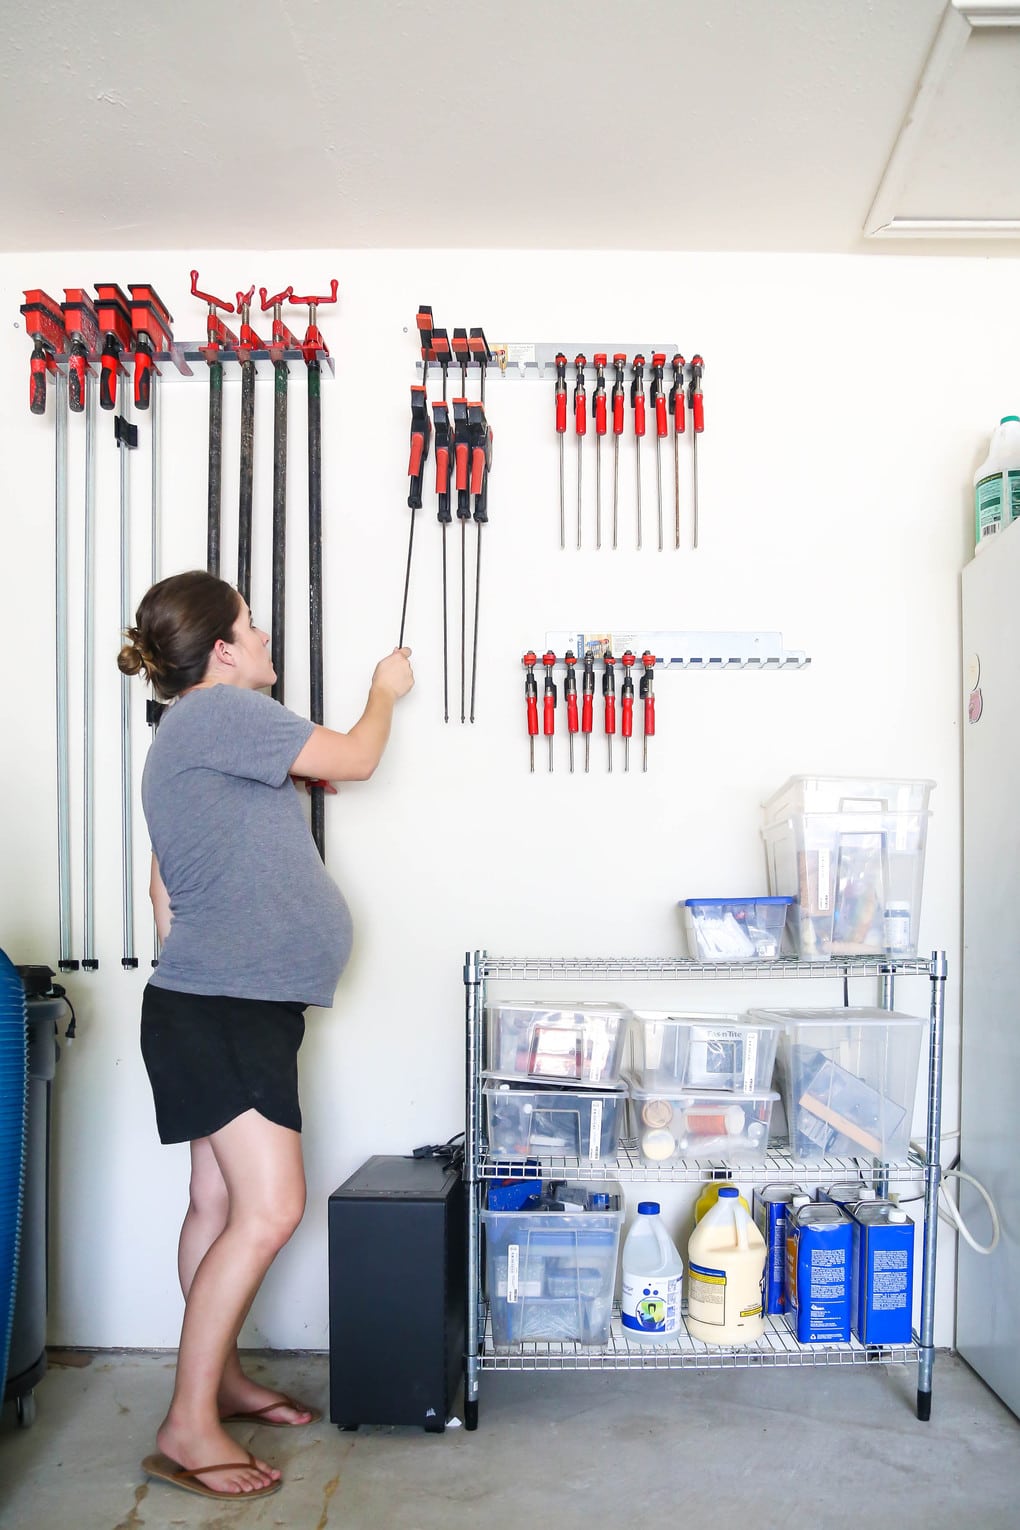
Wall organization is huge in any workshop. But, it’s especially vital if you’re working in a small space like we are! We recently installed these clamp racks from Rockler. I didn’t realize how much space our clamps took up until they were all hung up on the wall! Suddenly, an entire (giant) plastic tub was totally emptied out! And, the clamps went from taking up a ton of square footage in the room to almost nothing. Plus, it’s a lot easier to find what we need this way! One thing we still need to do is hang up a board on the wall for our smaller clamps. I think we’ll just mount a 2X4 on the wall and clip them right to it. Or, we could always just clamp them to the side of the metal bookcase. Wall storage is a really easy way to clear up a lot of floor space and keep things within easy reach. These clamp racks have done both of those things, and you know I’m a fan of anything that makes my life easier!
I’m so excited to be making even more progress towards getting our workshop fully functional and organized. We spent this weekend doing projects in there with our new additions from Rockler. Both Corey and I were more than a little amazed at how much easier and faster it was to get things done!
What are your best tips for keeping your workshop organized and running smoothly?
Just how did you attach the Rockler t-track Table Top to the Rockler Material Mate. I know the core is MDF and I’m not sure of the best way to attach it securely.
Hi, John! As of right now, we use magnets to hold it in place while we use it for assembly, but when we use the t-track, we clamp it down to the work mate. The work mate has holes designed to accept bolts or screws – we plan on putting some T-nuts in the top to make it more permanent, but just haven’t yet.


Just how did you attach the Rockler t-track Table Top to the Rockler Material Mate. I know the core is MDF and I’m not sure of the best way to attach it securely.
Thanks,
John…
Hi, John! As of right now, we use magnets to hold it in place while we use it for assembly, but when we use the t-track, we clamp it down to the work mate. The work mate has holes designed to accept bolts or screws – we plan on putting some T-nuts in the top to make it more permanent, but just haven’t yet.