How to Get Over Design Paralysis: Where to Start
Learn how to get started decorating and renovating your home if you’re afraid to begin. A blank slate can be overwhelming – let me help you dive in.

One thing I really want to hone in on here on the blog this year is some very detailed, specific, and SIMPLE tutorials that will help you have the confidence to dive in and get started on a proejct if you’ve never done it before.
One of the things I hear over and over both from readers and from my friends in real life is that you want to work on projects in your home and make your home feel more like you, but you just don’t have any clue where to start.
I feel you.
There’s something so incredibly intimidating about looking at a blank slate of a house and trying to imagine getting it all finished and personalized. It’s overwhelming! It’s too much! And, as you’ll see in a minute, it’s something I don’t even recommend. Today I’m going to walk you step-by-step through how to make your house feel like a home if you’re feeling some design paralysis.
My hope is that this post will give you the confidence to just try something. Maybe you’ll tackle a whole room, maybe it will just be one project – but no matter how big or small the progress is, my goal with this post is to help give you the confidence to try something.
Are you ready? Are you excited?! Let’s do this!
How to overcome design paralysis and Get started on your home

Pick one room at a time
If you have an entire home that needs to be updated, it’s incredibly overwhelming to try to think about the house as a whole. There are far too many decisions to be made and way too many options, so don’t even try!
I always recommend you start with the room that you have the strongest opinions about. For example, I knew before we even chose a house that I wanted a dark, moody master bedroom full of trim on the walls. I don’t know much beyond that yet, but I do know that’s my starting point. So, that room is obviously the perfect choice for where to begin in our home!
If you don’t have any strong feelings about any of the rooms yet, then I’d just recommend starting with the room that feels the least overwhelming to you. The point is, pick just one room to think about at a time.
Narrow down your style
Now comes the fun part – it’s time to figure out what the heck you want. My favorite way to nail down the style I want for a space is to create a Pinterest board for that room and pin like crazy. For example, I have a “Dark and Moody Master Bedrooms” board that I pin all of my favorite dark-colored bedrooms to. This gives me a dedicated spot to send all of the inspiration that I come across, and is much easier than if I had all of these ideas buried in a more general board.
I recommend you spend at least a couple of weeks just slowly pinning to the board as you come across images that inspire you. Don’t overthink it at all – just pin anything that makes you smile. If you have something specific about the image that you like (for example, if you pin an image because you really love the light fixture or the wall color), be sure to add a note in the image description so you don’t forget. But, in general, just worry about pinning rooms that give you the overall feeling you want to get from your space.
Oh, and don’t feel like you need to have a theme like I do with my “dark and moody” rooms – you could just call your space “Living Rooms,” search for living room ideas on Pinterest, and start pinning the ones you like. You can start off as broad or as specific as you’d like!
Once you have at least 20 or so pins on your board (the more the better!), it’s time to narrow things down. Go into your Pinterest board and comb through the images and look for commonalities. Do you notice that most of the spaces have a similar wall color? Maybe they all have a ton of plants in them. Or, maybe, you pinned a ton of spaces that have large-scale art. Just try to analyze your images as a group and take a few notes on what you see as a recurring theme.
This is how you find your style!
For example, if you look at my Dark Bedrooms board, you might notice that a lot of the rooms have square molding on the walls, most of them have light-colored bedding, and large-scale greenery is a common theme. Not all of the images have these things, but a lot of them do.
Basically, what you’re doing here is going back over the images you’ve been pinning and trying to nail down what you love about them. Take notes, delete the images you no longer love, and slowly you’ll notice that a general plan starts to emerge.
make a mood board
Now, here’s where I think most people start to get hung up. You’ve got a general idea of what you want, you know the colors and vibe you’re shooting for, but you don’t know what’s next.
I love to make a mood board for the rooms that I’m working on. It sounds overwhelming, but I promise it can be really, really simple. I wrote a tutorial on how to create a mood board using Canva (which is a FREE) design software, and that’s a really great place to start. You can use some of the images from your Pinterest board (you can even crop them so they just show the specific elements of the room you love), and you can add in products that you’re considering using in the room. It’s a really good way to see how things flow together, and you can delete things and change them up as much as you want!
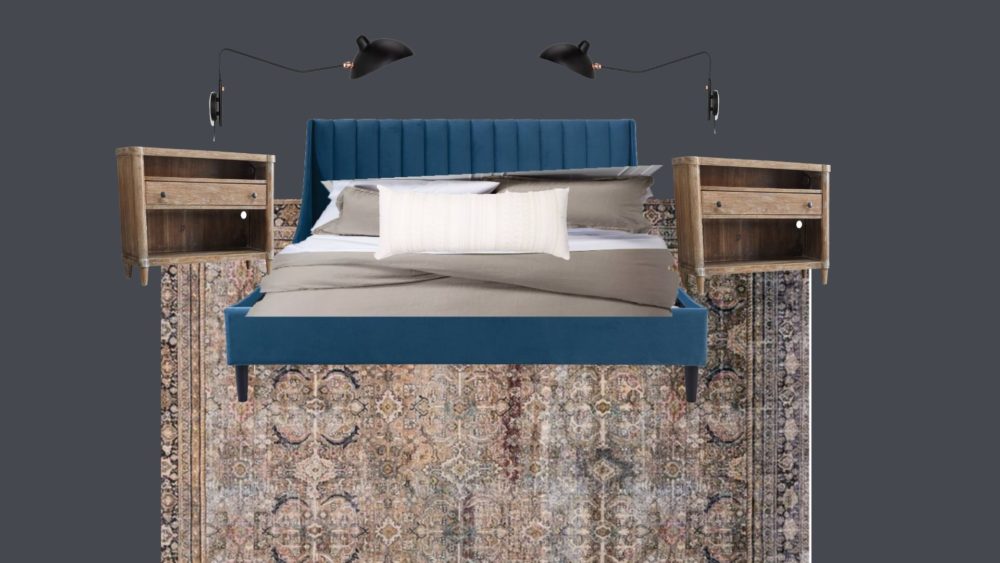
Sometimes I create mood boards with inspiration for the room as a whole (like in that post I linked above), and sometimes I just create simple mood boards that give me an idea of how certain elements will look. For example, here’s one I made for our master bedroom in this house when I was first planning:

It doesn’t have the trim on the walls, but I just wanted to see how the blue bed would look with the dark blue walls, the bedding we were considering, and the rug I have my eye on. For this mood board, I did play around with a few things in Photoshop to layer everything in, but you could achieve the same general idea just placing all of the images on the same Canva template and seeing them next to each other!
Remember that your mood board can be as simple or as complex as you like, and it probably will shift and evolve as the room comes together.
For more ideas of how mood boards work, let’s take a look back at some of ours over the years, along with the finished spaces.
Mood Board Examples
- Here’s the mood board for our first ever bathroom renovation, and here’s the finished bathroom
- This is the mood board I created for Grant’s nursery, and here’s a look at how his room turned out.
- I made this mood board for a weekend refresh I did in Jackson’s bathroom in our first house….and here’s the final product.
- And finally, here’s the mood board I created for the hall bathroom renovation in our second house, and here’s the reveal of that space.
If you go through each of those, you’ll note that it doesn’t stay exactly the same. Some of the products or ideas don’t get used at all, some change pretty drastically…but overall, the feel of the space tends to stay the same over time!
And that, my friends, is the beauty of a mood board. It gives you a roadmap and a way to plan for your space – you can compare each purchase or decision you make to your board to make sure it goes, and it makes decision-making much, much simpler.
make your plan
Once your mood board is all planned out and you know what you want for your space, you have one more step before you can dive in – you need a plan!
This process may take you a week from start to finish, or it may take you a couple of months. There’s no wrong way to do this – just take your time and don’t stress about doing it on a specific timeline.
I recommend that your next step is to come up with an overarching plan for your timeline and budget. Do you have the finances and time to tackle the whole room right now, or will you need to do it slowly over a period of several months?
Start by determining what your budget is for updates right now, and decide if that’s going to be enough to do everything, or if you’d rather tackle the project in phases. For example, our bedroom will be done in a few different phases. Phase 1 is happening right now – we’re adding trim to the walls and painting them. That’s it! Phase 2 will come later when we have more room in the budget and a better idea of what we want for the rest of the space. Don’t feel like you need to do it all at once – there’s nothing wrong with taking it just one small project at a time.
Got your budget and your timeline? Let’s get started!
get to work.
Now, you’re ready to determine your first few projects. I’d recommend making a list of everything you want to do in the room (that you know of so far), and a general idea of the budget next to it.
Here’s an example of what that might look like for a living room:
Example Project List: Living Room
- Paint walls: $75
- Replace light fixture: $150
- Build new side tables: $200
- Get a new rug: $400
- Add a gallery wall: $100
- DIY wall treatment: $50
Once you have your list and a (very general) idea of what each project will cost, choose what you can do now based on your budget. For example, if I had $300 to spend right now on the example living room project, I’d probably tackle painting the walls, adding a wall treatment, and putting up a gallery wall. Those are all high-impact projects that fit within my budget – and the rest can wait for now!
Once you choose a few things to tackle, you’ve reached the hardest, most fun part of the entire process: actually doing it. I say it’s the hardest not because it’s actually challenging to tackle projects in your home but because for most people it seems that taking the step of actually diving in is the most difficult part!
Start with what intimidates you the least, then work your way up from there. Maybe your first step is just buying a few new pieces for your gallery wall and slowly collecting the art. Then, you can plan out your DIY wall treatment and come up with a game plan. Once you’re feeling a little more confident, you’re ready to paint the room! If you start with something that doesn’t scare you and slowly work your way up to the more intimidating things, you’ll find that your confidence grows with each item you cross off the list, and soon enough you’ll be ready to conquer the world!
Rinse and repeat
Once you’ve got this basic system down, you’re ready to do it all over again with the next room. Eventually, you may reach a point that Corey and I are at where you can kind of bounce around from room to room based on what works best for your timeline and schedule. We don’t generally tackle most of our rooms from start-to-finish anymore, but we do go into every space with an overarching plan and we always have an end goal in mind!
And sometimes, it’s still really really fun to take on one space and not stop until it’s done!
I’d love to hear from you if you find this at all helpful – my hope is that this little ol’ guide gives you the confidence to try something new and dive in to working on a blank spot in your home.
I’ll be taking you along on the ride over the next month as we tackle “Phase 1” in our master bedroom, and I’m excited to see where the finished product ends up!

I needed this post so badly! I’m going to have to come back and reference it multiple times. We are planning on adding on a master bath & closet to our house soon and I’m so overwhelmed with all the details. Thanks for so many great tips.