
How to Add Shiplap to a Kitchen Island (DIY Tutorial)
Last updated on June 11th, 2026 at 12:33 pm
If you want to add some personality to your kitchen island, it’s not that hard! Here’s how to create a gorgeous shiplap island in an afternoon.
If you’re looking for a simple, budget-friendly way to upgrade your kitchen island, this is it. Adding shiplap to your island is a quick and easy project that is relatively affordable and will make a huge difference in your home. Updating your kitchen doesn’t have to be hard or expensive – small changes like a shiplap island can add up to huge progress!
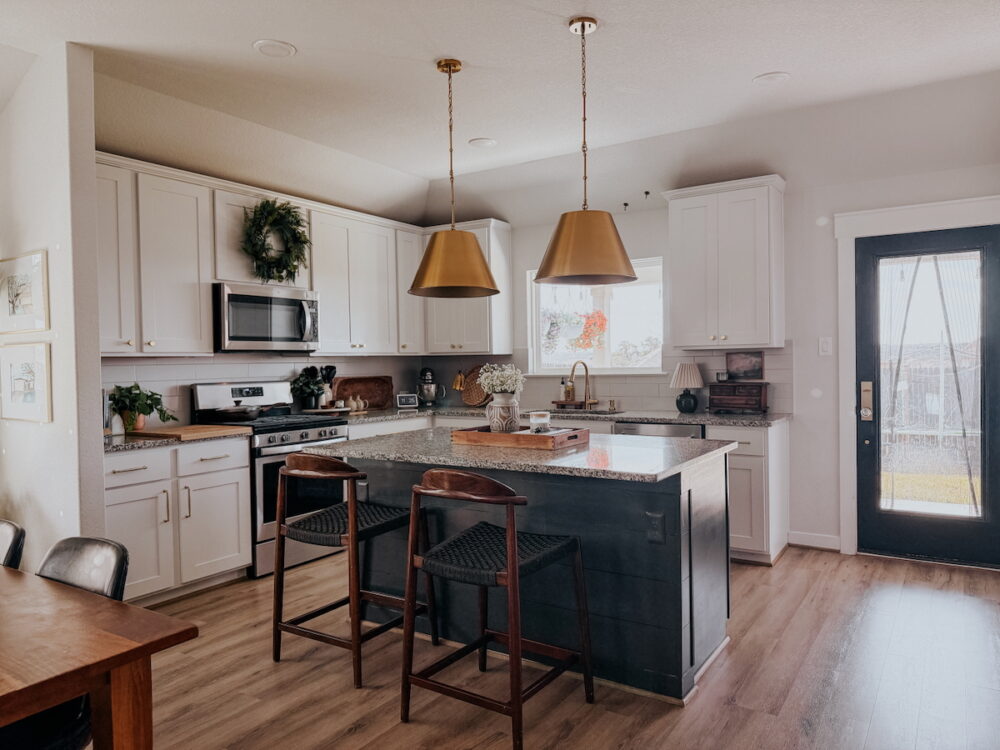
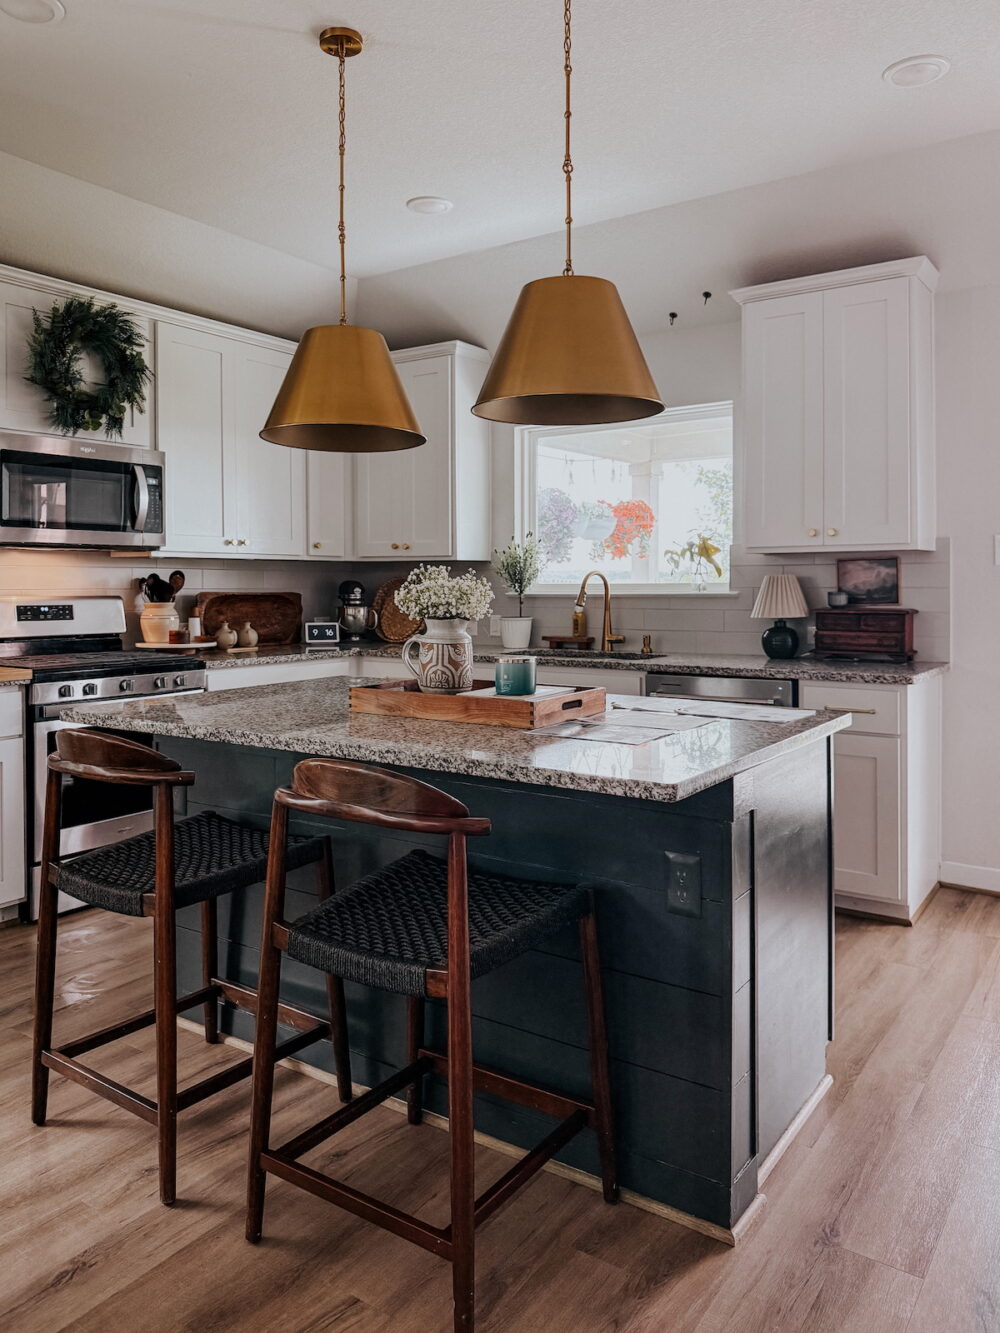
Our kitchen design is all white, with lighter granite countertops, a gray tiled backsplash, and stainless steel appliances. It’s pretty, but bland. So, we knew from the moment we decided to purchase this house that we would want to do something to the drywall on the back of the island. I wanted something that would ground the space a little and make it feel more like us.
A shiplap kitchen island was exactly what this space needed.
This was such an easy project, and it gave our kitchen a whole new look! This project is very beginner-friendly, and the steps I’m outlining below could also be used to create a shiplap peninsula, or even a shiplap backsplash! Before we dive in, let’s take a moment for the before and after:

So good! Okay, let’s get to the details.
Easy DIY Shiplap Island (The Full How-To!)
Materials Needed
- Shiplap Boards
- 3/4″ corner trim
- Painter’s tape
- Wood putty
- 180-grit sand paper
- Caulk
- Paint
- Paintbrush
- Foam Roller
TOOLS NEEDED:
- Nail gun (with 1 1/2″ nails)
- Miter saw
- (Optional) Pin nailer
A Note on Shiplap:
I always like to note that if real shiplap isn’t an option for you due to budget or resources, you can make your own! You can use a table saw to rip down MDF boards or plywood, and use a nickel to create the gap in the boards. It’s much more affordable, and creates a similar look!
Determine Starting Lengths
The first thing you’ll need to know is how you want to lay the boards. If you have enough material to do full-length pieces all the way up, that’s great! However, it wastes a lot of material. For example, I could only get one row out of an 8′ board, and the rest of the board was waste!
The other option is to have seams in your boards – this is totally normal, and easy to hide when all is said and done.
You can plan out specific spots for the seams to be, or you can do what I did and randomly stagger them. I started with a board that went approximately 3/4 of the way down the island, then simply measured and filled in the rest of the row with a second board. On subsequent rows, I used scrap or alternated where the seams were.
There’s no right or wrong answer here. Just decide if you’ll have seams or not, then you’re ready to go from there.
Measure and Cut Your First Board
Start by measuring the length of your island at the bottom where you’ll be installing your first board. Walls aren’t always even or straight, so you’ll want to measure for each board individually.
Once you’ve measured, you’re ready to cut your first piece (based on the lengths you determined in step one). The outside edge of the board (where the board meets the corner) will need to be cut at a 45-degree mitered angle. Click here to see my full tutorial for how to use a miter saw (including how to make mitered cuts) . Just remember that you’re measuring the BACK of the board. That’s the part that touches the wall and where you should be measuring and marking from!
How to Install a Shiplap Board
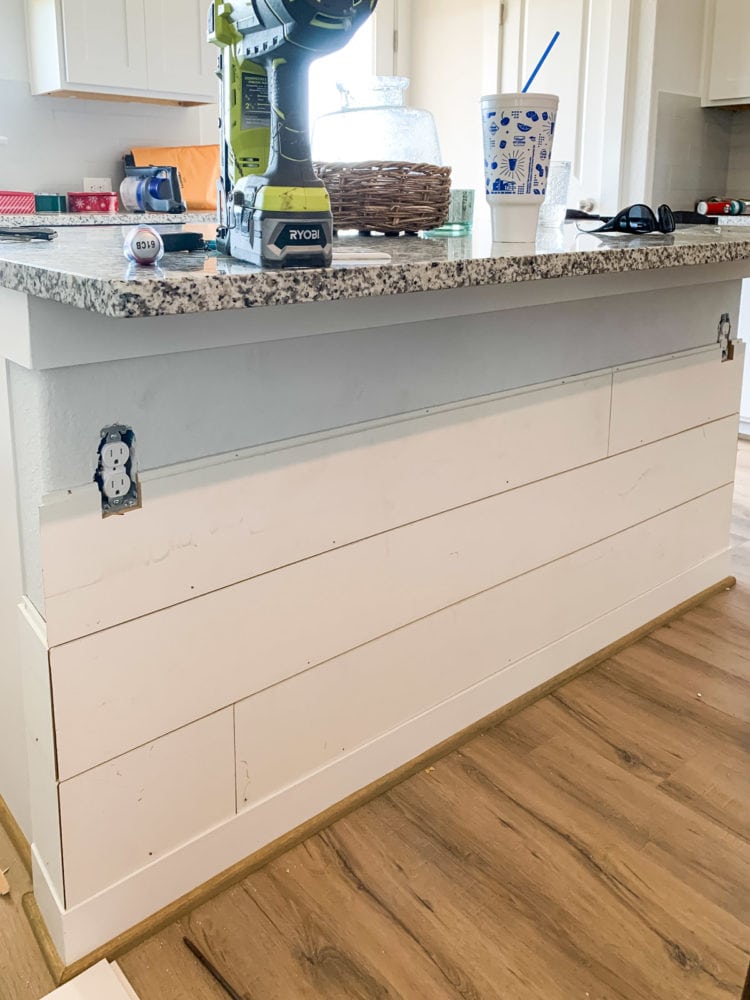
After you’ve cut the first board, it’s time to install it. If you have more traditional baseboards, I recommend removing them before installing the shiplap. You can reinstall it on top when you’re done. I have 1x4s as baseboards, so it worked well to just start the shiplap right above it.
Place your shiplap board in place and line the mitered edge up with the edge of the island. Check to be sure it’s level before you nail it in place (I just used the level app on my phone – I find that it’s generally really accurate!) – if your floors are level, you should be fine.
Grab your nail gun and nail the board into place. I like to put a nail every 8-12 inches along the top ridge of the board (where the next board will sit) so that most of the nails are hidden. Then, I add a second nail every 12-18 inches along the bottom to prevent the board from tilting at all.
Note: Some people recommend using liquid nails to hold the boards in place. I’ve installed shiplap many times and usually skip that step. I find nails hold it in place really well, and they don’t destroy the drywall.
Now, you can measure the remaining space from your first installed board to the other end of the island, and go cut that piece and install it using the same process. Remember to miter the outside edge!
Adding Shiplap to the Sides (If Applicable)
Once the front row is up, you can wrap the shiplap around the sides. My sides were only about 5″, so I only needed one piece per row.
You’ll miter the edge to line up with the front (remember the back should have LESS wood showing and the front should have MORE in order for the mitered edges to line up), and install it using the same method.
Don’t stress if the corners don’t line up perfectly. That’s what trim is for!
Repeat Until You Reach The Top!
Rinse and repeat steps 1-5 until you reach the top row!
You may end up needing to use a table saw to rip the top row down a bit if the rows don’t fit perfectly (we did).

Tips for Adding Corner Trim
This step is optional, but my mitered corners rarely line up perfectly (thanks to uneven walls and human error). I find that adding some corner trim makes everything look professional and finished. It also allows me to not stress about making things perfect.
I got this 3/4″ pine corner trim from the hardware store. They had some larger corner trim that was pre-primed, but I wanted to get it as small as possible so I just primed it myself using my favorite spray primer.
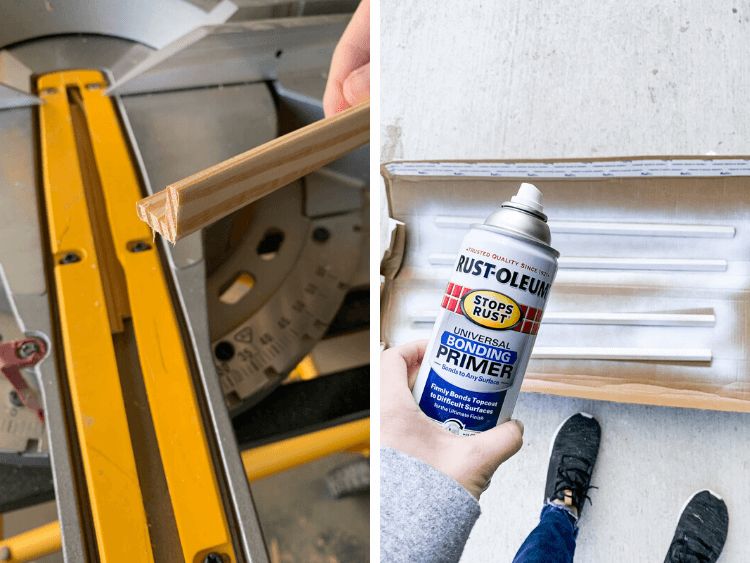
Once it was primed, I simply measured the height of wall where I wanted to install it, then used my pin nailer to install the trim. You could use a regular nail gun as well, but a pin nailer allows you to avoid needing to patch any nail holes!
I installed mine on both the front corners and on the corners where the shiplap meets the cabinet because the spacing was perfect. If your island is set up differently than mine, you may only need it on the front!
Final Touches: Filling Nail Holes!
You’re almost ready to paint – just one last step!
Your final step before painting is to patch all of the nail holes and caulk the seams. I used the wood putty linked above to patch all of the nail holes in the shiplap, as well as the seams. Be sure to over-fill the nail holes – you’ll sand it down once it dries, so you can be generous! Click here to learn more about how to use wood filler.
Every wood putty will have different directions and dry times, but as a rule you just use a putty knife (or a plastic knife if you’re like me and can’t find yours) to press it into the hole, allow it to dry for about 30 minutes, then sand until smooth.
Same thing for the seams – press the putty in the seam (overfill just a little!), let it dry, then sand!
You’ll use caulk on the edges where the shiplap meets your island or baseboard. I like to use this stuff that doesn’t need a separate caulk gun for small projects like this. Run a bead of caulk along the edge, then use your finger to smooth it out. It can help to use painter’s tape to keep it from getting anywhere you don’t want it! Check the directions on your caulk to see how long it needs to dry before painting – 30 minutes to an hour is typical.
Painting Your Shiplap Island
Now comes the fun part – time to paint!
Tape off all of the baseboards and trim that you aren’t painting with painter’s tape, then use your foam roller to paint the shiplap. I like to use a regular angled paintbrush to get into the gap between the shiplap. I used NYPD by Behr for our island – it took two coats to fully cover the shiplap, and we were good to go!
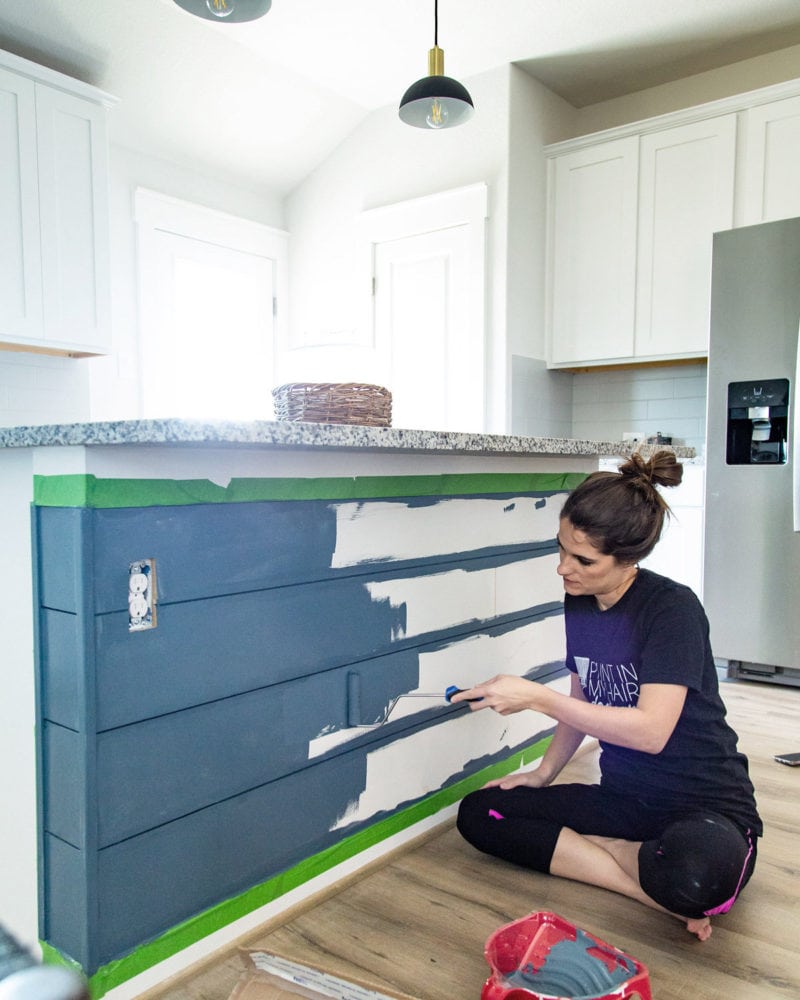
I painted the island NYPD by Behr before eventually painting it Carbon Copy, also by Behr!
A Note On Outlets:
If you have outlets on the back of your island like we do, you’ll have a couple of extra steps to take.
- When you get to the row that will need a hole cut for the outlet, measure exactly where it needs to be, mark it on the back of your board, and use a jig saw to cut a hole for the outlet. It only needs to be as big as the opening in the drywall – any bigger and the outlet cover may not cover it up!
- Install the shiplap as usual. When you’re done, you can use these outlet spacers to push the outlet out to be level with the shiplap, then re-install the cover!
- I like to use these paintable outlet covers for this kind of project, as they blend right in.
And that’s it! When you’re done, you’ll have an island that looks a little something like this.
Frequently Asked Questions
How Much Does a Shiplap Island Cost?
Pricing will depend on how large your kitchen island is. However, on average an 8′ shiplap board tends to run about $10 a piece. I used less than 5 boards here, so if I hadn’t had leftover boards this project would have cost about $50, not including paint, caulk, and wood filler!
How Long Does it Take to Install?
If you’re comfortable with using your power tools, this project can easily be completed in an afternoon! However, if you don’t have a big chunk of time to dedicate in one day, it would also work well to break it up into several chunks over the weekend. For example:
- Installing the shiplap boards (about 2 hours)
- Caulk + wood filler (about 1 hour)
- Sanding and painting (1-2 hours, plus dry time)
Can This Be Done on ANY Kitchen Island?
This type of project will be easiest on a kitchen island that has drywall on the back. If you have an open kitchen island or one with cabinetry on the back, it adds a layer of complexity (and some extra steps) to make it happen. But, any island that has a solid back like this one can definitely handle this project!
I am so in love with how shiplap kitchen island turned out. I feel like it really makes our white kitchen feel more grounded and complete. Let this serve as your reminder that shiplap can be used for a lot more styles than just farmhouse! It fits right in with our more modern traditional style, and breathes some fresh life into the kitchen.
I still have some projects I want to eventually do in my kitchen (like add hardware, swap the microwave for a vent hood, add something above the kitchen window, and several other things), but this little change makes me a lot happier with it in the meantime!
UPDATE: A year or so after creating my shiplap kitchen island, I painted the entire kitchen island a new color. Click here to see the new look!
Can you share where you got your stools from? Your island looks great and I’m going to use your directions for shiplapping my island!
Thanks!
Gina
Hi! They’re from World Market – you can find a link on the Shop Our House page!
Love it! Do your corner trim pieces stick out and the tops needed painting or were they flush? Running into a dilemma in my own project.
They’re flush with the trim at the top!