
DIY Window Plant Shelf
I added a simple DIY window plant shelf in the window seat in our dining room. It’s the perfect spot to bring my plants in for the winter! Read on to see how to make your own.
This post is sponsored by DAP.
One of the (many) things that made me fall in love with this house was the giant window with a deep windowsill in our dining room. I knew we’d use it all the time, and we do! The kids love to sit there to eat dinner, I use it regularly when I’m working on big puzzles, and it’s so nice to have it as extra seating when we have family over.
Plus, who doesn’t love a huge window seat?!
I realized pretty quickly after moving in that the window wasn’t just a good seat – it’s a really great spot for plants! It’s a south-facing window so it gets really great sunlight all day long. Plus, the deep ledge makes it pretty perfect for tons of plants.
I didn’t want to have to choose if we’d use it as a bench or as a place for plants. So, I started doing some looking around for options that would allow us to do both. I never found exactly what I was looking for done anywhere else, but I did see a few beautiful options where people had installed some sort of window shelves to display plants. I knew it would be the perfect solution here.
This is one of those projects that’s really straightforward and simple. It just took a couple of Grant’s nap times to get it put together and finished!
Here’s how we did it!
How to Build a DIY Window Plant Shelf
Tools + Materials Needed
Every window will have different measurements for both the length and depth. You’ll need to measure for your specific space and adjust accordingly, especially for the 2×2 pine boards.
Video Tutorial
Prefer to watch things come together in video form? I compiled all of the Instagram stories I shared throughout this project into a video for you. Watch below, and then keep reading for more details.
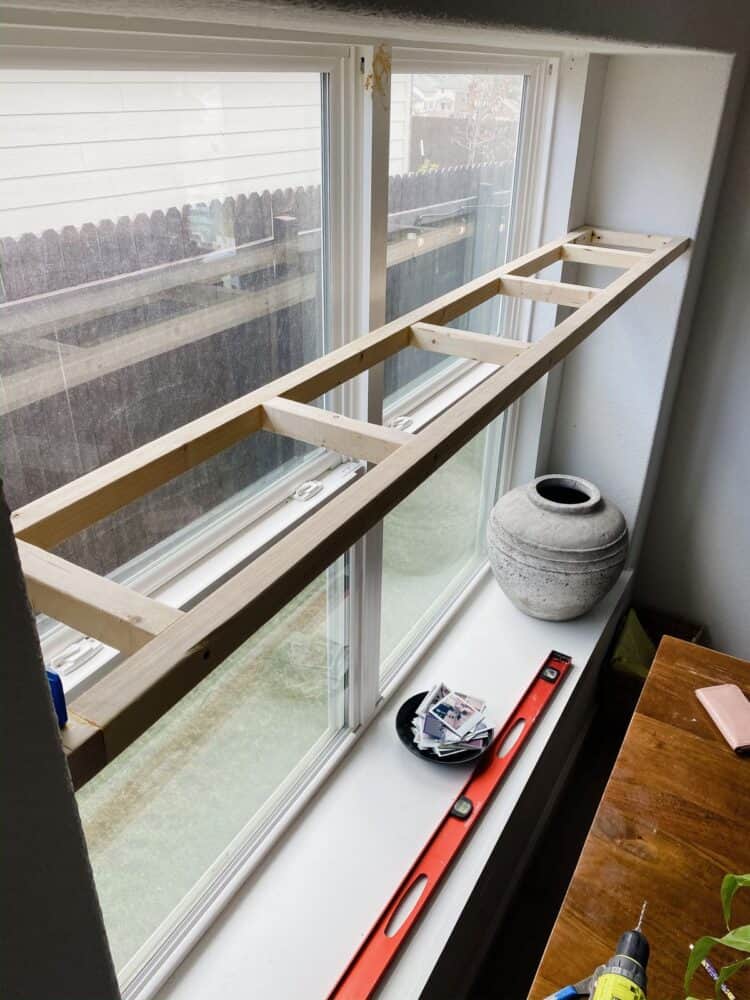
Step One: Build the Interior Supports
You’ll start by building the skeleton of the shelf. This will act as the support and won’t be visible once the shelf is complete. This step is vital to make sure the shelf can hold the weight of the plants. Here’s a breakdown of the process:
- You’ll use the 2×2 piece of wood to assemble a frame that fits the interior measurements of your window.
- The length should be exactly the length of the inside of your window.
- The depth should be the depth of the window minus 3/4″. This is to allow for the board you’ll be adding on top.
- To assemble the framing, use construction adhesive and screws (that way you know it’s not coming apart!).
- Be sure to pre-drill holes for your screws prior to adding the construction adhesive!
- Start with the two long pieces, then add a short piece on either end. Once the outside frame is complete, add cross pieces approximately every 16″.
When it’s done, it should look something like this:
Step Two: Install the Support
Once you’ve got the framing built, you’re ready to install it in your window well! Find the studs in your wall (usually on either corner). Then, pre-drill holes in the sides of the support, and drill it into place.
Note that nothing is being attached to the window frame itself. You wouldn’t want to mess with the actual window and cause issues!
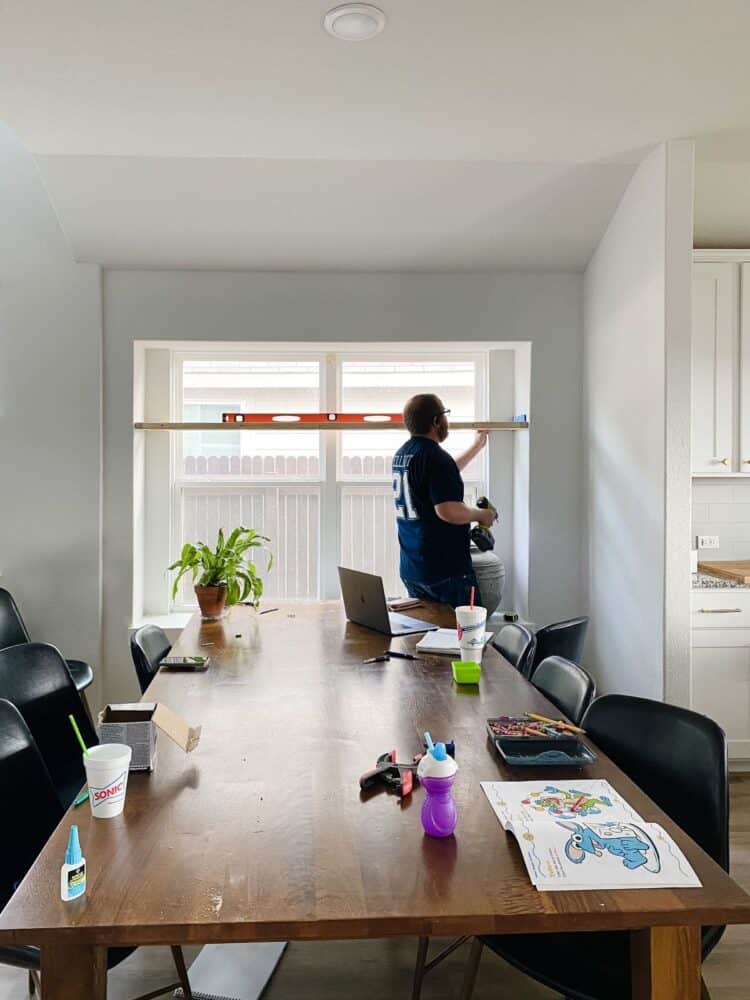
As you’re installing this, be sure to pay attention to the height you’re hanging it at – if you have a lot of taller plants, you’ll want to hang it a little lower.
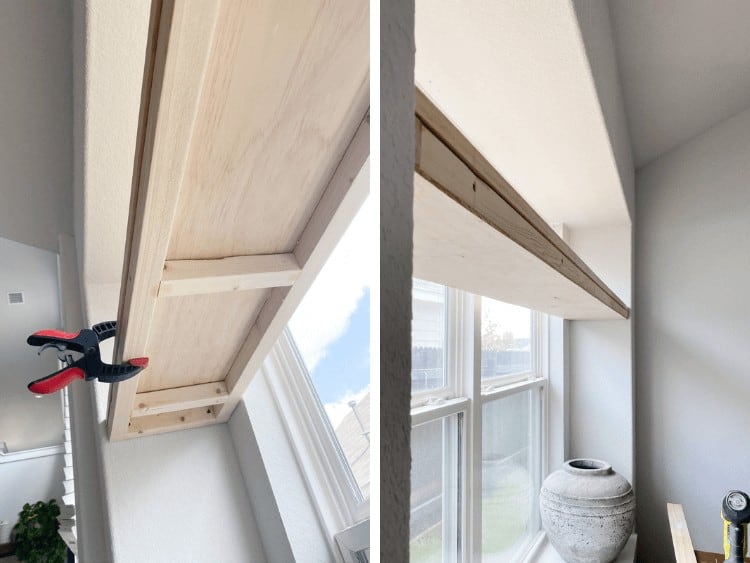
Step Three: Cover the Support
Now comes the part where it all comes together!
Take your 1×12 board and cut it down widthwise to fit the depth of your window well. Then, cut the length down so that it fits perfectly in the window.
Add some of the construction adhesive to the top of the framing. Then, place the board on top, and nail it into place. Repeat the process with the 1/4″ plywood on the bottom, and then once more with the 1×4 board on the front of the shelf.
Step Four: Caulk & Patch
Now that the shelf is assembled and installed, it’s time to make it look pretty.
I used DAP Premium Wood Filler to fill all of the seams along all three sides of the board, as well as all of the nail holes. I love this wood filler because the texture makes it very easy to work with and the finished product looks completely seamless. Be sure to overfill it slightly so that when you sand it down, the seams are fully covered! Click here for a full tutorial on how to use wood filler.
Allow it to dry according to the package directions, then sand it down so it’s flush.
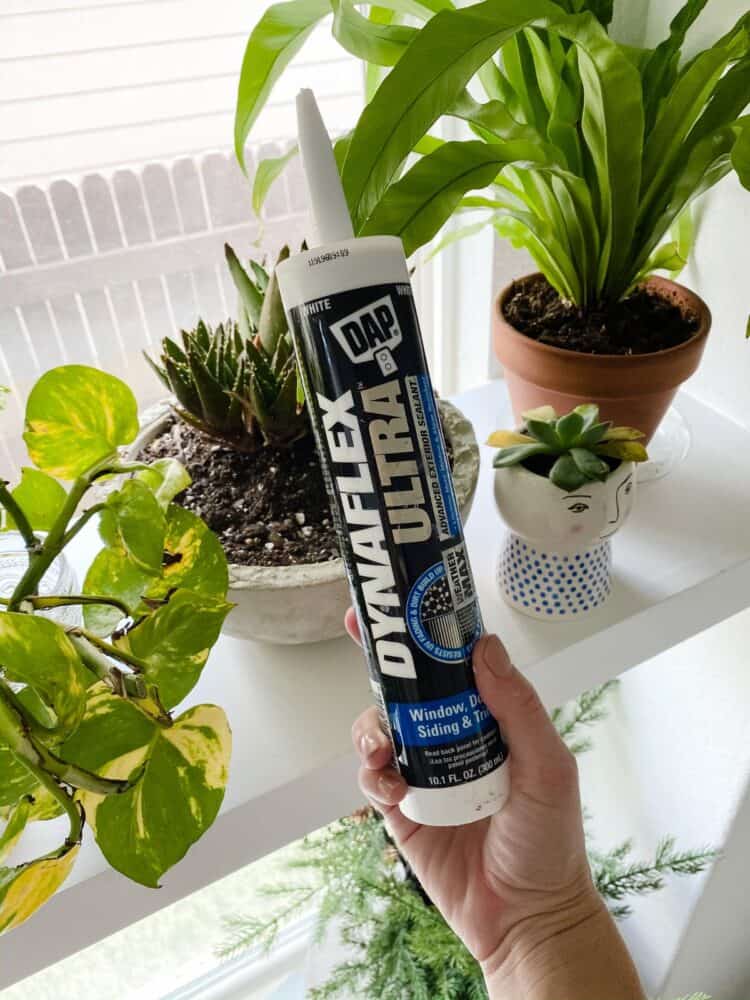
As far as the caulk, you’ll want to use the DAP DynaFlex Ultra caulk to fill in all of the seams where the shelf meets the walls. I specifically chose this particular caulk because it has really great hold and is water-resistant, so if it gets wet when I’m watering the plants it won’t be a big deal! If caulking makes you nervous, click here for a full, in-depth tutorial on how to use caulk!
Step Five: Paint!
Now you’re ready to paint! For my shelf, I chose to use the exact same paint that is on all of our trim around the house. It helps the shelf feel like it was always a part of our house, and makes it look really cohesive with the trim on the window seat right below it.
Once the paint is dry, you can fill it up!
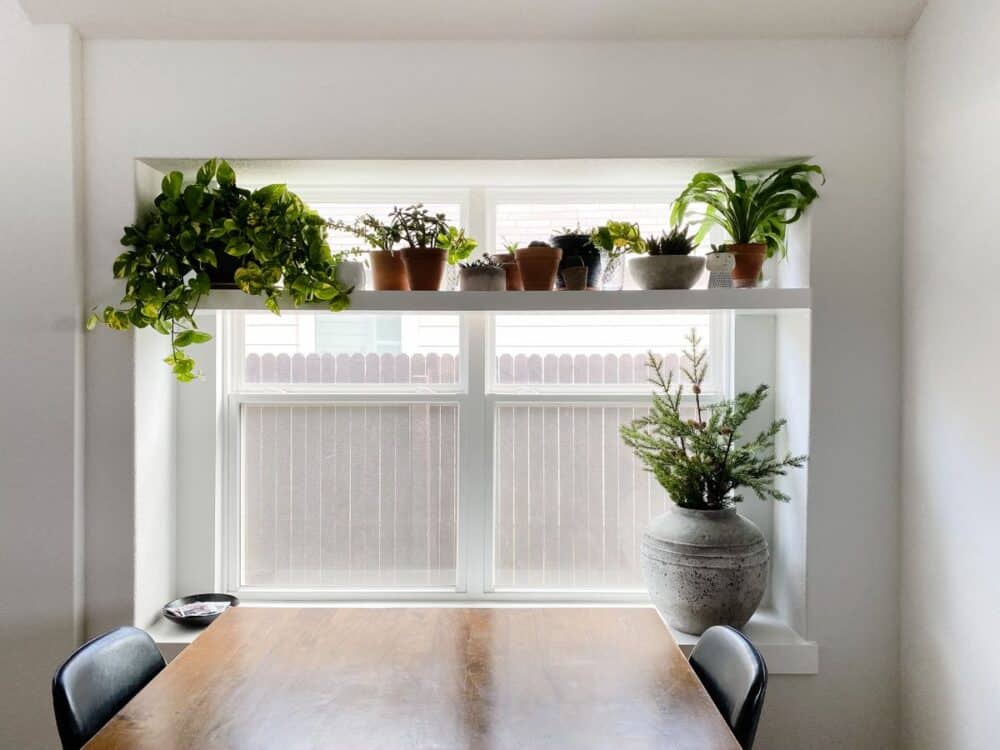
I LOVE how this little shelf turned out, and I’m thrilled that we can still comfortably use the seat while also displaying all the plants I could possibly want (seriously, this thing can hold a lot!).
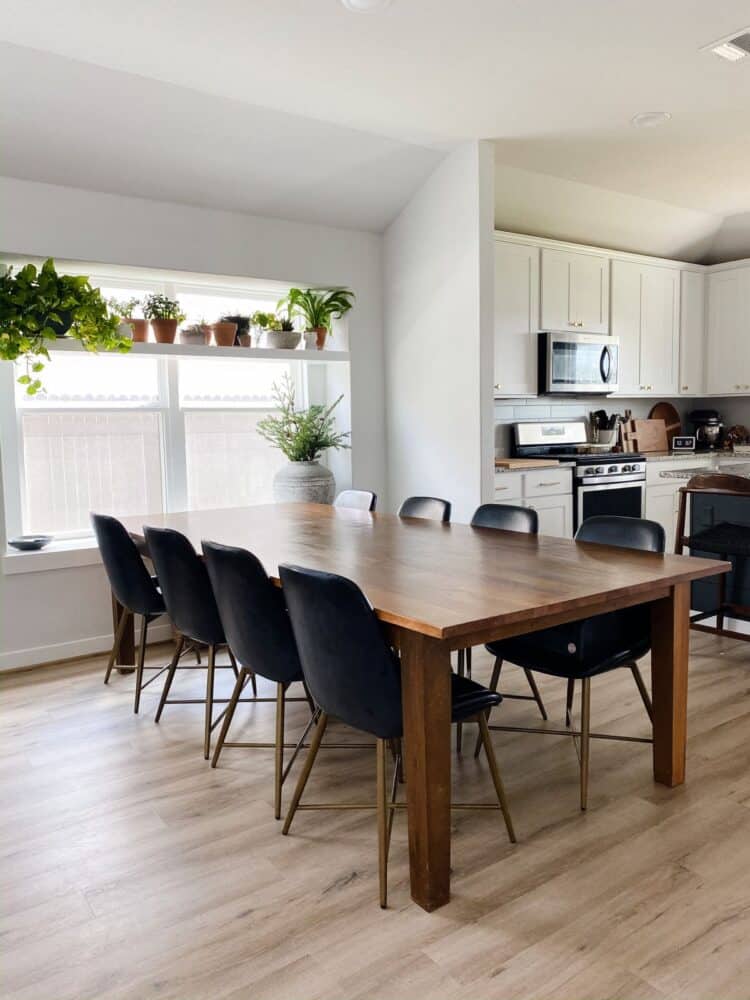
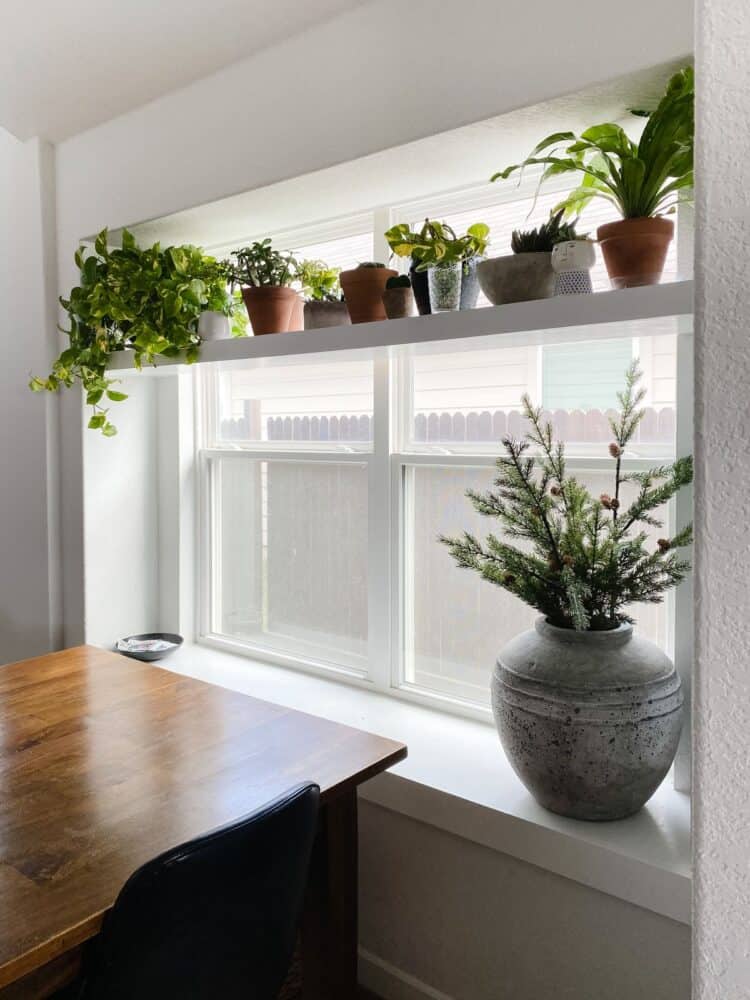
I only installed a single window shelf because I wanted to be able to continue to use the window seat. But, if you don’t have a seat like we do you can create tiers and do multiple shelves!
Other Window Plant Shelf Ideas
Need to take a different approach? Here are a few other ideas for window plant shelves that could work for your space.
- If you’re working with a smaller window, you could add brackets on either side and simply set a shelf on top.
- You could create a hanging window plant shelf by hanging rope from the ceiling, drilling holes into the wood for it to go through, and tying knots underneath.
- Hang some macrame planters from the window well and use small pots.
- For something pre-made, I love these acrylic window plant shelves.
This little shelf has been an absolute life-saver when it comes to displaying my (slightly over the top) plant collection! I love how it looks, it still allows us to use the window seat, and my plants are so happy up there.
Looking for more plant display ideas? I’ve got you covered.

Love this! We’re doing a kitchen reno and looking to add a shelf in front of the window. My question is “how do you clean the window? Is there enough space between shelf and window to remove the window for cleaning?”
Hi Donna – I clean what I can reach with the shelf in place. I don’t remove the window to clean it.
I am ABSOLUTELY THRILLED to find your tutorial!! This is the exact vision I’ve had in my head since moving into my home. Thank you!! I’m so excited to give it a go!! (as made obvious by my million exclamation points that I typically never use, ha). One question — how much weight do you suppose this shelf/support can hold?
I don’t have an official weight estimate for you but mine is full of small plants at all times and holds up just fine! I wouldn’t put anything huge in the middle, but I’ve put larger, heavier plants towards the side. It can hold quite a bit!
I love this!!! What a smart idea!! You are so creative!!! I know those plants will thrive on that shelf!