
The Back Patio Cover MAKEOVER
Last updated on January 22nd, 2024 at 11:34 am
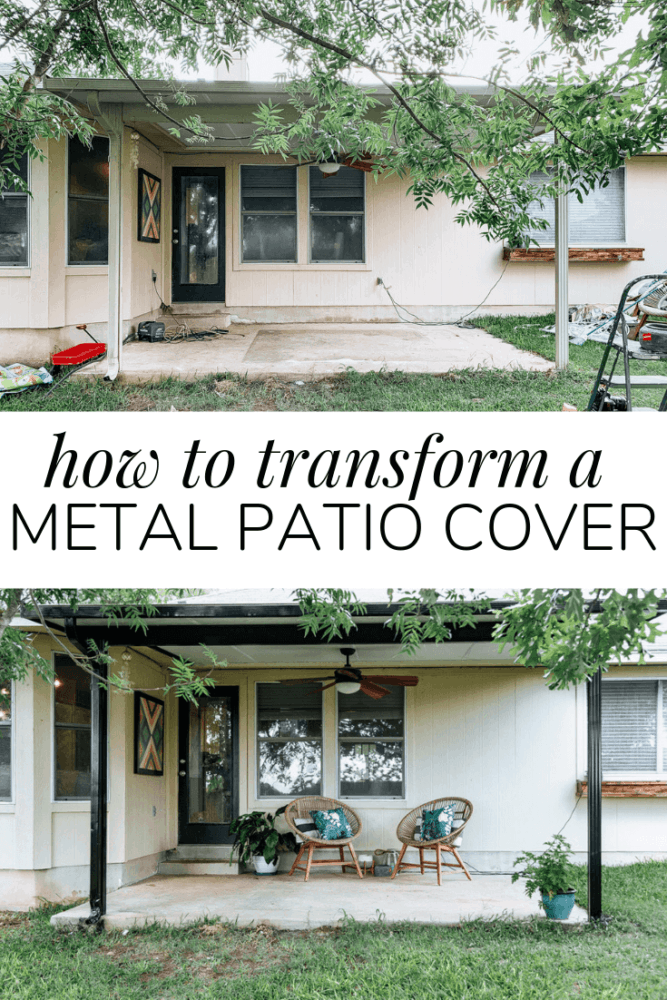
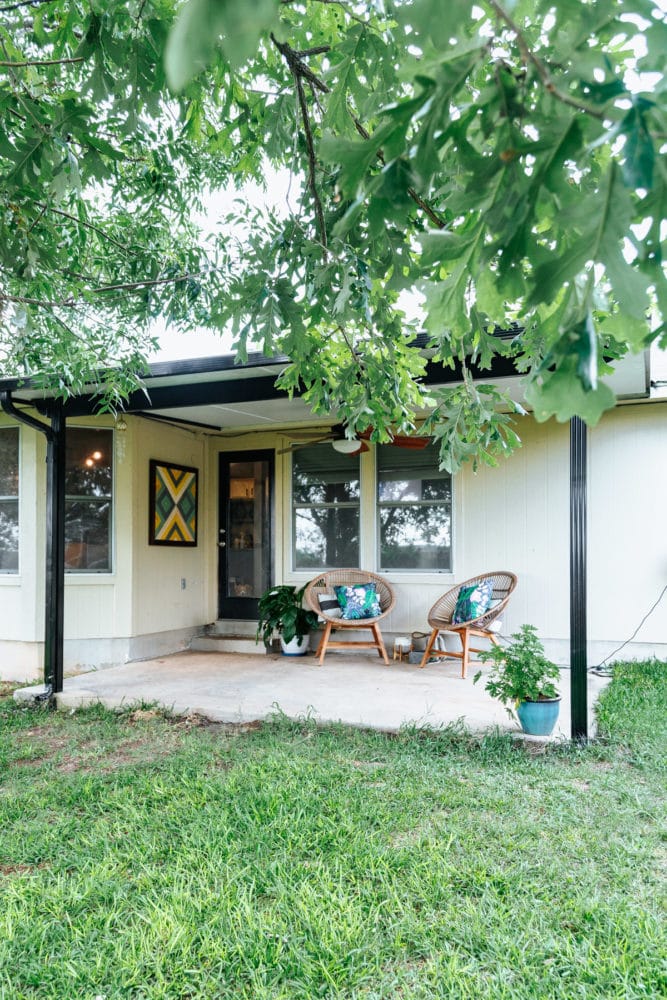
When I started working on our back patio, the first project on my list was to make the back porch cover look a little less hideous. It’s just a plain ol’ metal patio cover and it was looking a little worse for the wear after 20+ years of being attached to our house. Today, I’m sharing how I totally transformed the metal awning over our back patio with nothing but a few cans of spray paint!
That’s right. Just some spray paint and elbow grease got me here.
Can you believe it?! This is a project that has been percolating in my mind for a really long time now, and I wasn’t really sure if I could ever actually pull it off. I was very nervous to try it because despite tons of research, I couldn’t find a single other person on the internet who has done this and talked about it.
You know I love a good challenge, though, so I guess I’ll be the guinea pig!
Our Backyard Makeover
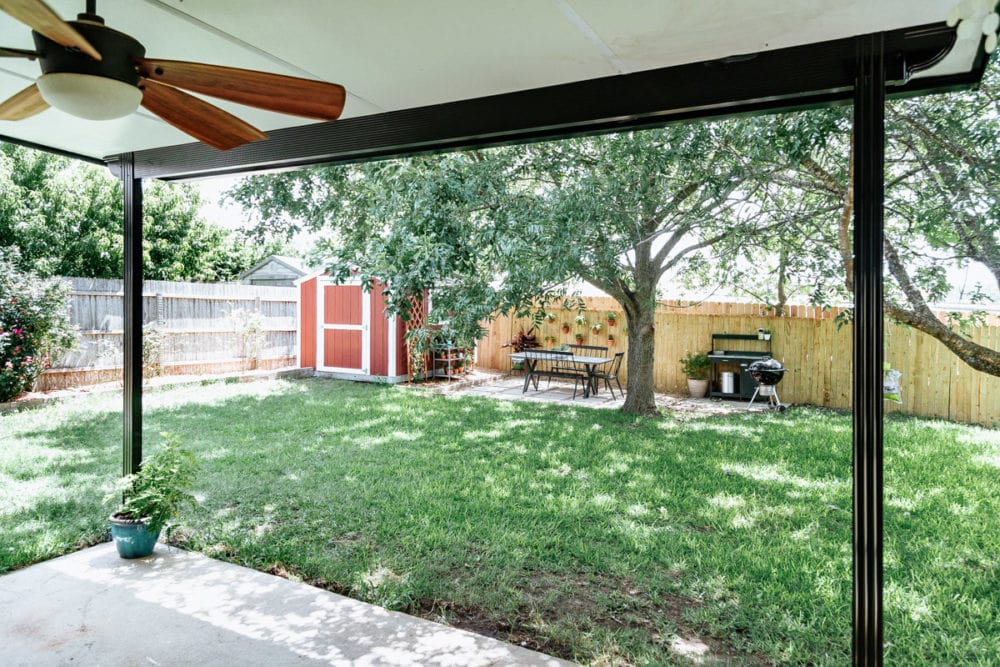
First of all, let me catch you up. This summer, we’re tackling our backyard (after you voted for it to be the space we worked on), and while the main focus of the makeover was always supposed to be our back porch, we had to build a DIY patio in the yard before that could happen. It’s finished and styled – including a cute little grilling area – and now we’re finally (FINALLY!) ready to start creating a cozy, welcoming lounge space off of our house and I am so excited to jump in.
One of the most-suggested projects for this area was to do something about the wimpy little posts that hold up the metal roof on our porch. It’s really a pretty ugly covering, and if I had limitless money and time we’d certainly be ripping it out and doing something that feels a little more like part of the house. But, of course, that’s not in the budget so we’ve got to make do with what we have.
Choosing a Solution For the Patio Cover
We debated wrapping the posts in wood. The problem was that the rest of the awning would still be this cheap, ugly metal. We felt like it would just look like we were trying (and failing) to disguise the metal awning.
Which is exactly what we would be doing. But, I don’t want to be obvious about it, you know?
Here’s a reminder of what it looked like before:
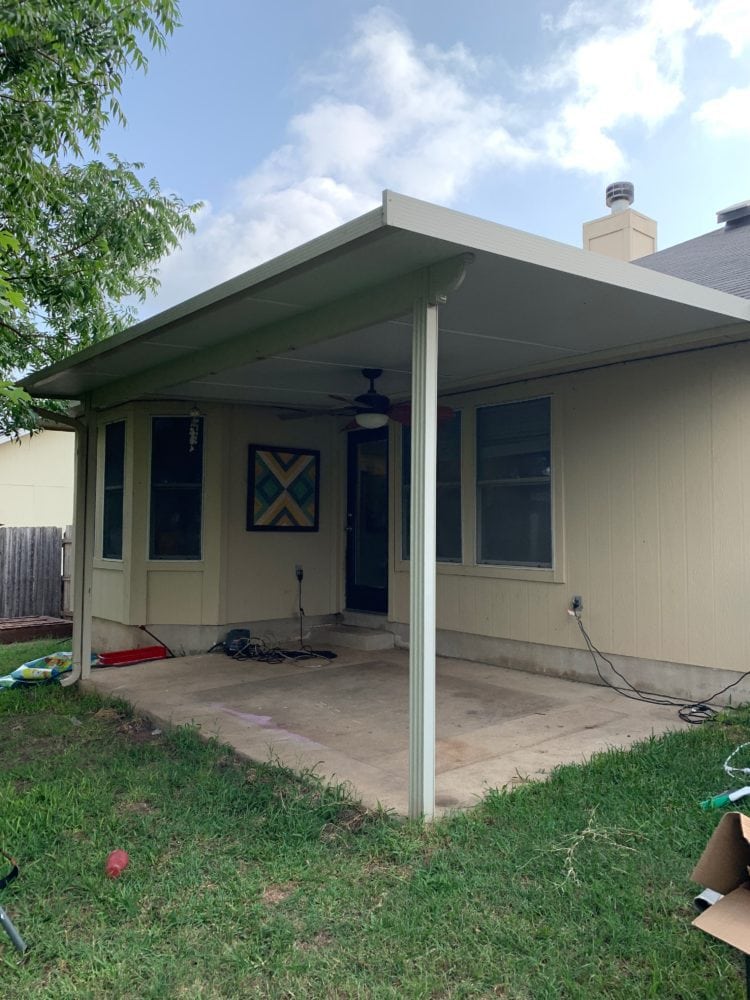
I really felt like covering it wasn’t going to work. So instead, I asked what y’all thought about painting it black. The overwhelming answer was a resounding “DO IT!” So, I dove in.
Today, I’m going to be possibly the first person on the internet to talk about how to transform an ugly metal porch covering. I don’t take this honor lightly. Hopefully, if some poor soul finds this post some day wondering if they can do the same, I’ll be able to convince them that they can and they should!
Do you hear me? I’m talking to you! You can do this!
How to Paint a Metal Patio Cover
Materials Needed
Step One: Clean Everything
I started off by giving the entire patio a super thorough cleaning with my pressure washer. Be sure to do this at least a few hours before you plan to actually paint, so you have time for it to dry. I did it in the morning, then tackled the painting later that afternoon.
If you don’t have a pressure washer, you can use your regular hose to clean it off, you may just need to do some scrubbing. You just want the patio to be clear of dirt, spiderwebs, and anything else that may be stuck to it.
Step Two: Prep Your Space
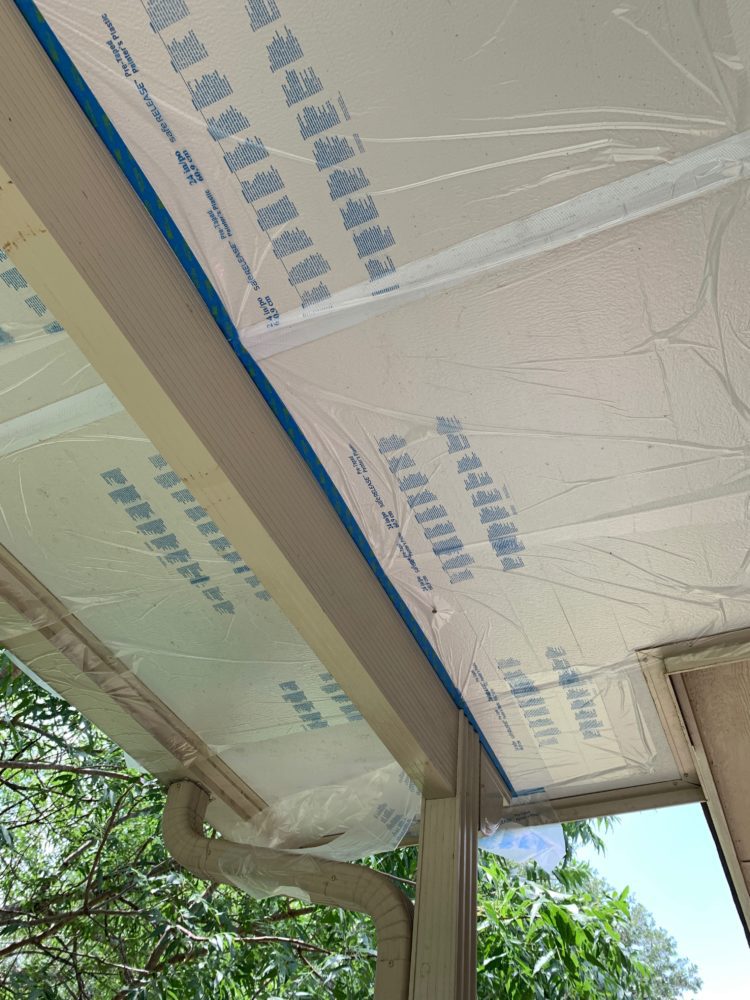
Once everything is clean and dry, you can tape off the areas that you want to protect. Be sure to be thorough with this, because spray paint will overspray and leave a mess if you aren’t careful!
I taped off the concrete at the base of the posts, the house, and the ceiling. Obviously you’ll need to move any furniture off your patio. If you have a large tarp or dropcloth to cover the rest of your porch floor, go ahead and use that too. You basically want to make sure everything that you don’t want to paint is out of the way or fully covered!
I’ll also note that when you paint outside, there’s this obnoxious thing called wind that can mess with your drop cloths. Don’t underestimate it like I did! I recommend adding a bit of painter’s tape at the seams between your runs of plastic drop cloth, as well as securing them at the ends. Basically, secure that stuff to the ceiling of your metal awning, or else you may have to clean up some stray spray paint.
Can you tell I’m speaking from experience? More on that later…
Step Three: Paint!
Now comes the (admittedly) scary part. It’s time to paint!
I chose to use spray paint for this project because, generally speaking, I find that it’s the most durable and long-lasting paint to use when you’re painting metal. Especially metal that will live outside!
Of course, it also helps that it’s way faster than using a regular paintbrush!
While this project felt really intimidating to me before I got started, it really was shockingly fast to knock it out. The entire thing (including taping) took me under two hours from start to finish. One of the best parts is that since you’re able to do multiple coats of spray paint within a few minutes of each other, I didn’t have to come back later to re-coat!
Once you’re done painting, be sure to remove all of the tape before the paint dries fully. If you wait, you may end up peeling some of the fresh paint off. So, even though it’s scary to pull it off while it’s still wet, I promise it’s the way to go.
Step Four: Clean up (If Necessary)
Despite how hard I worked at taping off the covering, I still ended up with a few places where paint hit the ceiling of our awning.
Thankfully, with a few tips from y’all over on Instagram and a lot of good ol’ elbow grease, I was able to get it up. I tried approximately 7 billion solutions so you don’t have to, and I can definitively tell you the best method for removing spray paint. It’s acetone. All you need to do is grab some pure acetone, load it up on a sponge (be sure to use gloves!) and scrub. It’ll come right up – just be sure not to let the acetone touch where you want the paint to be!
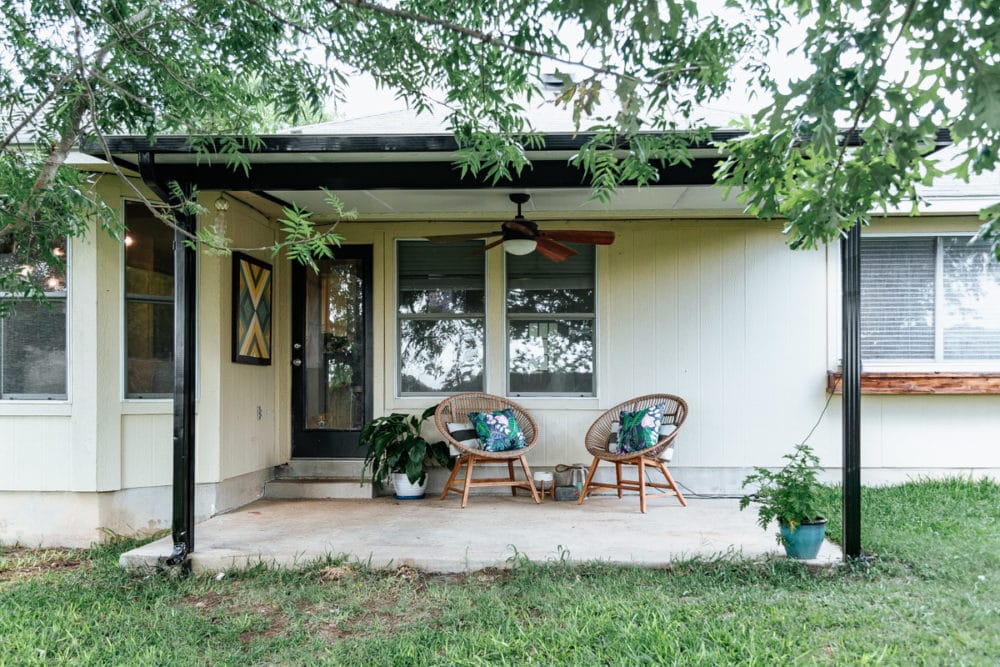
Can you even believe how good it turned out? I’m absolutely in awe of how much of a difference it made on the patio. I genuinely never expected it to be quite this impactful!
Now, the metal awning no longer feels like a cheap and ugly growth off the back of our house. It’s this beautiful, intentional thing that actually makes me smile. The black feels a little dramatic and instantly makes the porch feel cozier.
Thanks for all of your excitement and encouragement about this project. I heard from so many of you who also have one of these ugly metal awnings and hate them. Now we all know that it is fixable! This is such and easy (and incredibly cheap) project, and I would do it again in a heartbeat.
Doesn’t black make it hotter in the summer?
Not really! I’m sure if you’re touching the poles directly it’s more hot than when it was white, but the patio as a whole isn’t any hotter.
YOU WROTE THIS FOR ME!!!!!!
I bought my home a little over a year and a half ago and the back patio is metal and I HATE it and like you, if I had unlimited funds I would rip it out and have something beautiful built but… I am a mom with busy kids that are into everything and one graduating this year and I literally sat on my back patio over the weekend after pressure washing and contemplated painting it black (since I’m painting the house a creamy white) and so to pinterest I came and it brought me directly to your post and it’s given me so much confidence to transform this mess of a patio! THANKS!!!
To quote Cher from Clueless in my most excited voice “PROJECT!”
I’m SO GLAD! 🙂
Love! Did you tape off the roof too? I’m just curious how you painted the frame and avoided over spraying the roof? I might be overthinking it 🤔
Nope, I didn’t! If there was any overspray it was minimal, and we never saw it, haha.
I just found this, thank you SO much. I have almost exactly the same overhang roof and posts (but much uglier) over a basement door well entrance and steps stuck onto our 1956 brick ranch house. . I HATE it and wanted to rip off and redo, but too many other things come first. I thought of cladding, but like you, worried about that too. Just the other day I thought, out of the blue, paint it all black! And today found your post just from googling”how to disguise ugly metal porch roof and posts”. This is perfect for giving me an idea of how it will look!
Yay! I’m glad you found it! It made the BIGGEST difference for us, so glad I did it!
Thank you so much for this article! We have a house built in the 1960s, in Southern California. Although I would love to have a new patio cover built, I can’t see tearing down something that has worked perfectly good for 60 years! It’s ugly yes! That works so well! My daughter and I are going to tackle painting the trim and post black this weekend! So excited!
Love how this turned out! Our front porch is a concrete slab from the 60s. It’s weather worn and I’m not a fan. I’m wondering if you’ve considered painting concrete before? I see you have a similar concrete slab on your porch. Pinterest makes me think I can do it, lol. Just wondering about your plans for the concrete and if this is something you’ve considered.